
Data Recognition Corporation (DRC)
13490 Bass Lake Road
Maple Grove, MN 55311
LAS Links Help Desk, toll-free: 1.800.538.9547 (9:00 a.m. – 7:00 p.m. CST)
Email: [email protected]
Revision Date: August 1, 2023
Technology User Guide
LAS Links
COPYRIGHT
Copyright © 2023 Data Recognition Corporation
The following items in DRC INSIGHT are protected by copyright law:
• The User Guide.
• All text and titles on the software’s entry and display, including the look and feel of the interaction of the windows, supporting menus,
pop-up windows, and layout.
DRC INSIGHT Online Learning System and DRC INSIGHT Portal are trademarked by Data Recognition Corporation.
Any individuals or corporations who violate these copyrights and trademarks will be prosecuted under both criminal and civil laws, and any
resulting products will be required to be withdrawn from the marketplace.
The following are trademarks or registered trademarks of Microsoft Corporation in the United States and/or other countries:
• Internet Explorer
• Microsoft
• Windows
• Windows 8
• Windows 10
• Windows 10 in S mode
• Windows 11
The following are trademarks or registered trademarks of Apple Corporation in the United States and/or other countries:
• Apple
• iPad
• iPadOS
• macOS
• Safari
The following are trademarks or registered trademarks of Google Corporation in the United States and/or other countries.
• Chrome
• Chrome OS
• Google Play
The following is a trademark or registered trademark of Mozilla Corporation in the United States and/or other countries.
• Firefox
Linux is a registered trademark of Linus Torvalds.
Ubuntu and Canonical are registered trademarks of Canonical Ltd.
Gnome is a trademark of the Gnome Foundation.

Page 3
Volume I: Introduction Volume I: Introduction
to Online Testingto Online Testing
Introduction
About This Guide 12
DRC INSIGHT Online Testing 12
DRC INSIGHT Secure Application 12
System Readiness Check 12
Online Tools Training (OTT) 12
Testing Accommodations 13
Central Oce Services (COS) 15
COS Dashboard 15
COS Terminology 15
Visual Overview of COS 16
Why Use a COS Service Device? 17
COS Testing with or without a COS Service Device 17
DRC INSIGHT, COS - SDs, Devices, Testing and Testing Programs 18
Software Installation and Update Rights for DRC INSIGHT Testing Devices and
COS Service Devices 18
Online Testing Setup Options 19
Setup Options for a COS Conguration 21

Page 4
Volume I: Introduction Volume I: Introduction
to Online Testingto Online Testing
System Requirements and Testing Information
What’s Covered in This Section 23
LAS Links Conguration Information 23
Software Updates 24
Operating System Updates 24
COS - SD Software Updates 24
DRC INSIGHT Software Updates 24
Network Requirements for Testing Computers 25
Network Connectivity 25
Wireless Networking 27
Desktop Monitoring 27
DRC INSIGHT Bandwidth and Connectivity Requirements 28
Bandwidth Required with a Content Hosting COS - SD 28
Background Applications and Online Testing 29
Video Sign Language (VSL) Conguration 30
Changing the Monitor Display for VSL 30
Text-To-Speech (TTS) Conguration (Audio) 31
Human Voice Audio (HVA) Conguration 32
HVA Testing Considerations 32
DRC INSIGHT and Virtual or Remote Desktops 33
Kiosk Mode and Security 33
Native Operating Systems and Devices 33
Virtual Desktop Operating Systems 34
Virtual Desktop Devices 34
Windows 10 and 11 Desktop Font Size Requirements 35
Windows 10 and 11 Taskbar Security Requirement 35
Online Testing, Testing Devices, Peripheral Devices, and Software Features 36
Disabling Cortana in Windows 10 and 11 Devices 37
Enabling the Microphone on an iPad 38
Enabling the Microphone on a macOS Device 39
Keyboard Settings for Chrome OS Devices 40
Changing Chrome OS Keyboard Settings 41
Changing Chrome OS Keyboard Setting by Using Shortcuts 41
Changing Chrome OS Keyboard Setting by Using the Google Admin Console 41
Changing the Chrome OS Keyboard Language Setting 41
Disabling On-Screen Keyboards 41
macOS Device Trackpad/Mousepad Settings 42
Enable Dragging with Lock Feature 42
Disable Look Up & Data Detectors (Force Click) 42
Manually Adjusting the Timeout Settings on a macOS Device 43
Example of Combining Timeout Settings 44

Page 5
Volume II: Central Oce Volume II: Central Oce
Services (COS)Services (COS)
Introduction
About This Guide 47
Central Oce Services (COS) 47
COS - SDs and the Number of Students Testing 47
COS - SD System Requirements 48
Tablet Devices and COS - SDs 48
Software Installation and Update Rights 48
Overview of Working with COS 49
COS - SD Windows Installation
Quick Tour: Installing COS - SD Software on Windows Devices 51
Manually Updating COS - SD Software on Windows Devices 53
Uninstalling the COS - SD Software on Windows Devices 53
Removing Outdated Test Administration Content from the COS - SD 53
COS - SD macOS Installation
Quick Tour: Installing COS - SD Software on macOS Devices 55
Rosetta Software and COS - SD Software for macOS Devices 55
Manually Updating COS - SD Software on macOS Devices 58
Uninstalling the COS - SD Software for macOS Devices 58
COS - SD Linux Installation
Quick Tour: Installing COS - SD Software on Linux Devices 60
Manually Updating COS - SD Software on Linux Devices 62
Uninstalling Central Oce Services for Linux 62
Creating a COS Conguration
Quick Tour: Creating a Central Oce Services Conguration 64

Page 6
Volume III: DRC INSIGHTVolume III: DRC INSIGHT
Introduction
About This Guide 69
DRC INSIGHT Windows Installation
What’s Covered in This Section 71
Multiple Testing Programs 71
Quick Tour: Installing the DRC INSIGHT Online Assessments App for Windows 72
Quick Tour: Installing DRC INSIGHT for Windows OS Interactively 74
Installing DRC INSIGHT from a Command Line or Silently 76
Installing DRC INSIGHT from a Command Line 76
Installation Command Syntax and Example 77
Installing DRC INSIGHT Silently Using Orca 78
Starting, Stopping, and Uninstalling DRC INSIGHT 79
Starting DRC INSIGHT 79
Stopping DRC INSIGHT 79
Uninstalling DRC INSIGHT 79
Control Panel 79
Start Menu 79
Command 79
DRC INSIGHT macOS Installation
What’s Covered in This Section 81
Multiple Testing Programs 81
Rosetta Software and DRC INSIGHT Software for macOS Devices 82
Quick Tour: Installing DRC INSIGHT for macOS 83
Managing DRC INSIGHT 85
Installing DRC INSIGHT Using a Software Deployment Tool 85
Starting DRC INSIGHT 86
Stopping DRC INSIGHT 86
Uninstalling DRC INSIGHT 86
DRC INSIGHT Linux Installation
What’s Covered in This Section 88
Installation Prerequisite 88
Multiple Testing Programs 88
Installing 32-bit Java Libraries 89
Installing the GNOME Desktop Environment 90
Quick Tour: Installing DRC INSIGHT for Linux 91
Managing DRC INSIGHT 93
Installing DRC INSIGHT Using Terminal Mode 93
Installing DRC INSIGHT from a Command Line 93
Installation Command Syntax and Example 93
Uninstalling DRC INSIGHT Using the Synaptic Package Manager 94
Uninstalling DRC INSIGHT Manually 94
Cleanup 94

Page 7
Volume III: DRC INSIGHTVolume III: DRC INSIGHT
Installing DRC INSIGHT on iPad Devices
What’s Covered in This Section 96
DRC INSIGHT and the Apple App Store 96
Distributing and Registering DRC INSIGHT 96
Cross-Website Tracking 97
Preparing iPads for Testing 97
Viewing the DRC INSIGHT Conguration on an iPad 99
iPad Timeout Issue Due to Content & Privacy Restrictions 99
Installing DRC INSIGHT on Chrome OS Devices
What’s Covered in This Section 101
Setting Up DRC INSIGHT on Chrome OS Devices 101
DRC INSIGHT Installation Overview 102
Chrome OS Devices and COS - SD Software 102
Multiple Testing Programs 102
Example of Chrome OS Device Setup and Conguration for DRC INSIGHT 103
Quick Tour: Installing and Deploying the DRC INSIGHT Secure App to
Chrome Devices 104
Using the System Readiness Check on a Chrome OS Device 106
The System Readiness Check
What’s Covered in This Section 108
Starting the System Readiness Check 108
What the System Readiness Check Displays 109
The System Readiness Check Fields 110
The System Readiness Check Buttons and Icons 111
The System Readiness Check Required Tests 112
Resolving System Readiness Check Required Tests 113
Issue 1. Audio Capability Error 113
Issue 2. Client Version Error 113
Issue 3. Internet Connection Error 113
Issue 4. Operating System Level Error 113
Issue 5. RAM Error 114
Issue 6. Screen Resolution Error 114
Issue 8. User Agent Error 114

Page 8
Volume IV: Volume IV:
TroubleshootingTroubleshooting
Introduction
About This Guide 117
Working with DRC INSIGHT
What’s Covered in This Section 119
Online Tools Training (OTT) 119
The Monitor Setting Verication Test 119
The Testing Site Capacity Estimator 119
Online Tools Training (OTT) 120
The Monitor Setting Verication Test 121
Changing the Monitor’s Contrast or Brightness 122
Windows Operating System 122
macOS 122
Linux 123
iPad Devices 123
Chrome OS Devices 123
The Testing Site Capacity Estimator 124
FAQs, Hints, and Tips
What’s Covered in This Section 126
General Questions 127
Common Technical Questions and Answers 129
Question: How do I update test forms on a COS - SD? 129
Question: Can I mass deploy test software to all student computers? 130
Modifying the Setup File 130
Silent Install Example 131
Silent Uninstall Example 131
The Testing Site Capacity Estimator 132
iPad Questions 133
Chrome OS Device Questions 134
General Hints and Tips 137
iPad Hints and Tips 137
Chrome OS Device Hints and Tips 138
Google/Chrome OS Device Plug-In Error 139

Page 9
Volume IV: Volume IV:
TroubleshootingTroubleshooting
Error Messages
What’s Covered in This Section 141
Message: Chromium OS version xxxx.xx.x is not supported by DRC INSIGHT 142
Message: Conguration Error 142
Message: Conguration Not Found 142
Message: Connection Error 143
Message: Connection Error 143
Message: Connection Error Retrieving Content 143
Message: Connection Error Retrieving Content 144
Message: Connection Retry is in Progress 144
Message: Could Not Retrieve Testing Information 145
Message: Device Registration 145
Message: Download Of Upgrade Failed 145
Message: Error Retrieving Content 146
Message: Failed to Load Device Information 146
Message: Guided Access Is Not Enabled 146
Message: Internet Connection Error 147
Message: Operating System version is not supported by DRC INSIGHT 147
Message: Registration Failed 147
Message: Session Ended 148
Message: Session Inactive. Please raise your hand and wait for help. 148
Message: Session Status Outside Window 148
Message: The device’s operating system has been updated and is in the process of
being certied by DRC. 148
Message: Your Client Attempted To Access An Invalid URL 149
Message: Your Client Failed The Readiness Check 149
Message: Your Client Is Out Of Date 149
Message: Your Client Is Out Of Date 149
Message: Your Device Has Not Been Registered 150
Message: Your Testing Session Has Been Stopped 150

Page 10
Volume I: Introduction to
Online Testing

Page 11
Introduction
Getting AroundGetting Around
About This Guide
This user guide is part of a multivolume set that describes how to congure, install, manage, and
troubleshoot the DRC INSIGHT online testing. This volume, Volume I: Introduction to Online Testing,
introduces the DRC INSIGHT Secure Application (DRC INSIGHT), a major component of the DRC
INSIGHT online testing. The guide also references conguration, installation, network, and system
requirement information and provides state-specic testing information and a glossary of common online
testing terms.
All the volumes in this guide are designed primarily for Technology Coordinators (TCs) and IT personnel
who are responsible for setting up and managing online testing and ensuring their systems work eectively
and securely. TCs should be knowledgeable about the technical details of the various operating systems and
have the necessary security privileges to perform the tasks discussed in this guide.
Important: Throughout this user guide, the Information icon ( ) indicates important information
or crucial tips.
DRC INSIGHT Online Testing
DRC INSIGHT is a secure web-browser testing interface that is installed on each Testing Device to provide
a secure testing experience. DRC INSIGHT works with various software and hardware components
to provide a secure, online testing system that successfully delivers assessments. DRC INSIGHT
delivers assessments and related resources online for all content areas and grade levels by incorporating
computerized testing, related resources, dynamic reporting, and a suite of tools. It works with the Central
Oce Services (COS) application to help manage network trac, maintain connectivity, and handle
bandwidth issues.
DRC INSIGHT Secure Application
The main component of DRC INSIGHT is the secure web-browser testing interface installed on each
Testing Device.
System Readiness Check
The System Readiness Check runs when the DRC INSIGHT Secure Application is installed or starts. It
helps you verify that the Testing Device is congured correctly and ready for testing.
Tutorials
DRC oers online tutorials to help students become familiar with all aspects of online testing. Students
can access the tutorials from the DRC INSIGHT Online Assessments Tutorials link from the main DRC
INSIGHT testing page.
Page 12
IntroductionIntroduction

Page 13
Getting AroundGetting Around
DRC INSIGHT’s OTT simulates online testing and allows students to practice using the testing interface’s
online tools.
• The OTT allows students to become familiar with the online test environment and the suite of online
testing tools, such as the Line Guide tool and the Highlighting tool.
• The OTT contains sample test questions to help students become familiar with the tools and features
available during online testing.
Note: Install DRC INSIGHT on the testing computers as early as possible to give students time to
familiarize themselves with the DRC INSIGHT test environment and the testing tools.
Testing Accommodations
DRC INSIGHT also supports many accommodations, including optional testing accommodations, to help
students test successfully.
Text‑To‑Speech
Text-To-Speech (TTS) is an audio accommodation that allows a student to hear the test recorded by a
computer-simulated voice.
IntroductionIntroduction
Online Tools Training (OTT)
Page 14
Getting AroundGetting Around
DRC INSIGHT Online Learning System. Technical users download the COS - SD software, the DRC
INSIGHT Secure Application, and other software and links from the DRC INSIGHT Portal to set up their
testing environment. Administrative users use the DRC INSIGHT Portal to create student records and test
sessions to help manage or monitor their testing environment and report the results.
DRC INSIGHT Landing Page
When a Testing Device is successfully registered with DRC INSIGHT, the landing page displays after the
application is launched. This page displays when you start DRC INSIGHT and contains links to online tests,
tutorials, and OTT.
IntroductionIntroduction
The DRC INSIGHT Portal
The DRC INSIGHT Portal is a secure gateway to the various testing programs and tools that you have
permission to use. The DRC INSIGHT Portal provides distribution and administrative functions for the
Page 15
IntroductionIntroduction
Central Oce Services (COS)
COS is an application that allows you to install, congure, and manage your online testing environment
from a central location. The complete COS application includes a number of functional components, such as
the COS - SD software, which oers local Content Management and Content Hosting.
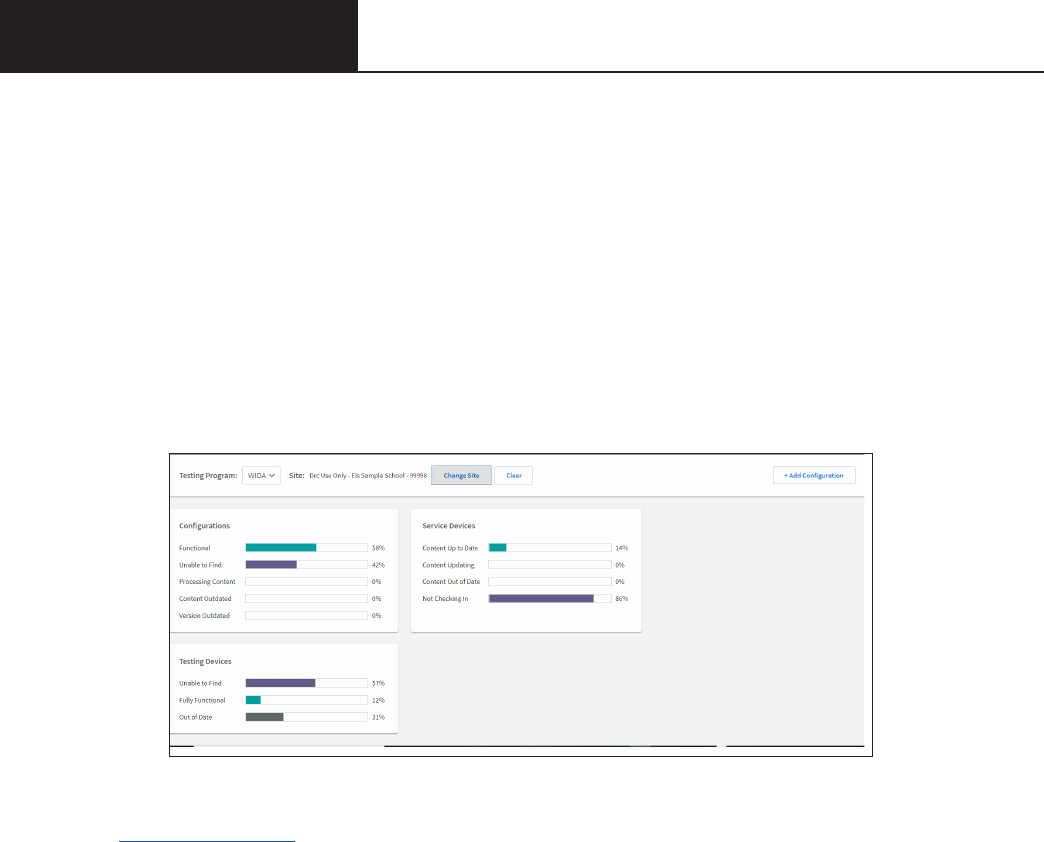
COS Dashboard
COS allows you to seamlessly congure and organize your devices using the COS Dashboard. The
COS Dashboard is a visual dashboard of the various COS Congurations that currently exist. The
COS Dashboard displays status information about all the COS Congurations. It also provides links to
information about specic COS Congurations and the Testing Devices and COS - SDs associated with
each COS Conguration.
COS Terminology
Refer to the COS Online Help Glossary for descriptions of various COS terms.
Page 16
IntroductionIntroduction
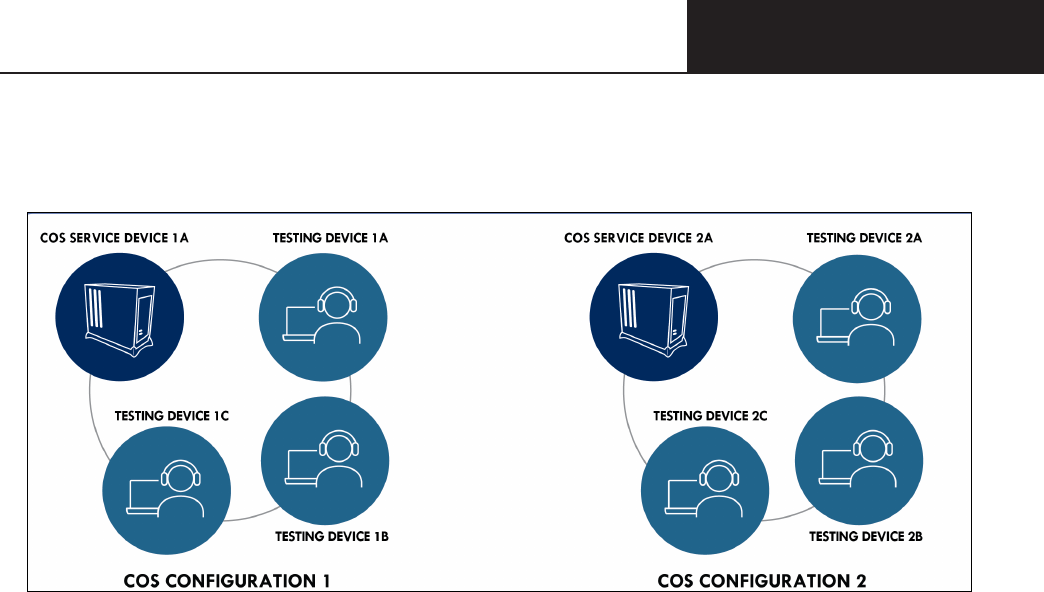
Visual Overview of COS
The COS application consists of COS Congurations, COS - SDs, Testing Devices, and related options. The
diagram below provides a visual overview of a sample relationship between these COS components.
COS Congurations
A COS Conguration has two primary functions:
• It allows you to logically group Testing Devices and COS - SDs.
• It allows you to easily specify the settings for all the devices in the COS Conguration.
In the diagram above, when a student logs into DRC INSIGHT on any Testing Device in COS
CONFIGURATION 1, the student’s test content comes from COS SERVICE DEVICE 1A. When a
student logs into DRC INSIGHT on any Testing Device in COS CONFIGURATION 2, the student’s test
content comes from COS SERVICE DEVICE 2A.
COS Service Devices
The COS - SDs provide the test content and test hosting services for the COS Conguration if those services
are enabled by the COS Conguration. Once a COS - SD is registered with a COS Conguration, it cannot
be used in another COS Conguration, although you can remove the COS - SD from a COS Conguration
and add it to another COS Conguration. If there are multiple COS - SDs in the COS Conguration, the
devices become part of the pool of COS - SDs associated with the COS Conguration.
Testing Devices
For a student to test using DRC INSIGHT on a Testing Device, the Testing Device must be registered to a
COS Conguration, and it cannot be used in another COS Conguration without moving the device. After
a Testing Device is registered with a COS Conguration, the device becomes part of the pool of Testing
Devices associated with that COS Conguration. Registering a Testing Device to a COS Conguration
denes where the Testing Device’s test content will come from during testing.
In the diagram above, moving a Testing Device from COS CONFIGURATION 1 to COS
CONFIGURATION 2 causes the device to receive test content from COS SERVICE DEVICE 2A. Moving a
Testing Device from COS CONFIGURATION 2 to COS CONFIGURATION 1 causes the device to receive
test content from COS SERVICE DEVICE 1A.
COS Conguration Options
Within a COS Conguration, you can manage Testing Devices, determine which DRC test programs will be
available to the COS Conguration, add an optional proxy host for testing, and establish other settings.
Page 17
IntroductionIntroduction
Why Use a COS Service Device?
Using a COS - SD allows for additional test security as it requires testing devices and the COS - SD to be
on the same network, thus preventing testing from occurring o-network.
Hosting testing content closer to the student also reduces network bandwidth and provides a more
consistent and equitable testing experience for all students across testing sites. It is especially benecial for
test sessions with audio, images and/or video content.
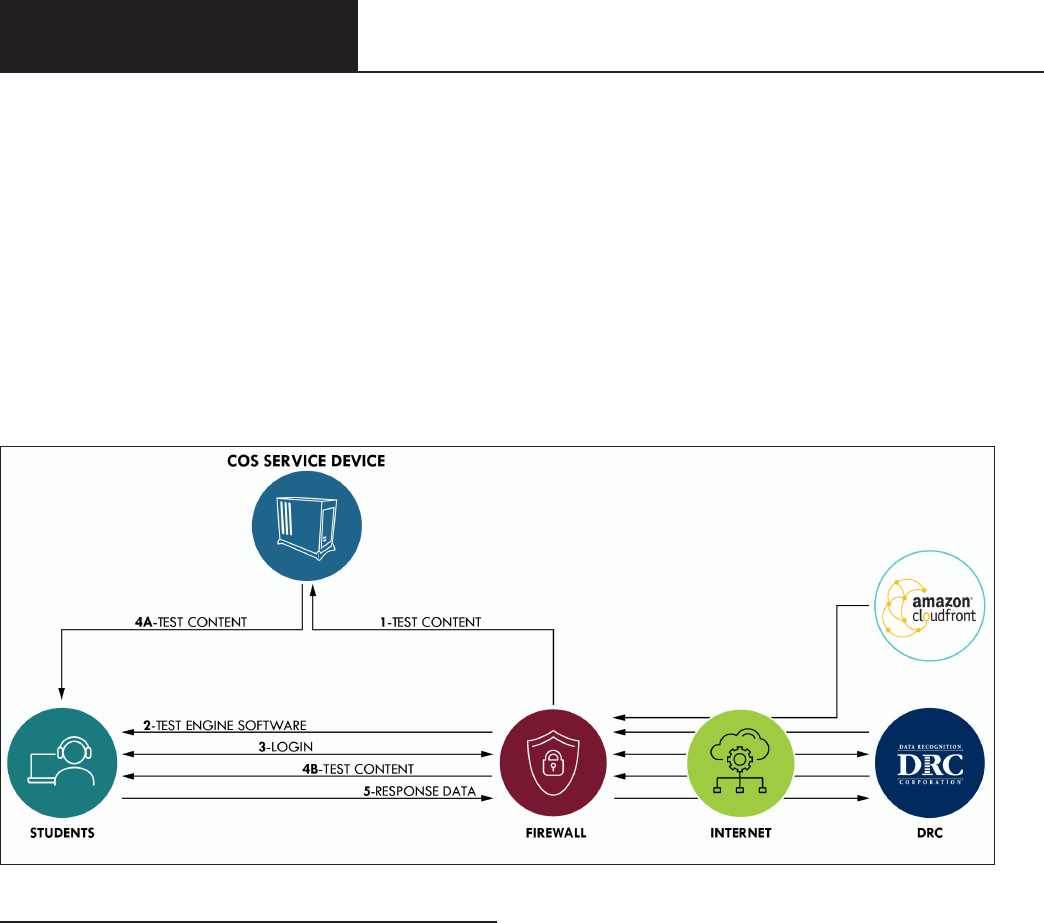
COS Testing with or without a COS Service Device
The following diagram provides a visual overview of the process of testing with COS, with and without a
COS - SD congured for Content Management and Content Hosting.
TEST CONTENT and TEST ENGINE SOFTWARE
• (1) This path represents the initial path for test content with a COS - SD congured to use Content
Management and Content Hosting. When the COS - SD is installed, test content stored on the Amazon
Web Services (AWS) CloudFront is automatically sent to the COS - SD. The Content Management
service automatically checks for new content several times a day and updates the COS - SD.
• (2) When a student starts DRC INSIGHT (i.e., the DRC INSIGHT Secure Application is launched), the
test engine software is automatically loaded from the DRC servers to the Testing Device.
• (3) When a student logs in to the test, the student’s login is veried by the DRC servers and the student’s
scheduled test sessions are sent to the Testing Device.
• (4A) When a student selects a test and a COS - SD is congured, the COS - SD delivers the test content to
the student’s Testing Device, reducing the start-up time for the student. All the test content is encrypted
for security.
• (4B) When a student selects a test in situations in which no COS - SD is congured (e.g., for tests with
no accommodations), the test content is delivered directly from the DRC servers to the Testing Devices.
Again, all the test content is encrypted for security.

Page 18
IntroductionIntroduction
COS Testing with or without a COS Service Device (Cont.)
TEST RESPONSES
• (5) The Response Data path represents the path for test response data. During testing, if the Testing
Devices can communicate with the DRC server, the test responses go directly to the DRC server. If the
Testing Devices cannot communicate with DRC, testing ends.
DRC INSIGHT, COS - SDs, Devices, Testing and Testing Programs
You can install DRC INSIGHT and a COS - SD on a computer and congure DRC INSIGHT to support one
or more testing programs.
• You can install a COS - SD on a Windows, macOS, or Linux computer.
• You can install only one COS - SD per physical, or virtual computer.
• You can use the same COS - SD for multiple testing programs.
• You specify dierent locations for the COS - SD within the COS Conguration.
• You can install DRC INSIGHT on Windows, macOS, Linux, Chrome OS and iPadOS devices.
• From the testing device, you can use DRC INSIGHT to access multiple testing programs. When you
start DRC INSIGHT, a page displays that lists the dierent testing programs you can select.
• From the testing device, you can congure DRC INSIGHT to work with a COS - SD that is installed
on a dierent Windows, macOS, or Linux computer.
• You can install a COS - SD and DRC INSIGHT on the same Windows or macOS device.
• For details, refer to the Technical Bulletins, Conguring a COS Service Device and DRC INSIGHT on
a Single Windows PC for Online Testing and Conguring a COS Service Device and DRC INSIGHT on
a Single macOS Computer for Online Testing on Portal site by navigating to MY APPLICATIONS–
General Information–Documents.
Software Installation and Update Rights for DRC INSIGHT Testing Devices and COS Service
Devices
Certain software rights are required to install and/or automatically update DRC INSIGHT and the COS - SD
software.
• DRC INSIGHT requires Administrator rights to install it and Write access to perform the software Auto
Update function.
• The COS - SD software requires Administrator rights to install it.
COS - SDs are automatically updated with new software releases without manual intervention, assuming
that the computer is turned on, is active (i.e., not asleep or hibernating), and has Internet access.

Page 19
IntroductionIntroduction
Online Testing Setup Options
You can create a variety of online testing setups using COS Service Devices and DRC INSIGHT.
Documentation explaining how to install, congure, manage, and troubleshoot COS Service Devices and
DRC INSIGHT for these various setup options is available in the following volumes:
Volume I: Introduction to Online Testing
This volume introduces the components that make up DRC INSIGHT and the COS Service Devices;
references conguration, installation, network, and system requirement information; and provides testing
information and a link to the COS Online Help for a glossary of common online testing terms.
Volume II: Central Oce Services (COS)
This volume describes how to use COS to install and set up COS Service Devices for Content Management
and Content Hosting.
COS Online Help
After you have installed COS, use COS Online Help to understand how to use the COS Dashboard to work
with COS - SDs, Testing Devices, and COS Congurations.
Note: Any site that plans to use proxy hosts during testing (i.e., computers that act as an intermediary
between a COS - SD and the Internet to prevent direct Internet access) should reference
COS Online Help.
Volume III: DRC INSIGHT
This volume describes how to install DRC INSIGHT on Testing Devices, register the devices, and use the
System Readiness Check to verify that the devices are ready for online testing.
Volume IV: Troubleshooting
This volume describes how to use various testing resources and tools, contains frequently asked online
testing Q&As, and provides a list of common error messages with corrective actions.
IntroductionIntroduction
Page 20
IntroductionIntroduction
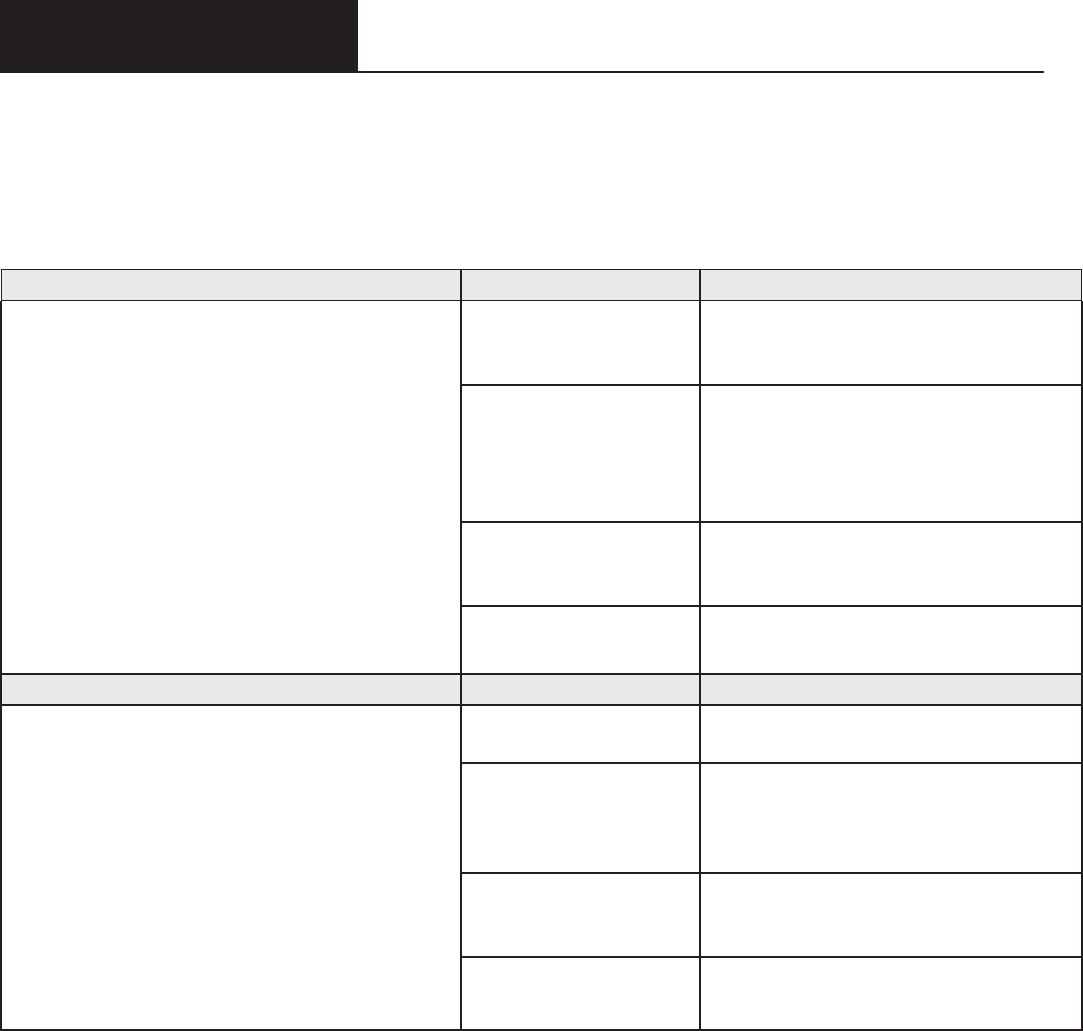
Online Testing Setup Options (cont.)
The particular information you need to know varies based on how you plan to perform online testing. The
COS Conguration Online Testing Setup Options and Tasks table lists the online testing setup options (A and
B) that are available, indicates which volumes to reference, and highlights the tasks required for each option.
COS Conguration Online Testing Setup Options and Tasks
Online Testing Setup A Reference Tasks
Use the COS interface to manage COS - SDs and
Testing Devices.
One or more COS - SDs are congured for
Content Management and Content Hosting.
Volume I: Introduction to
Online Testing
Review allowlisting information
(previously referred to as whitelisting)
and other network considerations.
Volume II: Central
Oce Services (COS)
and the COS Online
Help
Install COS - SDs and use the COS
interface to create, congure, monitor,
and manage COS Congurations/
locations containing COS - SDs and
Testing Devices.
Volume III: DRC
INSIGHT
Install, congure, and manage DRC
INSIGHT, including registering Testing
Devices with COS Congurations.
Volume IV:
Troubleshooting
Use testing tools and troubleshoot issues.
Online Testing Setup B Reference Tasks
Use
the COS interface to manage one or
more COS Congurations containing Testing
Devices only. Test content is received directly
from DRC without hosting of any type.
• No COS - SD software needs to be
installed.
• No COS - SDs are congured for Content
Management or Content Hosting.
Volume I: Introduction to
Online Testing
Review allowlisting information and
other network considerations.
Volume II: Central
Oce Services (COS)
and the COS Online
Help
Use the COS interface to create, monitor,
and manage COS Congurations/
locations containing Testing Devices
only—no content hosting is performed.
Volume III: DRC
INSIGHT
Install, congure, and manage DRC
INSIGHT, including registering Testing
Devices with COS Congurations.
Volume IV:
Troubleshooting
Use testing tools and troubleshoot issues.
Page 20
IntroductionIntroduction
Page 21
IntroductionIntroduction
Setup Options for a COS Conguration
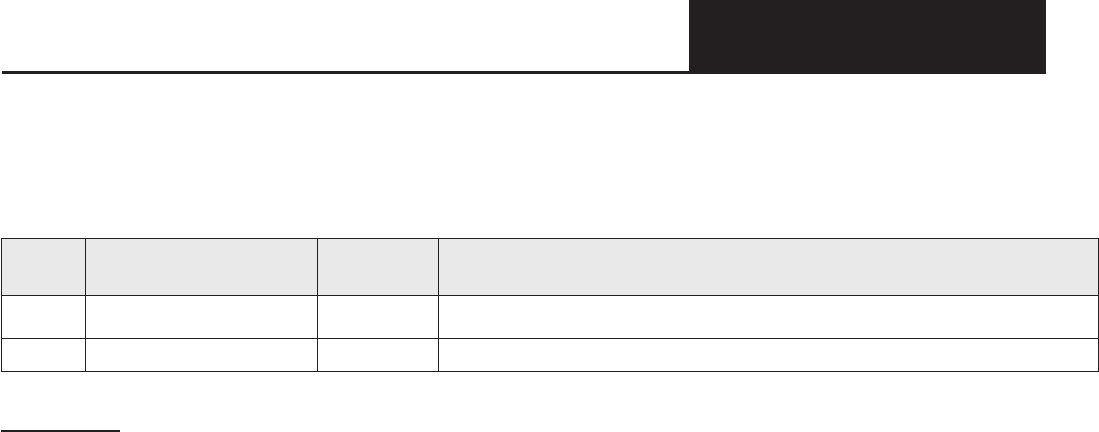
The following table provides an overview of COS Conguration online testing setup options for online testing
setups A and B. These testing setups include COS - SDs with or without Content Management (CM)/Content
Hosting (CH) turned on and locations within the COS Conguration.
Setup COS ‑ SD Installed*
CM/CH**
Setup Description/Notes
A Yes Yes or No COS interface with one or more COS - SDs; CM/CH on or o
B No NA COS interface only—no COS - SDs
Table Notes
* “COS - SD Installed” indicates one or more COS - SDs. COS manages COS - SDs and Testing Devices.
** After the COS - SD software is installed, CM/CH can be turned on (set to Yes) for a COS Conguration. If a COS - SD is
installed and you turn CM/CH to No (off) the COS - SD will be bypassed. Bypassing a COS - SD is not recommended.
IntroductionIntroduction

Page 22
System Requirements and
Testing Information

Page 23
System Requirements System Requirements
and Testing Informationand Testing Information
What’s Covered in This Section
This section points to the document describing the specic hardware, software, network, and desktop
requirements to congure COS Service Devices, DRC INSIGHT testing devices, and automatic software
updates. This section also discusses the tasks necessary to congure the DRC INSIGHT software
environment, including the tasks to congure DRC INSIGHT to connect directly to DRC servers and
databases through the Internet.
LAS Links Conguration Information
This guide includes information about the operating systems, software, devices, and accommodations that
work with DRC INSIGHT testing devices and COS Service Devices. The specic technical information
covered in this user guide (and related Technical Bulletins) that pertains to is shown below. Use this
information as reference when reading the volumes in this user guide.
Operating Systems
• Windows
• macOS
• Linux
• Apple iPadOS
• Chrome OS
Central Oce Services (COS) Hosting and Other Options*
• Content Management
• Content Hosting
• Proxy Host and Restricted Proxy Host
Accommodation(s)
• Text-To-Speech (TTS)
Testing and Capacity Tools
• Testing Site Capacity Estimator
• Load Balancing
*A COS Service Device is required.
System Requirements Information
The DRC system requirements information describes the specic hardware, software, network, and desktop
requirements to congure DRC INSIGHT and COS Service Devices to work with various Testing Devices in
dierent testing scenarios. This information is updated regularly based on various factors, including changes
in vendor support of various operating systems and hardware devices.
To review current information, refer to DRC INSIGHT System Requirements, which is available at Portal site,
by navigating to General Information–Downloads and clicking View System Requirements at the left side
of the bottom of the Test Setup General Information page.
Page 24
System Requirements System Requirements
and Testing Informationand Testing Information
Software Updates
For online testing, the COS Service Device and DRC INSIGHT software must be up to date. You can use
the System Readiness Check to conrm that you have the latest version of the COS Service Device and
DRC INSIGHT software (see Volume III: DRC INSIGHT).
Operating System Updates
COS Service Device and DRC INSIGHT software updates are dierent from operating system updates. On
testing days, Testing Devices should not be set to automatically update the operating system. If a Testing
Device is set to accept operating system updates automatically, verify that it has the most current supported
version of the operating system before the test session starts.
Important: Operating system vendors such as Google, Microsoft, and Apple are using a model in
which operating system updates occur automatically in the background. Update processes running in the
background on Testing Devices consume CPU and memory and can aect the testing experience. To avoid
this situation, verify that no background processes are running on Testing Devices during testing.
COS - SD Software Updates
The COS - SD software is designed to automatically receive updates. To ensure that software updates are
installed automatically, COS - SDs should be kept up and running.
DRC INSIGHT Software Updates
Important: The Secure Browser now must be updated by a user with Admin rights on Windows and Mac
testing devices. This change only aects sites that update the Secure Browser on each device manually after
launching the DRC INSIGHT Secure Browser.
If your site uses deployment software to update testing devices, you are not impacted since the deployments
are performed by an Admin user.
Sites should update their software before testing begins to avoid delays.
See “Software Installation and Update Rights” on page 48.

Page 25
System Requirements System Requirements
and Testing Informationand Testing Information
Network Requirements for Testing Computers
This section describes various network considerations for online testing.
Network Connectivity
To ensure proper network connectivity for testing, keep the following information in mind.
• All testing computers should have access to the Internet and be able to access the DRC servers using
HTTPS protocols on port 443.
• All rewalls at the testing computer and network level should allow connectivity on ports 55222, 55223,
55224, and 55225. Ports need to be listed in order.
• Ensure that the following le types are allowlisted, both internally and externally:
• css
• exe (for updates)
• msi (for updates)
• gif
• html
• jpeg
• js
• json
• png
• ttf
• wo
• svg
• xml
• zip
• Prioritize and allowlist DRC INSIGHT trac on rewalls, Internet packet shapers, routers, switches,
proxies, and other network devices that you use.

Page 26
System Requirements System Requirements
and Testing Informationand Testing Information
Network Connectivity (cont.)
Each testing program uses its own URLs to communicate from the DRC INSIGHT software to the DRC
servers. Ensure that the URLs shown in the table below are allowlisted on the content ltering systems or
other proxy/rewall software that you use locally.
Program URLs Ports
LAS Links https://drc-centraloce.com
https://drc-wbte-prod.s3.amazonaws.com
https://eca-test-engine-service-ll.te.drcedirect.com
https://eca-test-init-ll.te.drcedirect.com
https://eca-test-engine-auth-service-ll.te.drcedirect.com
https://insight-services-ll.drcedirect.com
https://ll-te.drcedirect.com
https://ll-insight-client.drcedirect.com
https://ll-insight.drcedirect.com
https://ll.drcedirect.com
https://www.drcedirect.com
https://wbte.drcedirect.com
https://dtk.drcedirect.com
https://api-gateway-cloud.drcedirect.com
https://api-gateway.drcedirect.com
https://cdn-content-prod.drcedirect.com
https://cdn-download-prod.drcedirect.com
https://east-1-drc-wbte-prod-ll.s3.amazonaws.com
https://east-2-drc-wbte-prod-ll.s3.amazonaws.com
https://us-east-1-content-hosting-form-locker-prod.s3.us-east-1.amazonaws.com
https://us-east-2-content-hosting-form-locker-prod.s3.us-east-2.amazonaws.com
80/http
443/https
(applies
to all the
URLs)
Notes:
• Any URLs bolded in the table above were recently added. Make sure they are added to your allowlisted
URLs.
• You can allowlist *.drcedirect.com if your lter allows wildcard addresses. DRC recommends that you
allow *.drcedirect.com if possible. Some locations may have to allowlist both the individual address and
the wildcard address.
• If your location uses an Internet connection idle timeout, verify that the timeout limit is set to meet or
exceed the DRC INSIGHT testing session timeout limit, which is currently set to 20 minutes for most
state clients, to allow students enough time to complete testing.
• If your location uses screensavers, verify that the timeout limit is set to meet or exceed the DRC
INSIGHT testing session timeout limit, which is currently set to 20 minutes for most state clients, to
allow students enough time to complete testing.
• DRC recommends allowing DRC INSIGHT trac to bypass your rewalls and proxies if possible.
• Besides allowlisting these sites, you may need to allow them to pass through the proxy server without
requiring authentication credentials to be passed by DRC INSIGHT.

Page 27
System Requirements System Requirements
and Testing Informationand Testing Information
Wireless Networking
DRC INSIGHT supports wireless networks. However, sites may experience issues if unreliable wireless
networks are used or if too many students attempt to connect to a single access point. When you test
load capacity in a wireless network, verify that your access points and network can handle the number of
simultaneous users that will be testing.
Important: Some access points interpret COS-SD-to-DRC INSIGHT communication as peer-to-peer
networking. If you have Layer 7 or peer-to-peer web ltering rules in your lters and access points, DRC
recommends that you disable them. Also, some content lters have advanced settings to allow for additional
checks. If your content lter has Reverse Lookup or Evasive Protocols, DRC recommends that those be
disabled as part of the ltering process.
Desktop Monitoring
If your testing location uses remote desktop monitoring software to monitor the computers that will be used
for testing, that software may interfere with the testing software.
Important: If possible, disable the monitoring software on testing computers during test times to
guarantee adequate security. The particular steps you need to take vary, depending on the monitoring
software you are using and the operating system of the testing computer. If it is not feasible to disable your
monitoring software, ensure that any sta members who can use the monitoring software refrain from using
it during testing periods.
Network Connectivity (cont.)
Page 28
System Requirements System Requirements
and Testing Informationand Testing Information
DRC INSIGHT Bandwidth and Connectivity Requirements
To start a test, DRC INSIGHT contacts DRC to download the DRC INSIGHT Test Engine and presents
the login page. After a successful login, DRC INSIGHT downloads the test from the DRC server or from a
congured COS - SD. DRC INSIGHT sends test responses to the DRC server every 45 seconds, or after a
navigational command, such as Next, Back or Pause, is issued.
• DRC INSIGHT must maintain connectivity to the Internet, or to a proxy server that maintains
connectivity to the Internet, at all times.
• DRC INSIGHT supports wireless networks. If you test using wireless networks, be careful not to
overload the network access points.
• DRC recommends using Ethernet networks where available for online testing.
Bandwidth Calculation Guidelines
Bandwidth requirements and recommendations are based on the actual amount of bandwidth available.
Even with a high-speed communication line, only part of the connection may be available for online testing
due to competing Internet trac. The greatest amount of bandwidth is required when students download
tests.
Calculating Bandwidth
You can estimate bandwidth requirements by dividing the size of the test by your target wait time (i.e., the
amount of time it should take the test to load).
Note: Accommodated tests contain audio and/or video les that make the test size larger and the download
time longer.
Bandwidth Required with a Content Hosting COS - SD
With a Content Hosting device, more students can load the test at a time. Using a COS - SD with Content
Hosting decreases your Internet bandwidth requirements because tests can be loaded from the COS - SD
rather than from the DRC server, which greatly increases your capacity.
Important: Bandwidth calculations are estimates. There are many variables, including network trac,
that can impact actual network performance. For additional information, see the Testing Site Capacity
Estimator in Volume IV: Troubleshooting.

Page 29
System Requirements System Requirements
and Testing Informationand Testing Information
Background Applications and Online Testing
For both test security and device performance, DRC recommends that unnecessary background processes
and software be removed, turned o or disabled. DRC also recommends prior to testing sites review which
processes and software are running in the background and have a procedure for disabling them before
the assessment and enabling them after the assessment. For more information on disabling background
processes and software, reference the most recent version of the DRC INSIGHT System Requirements from
Portal site.
Before testing temporarily disable or remove the following:
• Instructional Software
• Typing assistant and grammar checking software (e.g., Grammarly, Ginger Software, ProWritingAid)
• Classroom monitoring software (e.g., Linewize Classwize, Impero Wellbeing, GoGuardian)
• Remote access/remote control software (e.g., TeamViewer, AnyDesk, Remote PC)
• Automatic Updates
• Intelligent Personal Assistant (IPA) (e.g., Siri, Cortana)
• Collaboration Tools (e.g., Microsoft Teams, Zoom, Google Chat and Meets)
• Microsoft Game Bar and Other Screen Capture Software
• Screen readers when not used for Refreshable Braille online testing (e.g., ChromeVox, NVDA, VoiceOver)

Page 30
System Requirements System Requirements
and Testing Informationand Testing Information
Video Sign Language (VSL) Conguration
If you download the VSL software for your testing, remember that the hardware and software requirements
dier for VSL.
• You can download the VSL content on any machine whose hardware meets the minimum VSL system
requirements. DRC recommends that sites download VSL content only if they have one or more testers
that need to use VSL.
• VSL does not run on remote or virtual congurations/Testing Devices.
• VSL requires more memory for DRC INSIGHT.
• VSL requires more disk space for the COS - SD than a standard conguration.
• A COS – SD provides a more consistent testing experience when testing with VSL.
Changing the Monitor Display for VSL
After you have installed VSL, if the video looks pixelated or there is a semi-transparent grid or halo
displaying over the video, you may need to change the testing computer’s hardware acceleration setting
from None to Full. Hardware acceleration uses the computer’s hardware to perform certain tasks faster than
is possible with software. This can cause smoother rendering of graphics and better application performance.
The hardware accelerator is often described as either a graphics card or a video card.
Windows 10
1. To reset this setting on a Windows 10 computer, right-click on the Desktop and select Display settings.
2. When the Display settings page displays, scroll down and click Advanced display settings.
3. From the Advanced display settings, window, click the Display adapter properties for Display x link.
4. The Monitor and Graphics Properties window displays. Select the Troubleshoot tab and click Change
settings
.
Note: If the Troubleshoot tab does not display or if the Change settings button is grayed out, your
current display driver does not allow you to change the settings.
5. When the Display Adapter Troubleshooter window displays, move the pointer to the far left to disable or
reduce the hardware acceleration and click OK.
Note: These settings can help you troubleshoot display-related problems with your graphics hardware.

Page 31
System Requirements System Requirements
and Testing Informationand Testing Information
Text-To-Speech (TTS) Conguration (Audio)
If your site downloads TTS software for testing, remember that the hardware and software requirements
dier for TTS.
• Sites are responsible for supplying the headphones required for TTS.
• TTS software does not run on remote or virtual congurations/Testing Devices.
• A COS – SD provides a more consistent testing experience when testing with TTS.

Page 32
System Requirements System Requirements
and Testing Informationand Testing Information
Human Voice Audio (HVA) Conguration
The hardware and software requirements dier for HVA:
• Schools are responsible for supplying the headphones required for HVA.
• HVA does not run on remote or virtual congurations/testing devices.
• A COS – SD provides a more consistent testing experience, when testing with HVA.
HVA Testing Considerations
Students who test using HVA hear a TTS-synthesized voice for online help. The students hear a human voice
for the test directions and items.
To ensure that HVA works correctly, perform the following tasks.
Before Testing
• Complete a System Readiness Check and verify that the testing computer passes the Audio Capability
test (see The System Readiness Check in Volume III: DRC INSIGHT).
• Verify that the correct number of headphones are available and working.
• Adjust the volume on each testing computer to a comfortable level for the students.
During Testing
• Verify that when a student logs on, they see the audio buttons on the Welcome Student screen.
• If a student needs to adjust their computer’s volume during testing, they should click the Options button
on the test and select Audio Settings.
Page 33
System Requirements System Requirements
and Testing Informationand Testing Information
DRC INSIGHT and Virtual or Remote Desktops
DRC INSIGHT is a desktop-installed application that runs natively* on specic operating systems. To
successfully launch and run DRC INSIGHT, you must meet system requirements, such as operating system
level, processor, disk space, memory, Internet connectivity, and screen resolution.
*Running natively refers to running without external support, as opposed to running in an emulation.
As long as your virtual/remote machines meet these requirements, you can run DRC INSIGHT in a
virtual/remote desktop environment. However, if your site uses virtual computing technology and runs
DRC INSIGHT on virtual/remote operating systems and/or devices, you must implement appropriate
security measures to ensure that these virtual/remote desktops cannot access other applications during the
administration of an online assessment.
Important: Virtual/remote desktop software does not work with audio accommodations such as
Text-To-Speech (TTS).
Kiosk Mode and Security
The risk of running DRC INSIGHT on virtual/remote operating systems and devices in a virtual/remote
desktop environment is the loss of built-in security. When DRC INSIGHT runs on a supported device
and operating system, it uses Kiosk Mode to secure student access and prevent students from performing
inappropriate testing activities, such as accessing the Internet.
DRC INSIGHT’s Kiosk Mode is not available for unsupported operating systems and devices. Sites using
virtual computing technology for unsupported operating systems and devices must implement security
measures to ensure that any virtual/remote desktop a student is using cannot access other applications while
online assessments are being administered.
Native Operating Systems and Devices
To review the supported operating systems on which DRC INSIGHT runs natively and the devices
that can currently run DRC INSIGHT-supported operating systems natively if they meet the minimum
system requirements, refer to the latest version of the DRC INSIGHT Online Learning System Supported
System Requirements.

Page 34
System Requirements System Requirements
and Testing Informationand Testing Information
Virtual Desktop Operating Systems
Besides the physical devices that host operating systems directly, virtual desktops can indirectly host some
supported operating systems for DRC INSIGHT. Typically, users access these virtual desktops from another
operating system on another device across a network boundary. Below are the supported and unsupported
operating systems for virtual or remote desktop sessions.
Supported Operating Systems
• Microsoft Windows
• macOS
• Linux
• nComputing vSpace
Unsupported Operating Systems
• Google Chrome OS
• Apple iOS
• Google Android
Virtual Desktop Devices
The device a student interacts with is actually a gateway to the virtual or remote desktop. However, the
device may or may not be capable of supporting DRC INSIGHT natively or be able to run an operating
system that DRC INSIGHT supports.
DRC software is supported on any vendor-supported device that meets DRC’s operating system
specications and has a DRC-supported operating system.
Important: *Virtual/remote desktop software can access supported operating systems. If you test using
unsupported devices, ensure that students cannot access the Internet and other resources.

Page 35
System Requirements System Requirements
and Testing Informationand Testing Information
Windows 10 and 11 Desktop Font Size Requirements
The testing devices’ font size settings must match the test settings to guarantee that line breaks and other
items display correctly during testing. The correct font size for testing in the Windows 10 and 11 operating
system is 100% (Custom DPI). To verify and/or change this setting, perform the following steps:
1. Right-click the desktop and select Display settings.
2. Select Scale and layout–Change the size of text, apps, and other items and choose 100%. The DPI
scaling changes are applied instantly.
Windows 10 and 11 Taskbar Security Requirement
During testing, each testing computer is locked down while DRC INSIGHT is active to prevent the student
from having access to outside information. For Windows computers, you must be sure the Auto-hide the
taskbar setting is turned o to secure the testing computer. To turn o the setting on a Windows 10 or 11
computer, perform the following steps:
1. Right-click on the Taskbar and select Taskbar settings.
2. Toggle Automatically hide the taskbar in desktop mode and Automatically hide the taskbar in
tablet mode to O (in case the Windows 10 or 11 computer is being used in tablet mode).

Page 36
System Requirements System Requirements
and Testing Informationand Testing Information
Online Testing, Testing Devices, Peripheral Devices, and Software Features
This section describes various conguration details related to Testing Devices, peripheral devices, and
software features for online testing.
Peripheral/Feature Device Description Reference
Cortana Windows
10 and 11
For Windows 10 devices, Cortana must be
disabled for testing, either manually or by using
group policy.
See on page 37.
Microphone iPad The rst time sites launch DRC INSIGHT on an
iPad, the microphone must be enabled even if
testers are not taking a speaking test.
See “Enabling the
Microphone on an iPad”
on page 38.
macOS When DRC INSIGHT is launched on a macOS
device, testers are prompted to enable the
microphone.
See “Enabling the
Microphone on a macOS
Device” on page 39.
Keyboard Chrome (plus
a note about
iPads)
Before students start taking a writing test using
a Chrome OS device, the testing site must verify
that the device’s keyboard congurations are
correct for online testing. Specically, sites
must verify the keyboard congurations if
students might use quotation marks (“ ”) and/or
apostrophes (‘
’) in test responses.
Because some users may be prohibited from
using these characters, DRC recommends
conguring your device to use the US keyboard.
Sites must also disable on-screen keyboards so
they cannot be accessed in Tablet mode.
See “Keyboard Settings
for Chrome OS Devices”
on page 40 (for iPads,
see the “Keyboard Note
Regarding iPad Devices”
that follows).
See “Disabling On-
Screen Keyboards” on
page 41.
Trackpad/mousepad
and Force Click
macOS Before testing, sites must manually disable both
Force Click (look up) and three nger drag/
gestures functionality. Look up allows users
to tap a word with three ngers to display a
denition of the word. Three nger drag/gestures
allows users to access multiple applications by
swiping between two full-screen apps.
This functionality is activated via the device’s
trackpad/mousepad. If it is enabled, students have
the potential to access unauthorized information
and/or applications during the online assessment.
See “macOS Device
Trackpad/Mousepad
Settings” on page 42.
Timeout Settings macOS For macOS computers, it is important that various
timeout settings are set to work with the DRC
INSIGHT timeout value to avoid timing out
during testing.
See “Manually Adjusting
the Timeout Settings on a
macOS Device” on page
43.

Page 37
System Requirements System Requirements
and Testing Informationand Testing Information
Disabling Cortana in Windows 10 and 11 Devices
For Windows 10 and 11 devices, Cortana must be disabled for testing, either manually or by using group
policy. DRC INSIGHT does not check whether Cortana is o before starting a test.
Disabling Cortana Manually
To disable Cortana manually on a Windows 10 device, do the following:
1. Launch Cortana from the search bar on the taskbar.
2. From the left pane, click Settings.
3. Under Cortana, toggle the switch to O.
Disabling Cortana by Using Group Policy
To disable Cortana using Group Policy on Windows 10 devices, do the following:
1. Type gpedit.msc in the search bar on the taskbar and press Enter to open the Local Group Policy Editor.
2. Navigate to Computer Conguration–Administrative Templates–Windows Components–Search.
3. Double-click on Allow Cortana to open the Settings box.
The Allow Cortana Group Policy setting species whether Cortana is allowed on the device. If you
enable or don’t congure this setting, Cortana is allowed on the device. If you disable this setting,
Cortana is turned o on the device.
4. Set Allow Cortana to Disabled, click OK, and close the Group Policy Editor.
5. Sign out and sign back in—or restart your PC—to make the change take eect.
Page 38
System Requirements System Requirements
and Testing Informationand Testing Information
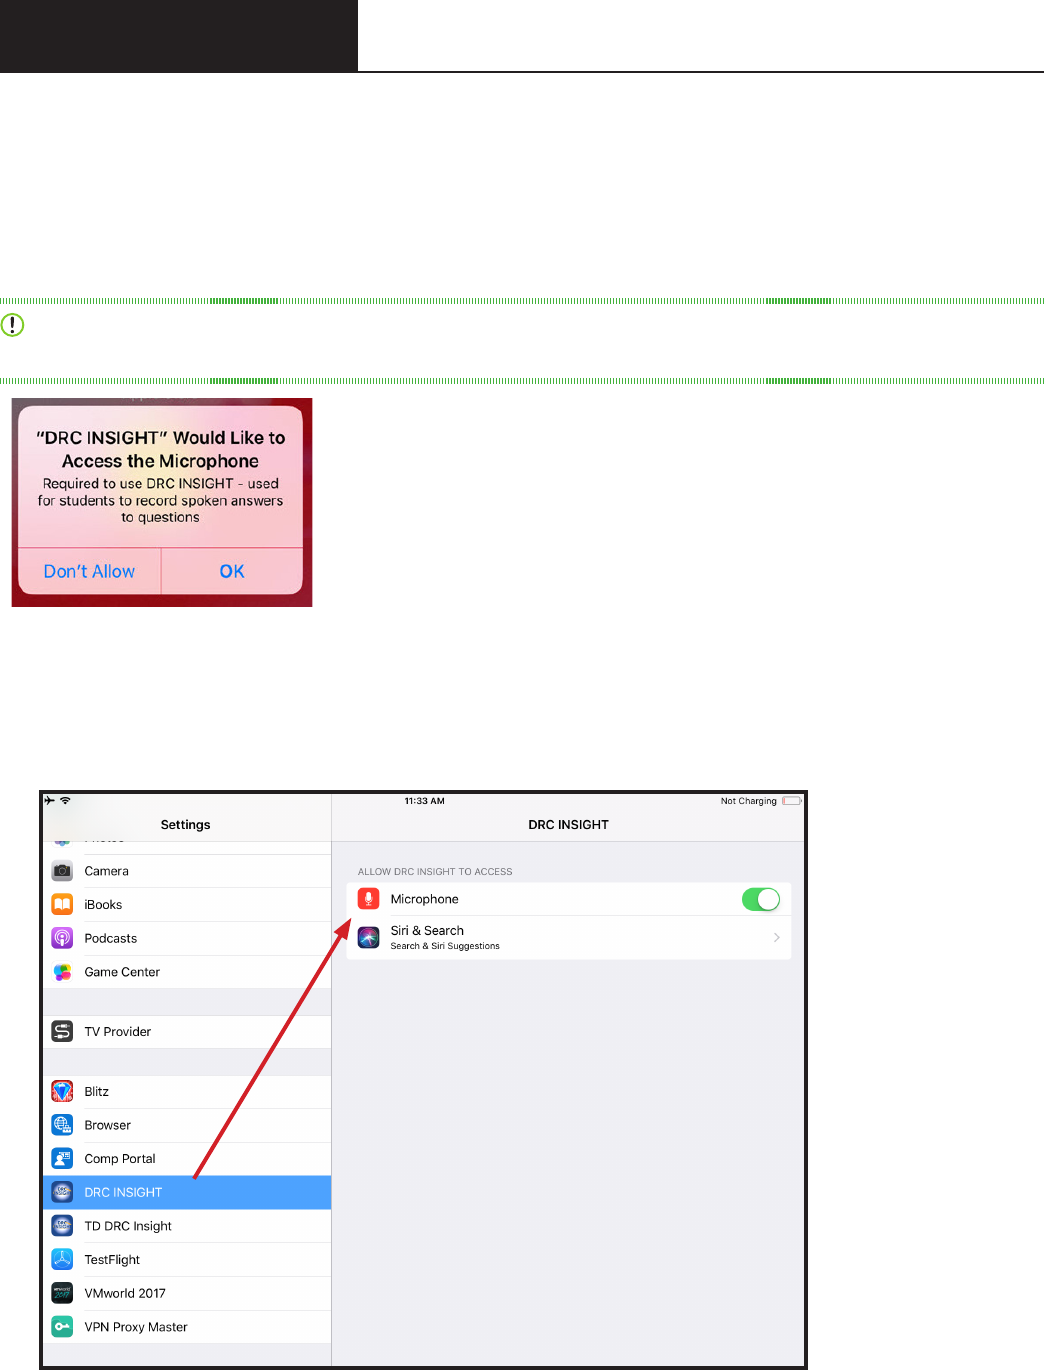
Enabling the Microphone on an iPad
Before DRC INSIGHT is installed on an iPad, there is no microphone access setting under Settings–
Privacy–Microphone (see below).
1. After DRC INSIGHT is installed, the rst time it is launched a message will display asking you to allow
microphone access. Tap OK.
Important: Even if the testing administration does not use a microphone or include any
speaking-response tests, you MUST tap OK to allow microphone access.
2. If you select Don’t Allow instead of OK, DRC INSIGHT displays the message Microphone Required -
Permission to use the microphone is required and testing cannot continue.
3. If this happens, you must click Settings, manually enable the microphone for DRC INSIGHT using the
DRC INSIGHT slider (see below), and restart DRC INSIGHT.
Page 39
System Requirements System Requirements
and Testing Informationand Testing Information
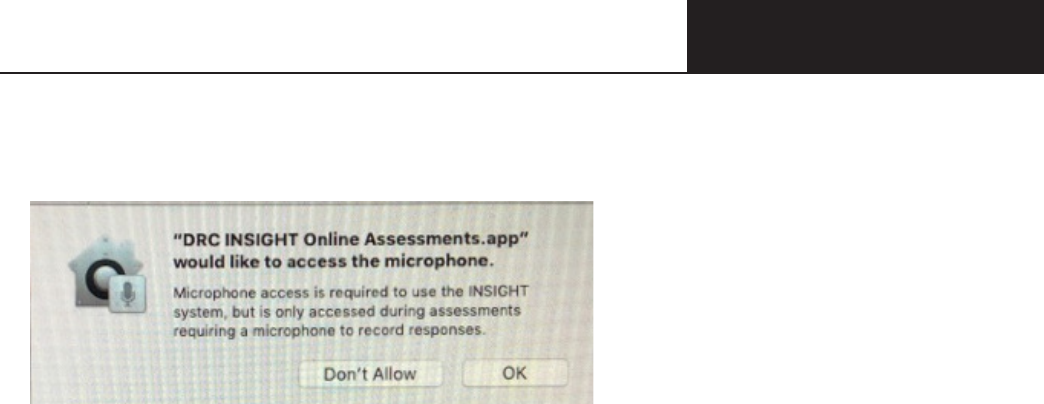
Enabling the Microphone on a macOS Device
When DRC INSIGHT is rst launched on a macOS device, the following message displays:
• If you select OK, which is recommended, the DRC INSIGHT Online Assessments App will be listed as
accepted in the macOS device settings and you can continue testing, regardless of whether or not the
test requires a microphone.
• Note: To verify this setting, navigate to System Preferences–Security & Privacy–Privacy–
Microphone settings.
• If you select Don’t Allow, the result depends on whether the test requires a microphone.
• If the test requires a microphone, the macOS device will not pass the internal microphone check and
the tester will be unable to continue testing.
• To change the setting manually, you must navigate to System Preferences–Security & Privacy–
Privacy–Microphone settings, check the checkbox next to the DRC INSIGHT Online Assessments
App, and restart DRC INSIGHT.
• If the test does not require a microphone, the software check for an internal microphone does not
execute and the tester can use the macOS device to test.

Page 40
System Requirements System Requirements
and Testing Informationand Testing Information
Keyboard Settings for Chrome OS Devices
Before students start taking a writing test using a Chrome OS device, the testing site should verify that the
device’s keyboard congurations are correct for online testing. Specically, if students might use quotation
marks (“ ”) and/or apostrophes (‘) in test responses, sites must verify that the Testing Device is congured
correctly (see “Chrome Keyboard Settings” on page 41).
As background, both quotation marks and apostrophes are commonly used in Passage Based Writing (PBW)
responses in which a student’s response is based on a passage presented to the student. The student must
provide evidence from the passage to support claims, opinions, and ideas. Some Chrome OS congurations
may cause these characters to display improperly or cause an error message to display.
Important: DRC INSIGHT does not adjust operating system settings. However, students can adjust the
keyboard settings. Because of this, it is recommended that the keyboard settings should be reviewed before
testing begins.
Keyboard Note Regarding iPad Devices
For the DRC INSIGHT Secure App for iPadOS, DRC INSIGHT is automatically placed in Assessment
Mode regardless of whether Mobile Device Management (MDM) software is used to deploy the App.
When DRC INSIGHT launches, the software prompts you to lock DRC INSIGHT in Assessment Mode. You
should select Yes. When the iPad is locked in Assessment Mode, the Smart Punctuation feature is turned o.
Turning this feature o removes the issues discussed above concerning quotation marks and/or apostrophes.
For more details, refer to Preparing the iPad for Testing in Volume III: DRC INSIGHT.
Page 41
System Requirements System Requirements
and Testing Informationand Testing Information
Changing Chrome OS Keyboard Settings
To ensure that quotation marks and apostrophes display properly in DRC INSIGHT on Chrome OS devices,
set the keyboard to US keyboard.
Changing Chrome OS Keyboard Setting by Using Shortcuts
On the Chrome OS device, press Ctrl–Shift–Spacebar to toggle through the keyboard types congured on
the device until US is displayed in the status area in the bottom-right of the desktop. During a test, ensure
the student has clicked outside of their text box.
Changing Chrome OS Keyboard Setting by Using the Google Admin Console
Within the Google Admin Console, navigate to Device management–Chrome–Device Settings and select
US keyboard.
Important: Ensure that the Chrome OS device keyboard is set to US keyboard.
Changing the Chrome OS Keyboard Language Setting
If the language setting on a Chrome OS device keyboard is set to International English (instead of US
English), it can cause the quotation marks button to become unavailable. Remove International English and
add US English to the available languages.
1. Sign in to the Chromebook and click Status.
2. Click Settings–Show advanced settings.
3. In the Languages section, click Language and input settings.
4. Select English (United States). If it is not available, click Add, select English (United States), and
click OK.
5. In the right column, click English (United States).
6. Click Done.
Disabling On-Screen Keyboards
Sites should disable on-screen keyboards so students cannot access speech-to-text or predictive text features.
Sites can also disable on-screen keyboards while Installing and Deploying the DRC INSIGHT Secure App (see
“Quick Tour: Installing and Deploying the DRC INSIGHT Secure App to
Chrome Devices” on page 104).
To disable the on-screen keyboard on a ChromeOS device, do the following:
1. Sign on to the Chrome OS device and click Status.
2. Click Settings–Show advanced settings.
3. Select Accessibility.
4. Under “Keyboard and text input,” turn o On-screen keyboard.
Page 42
System Requirements System Requirements
and Testing Informationand Testing Information
macOS Device Trackpad/Mousepad Settings
On macOS devices, sites must do the following:
• Manually enable the Enable dragging with drag lock feature, which prevents users from accessing
multiple applications by swiping between two full-screen apps
• Manually disable the Look up & data detectors (Force Click) feature, which prevents users from seeing
additional information from sources like Dictionary by selecting text
Important: DRC strongly recommends that sites make these changes before online testing. If school
technology personnel cannot make these changes without disrupting testing, sites must closely monitor
sessions using macOS devices to watch for the use of these features.
Enable Dragging with Lock Feature
To enable the Enable dragging with drag lock feature, do the following:
Note: Settings and directions may vary slightly depending upon your macOS device version.
1. Use the Finder (or click on the Apple icon in the upper-left corner of the screen) and select System
Settings or System Preferences.
2. Navigate to Accessibility–Pointer Control–Mouse and Trackpad–Trackpad Options.
3. Depending upon the version of your device, do one of the following:
• Check Enable dragging and select with drag lock from the drop-down menu.
• Select With Drag Lock under Trackpad Options.
Disable Look Up & Data Detectors (Force Click)
To disable the Look up & data detectors (Force Click) feature, do the following:
Note: Settings and directions may vary slightly depending upon your macOS device version.
1. Use the Finder (or click on the Apple icon in the upper-left corner of the screen) and select System
Settings or System Preferences.
2. Navigate to Trackpad–Point & Click.
3. Uncheck Look up & data detectors.
Page 43
System Requirements System Requirements
and Testing Informationand Testing Information
Manually Adjusting the Timeout Settings on a macOS Device
Online testers that are using macOS devices for testing must verify that the various computer timeout
settings are set to a value that works with the DRC INSIGHT timeout value. DRC recommends that the
combination of screen saver and energy-saving timeout settings on macOS Testing Devices should be
greater than the DRC INSIGHT timeout value.
Important: For most DRC clients, DRC INSIGHT is set to time out after twenty minutes of inactivity
during a test session (a sixty-second countdown/warning displays before the timeout begins). Some clients
have requested dierent timeout values for DRC INSIGHT. Please verify with your site administrator if you
are unsure which timeout value you are testing with. These instructions assume the standard value of twenty
minutes.
On a macOS device, the macOS administrator must verify that the three timeout settings for Security
Privacy, Energy Saver, and Desktop & Screen Saver are set correctly. These timeout settings are adjusted
from the System Preferences page. To display the System Preferences or System Settings page, use the
Finder (or click on the Apple icon in the upper-left corner of the screen) and select System Preferences or
System Settings.
Note: Settings and directions may vary slightly depending upon your macOS device version.

Page 44
System Requirements System Requirements
and Testing Informationand Testing Information
On a macOS device, the best way to prevent screen display timeout issues is to disable the Security Privacy
setting Require Password after sleep or screen saver begins during testing. If this setting is disabled, the
computer will not require a screen password during testing.
1. To disable the setting, select Security & Privacy from the System Preferences page.
2. Uncheck Require Password after sleep or screen saver begins.
3. Click Turn O Screen Lock.
If the Require password after sleep or screen saver begins setting is not disabled during testing, the
combined time for various timeout settings on the System Preferences page—Require Password X Minutes
after sleep or screen saver begins, the Energy Saver settings for Computer sleep and Display sleep, and the
Screen Saver start time—must total twenty minutes or more (based on the DRC INSIGHT timeout setting).
Example of Combining Timeout Settings
The example below shows how to combine timeout settings for testing with DRC INSIGHT. With these
settings, the testing computer will wait more than twenty minutes before requiring a password, fteen
minutes before sleeping, twenty minutes before starting the screen saver, and ve minutes after going to
sleep or starting the screen saver. Note that this is one example and other combinations of timeout settings
also work well.
1. Set the Security & Privacy password to Require Password 5 minutes after sleep or screen saver
begins.
2. Set the Energy Saver screen slider settings for Computer sleep and Display sleep to a value of 15
minutes or greater.
3. Set the Desktop & Screen Saver setting to start the screen saver to Start after 20 minutes.
Manually Adjusting the Timeout Settings on a macOS Device (cont.)

Page 45
Volume II: Central Oce
Services (COS)

Page 46
Introduction
About This Guide
This volume, Volume II: Central Oce Services (COS), is part of a multivolume set of user guides that describe
how to congure, install, manage, and troubleshoot the DRC INSIGHT Online Learning System. This volume
describes how to install and congure Central Oce Services (COS), a software application that allows you to
manage your online testing environment from a central location. After you have installed and congured COS,
the accompanying COS Online Help provides information about how to manage your COS environment.
This guide is designed primarily for the Technology Coordinators who are responsible for setting up and
managing online testing and ensuring that their systems work eectively and securely. The audience should be
knowledgeable about the technical details of the appropriate operating systems and have the necessary security
privileges to perform the tasks discussed in this guide.
Important: Throughout this user guide, the Information icon ( ) indicates important information or
crucial tips.
Central Oce Services (COS)
The complete COS application consists of a number of functional components, including the COS Service
Device (COS - SD) that can provide Content Management and Content Hosting (see Volume I: Introduction to
Online Testing). The COS - SD has the following characteristics:
• The COS - SD supports Content Hosting and Content Management. Within a COS Conguration, sites can
use COS - SDs for Content Management and Content Hosting. See Volume I: Introduction to Online Testing
for details about the online testing setups that are available with COS.
• The COS - SD is designed to automatically receive software updates. After you install the software, the
COS - SD automatically retrieves and installs COS updates as they become available.
• The COS - SD software can be installed on Windows, Linux, and macOS Service Devices.
• The COS - SD software supports Windows, Linux, macOS, iPadOS, and Chrome OS Testing Devices.
COS - SDs and the Number of Students Testing
As a general guideline, the COS - SD software can support a large number of testers who are testing at the same
time (concurrently). This guideline is based on the following assumptions:
• The COS - SD is congured for Content Management and Content Hosting.
• The COS - SD software is installed on a dedicated device.
• The COS - SD and network meet the necessary system requirements.
The number of COS - SDs required may dier based on the actual hardware and software specications of the
COS - SD, the network speed, and the COS - SD options selected.
System RequirementsSystem Requirements
IntroductionIntroduction
Page 47
COS - SD System Requirements
For details regarding COS - SD system requirements and the number of concurrent testers, refer to the latest
version of DRC INSIGHT System Requirements available at Portal site by navigating to General Information–
Downloads and clicking View System Requirements at the left side of the bottom of the Test Setup General
Information page.
Tablet Devices and COS - SDs
A COS - SD is used primarily to host test content. iPadOS, Chrome OS, and other tablet devices cannot be used
as host machines for a COS - SD. As a result, you should install the COS - SD software on a Windows, macOS
or Linux device, and connect to the COS - SD when you install DRC INSIGHT on the tablet device.
Software Installation and Update Rights
Certain software rights are required to install and update DRC INSIGHT and the COS - SD software. DRC
INSIGHT requires Administrator rights to install it and Write access to perform the software updates. The
COS - SD software requires Administrator rights to install it.
Important: DRC INSIGHT now must be updated by a user with Admin rights on Windows and Mac testing
devices. This change only aects sites that update each device manually after launching the DRC INSIGHT.
If your site uses deployment software to update testing devices, you are not impacted since the deployments are
performed by an Admin user.
A new error message without the Upgrade button will display when a testing device requires a DRC INSIGHT
update. (Note: Only Linux users will still receive an error message with the Upgrade button). The new
message will instruct users to contact their onsite or local IT sta (Admin users) to update the DRC INSIGHT
application. In addition, the Enable Auto Updates to testing devices eld, which enables manual updates, is
being removed from the COS Conguration user interface.
Are My Testing Devices Impacted by this Change?
YES
• If you use Windows (with DRC INSIGHT version 13 or 13.0.1) or Mac (with DRC INSIGHT
version 13) testing devices and typically have a non-Admin user update each testing device manually
after launching the DRC INSIGHT application.
• For more information, refer to the Technical Bulletin DRC INSIGHT Updates now Require Admin
Rights on Windows and Mac Testing Devices on the WIDA Assessment Management System (WIDA
AMS) Portal by navigating to MY APPLICATIONS–General Information–Documents.
NO
• If you use ChromeOS, iPadOS or Linux
• If you update multiple Windows or Mac testing devices using deployment software
• If you manually run the DRC INSIGHT application installer on a single workstation at a time
System RequirementsSystem Requirements
Page 48
IntroductionIntroduction

Overview of Working with COS
The tasks involved in the process of installing, conguring, and using the COS application are summarized
below. For details, see the reference information, which will direct or link you to other volumes, sections, or
topics within this guide.
Note: The rst ve tasks are numbered in the order in which you would perform them during initial installation
and setup. The unnumbered tasks are optional.
Task 1: Install the COS Service Device application and create a COS - SD.
Reference: The various installation sections within this volume
Task 2: Create a COS Conguration.
Reference: “Quick Tour: Creating a Central Oce Services Conguration” on page 64.
Task 3: Install (or uninstall and reinstall) DRC INSIGHT and associate it with the COS Conguration that you
created.
Reference: Volume III: DRC INSIGHT
Task 4: Use the COS Dashboard to monitor your COS Congurations, COS - SDs, and Testing Devices.
Reference: COS Online Help
Task 5: Use the Congurations tab options to manage your COS Congurations, services, and devices.
Reference: COS Online Help
Task: Create a Pool of COS - SDs.
Reference: COS Online Help
Task: Congure DRC INSIGHT to allow testers to test without using a COS - SD (for an extremely small
number of testers).
Reference: COS Online Help
System RequirementsSystem Requirements
IntroductionIntroduction
Page 49

Page 50
COS ‑ SD Windows Installation
Install COS - SD Software Install COS - SD Software
on Windows Deviceson Windows Devices
Page 51
Quick Tour: Installing COS - SD Software on Windows Devices
This Quick Tour describes how to install the COS Service Device (COS - SD) software on a Windows
device. DRC provides an easy-to-use wizard to install the COS - SD software.
Important: To access COS, you must have the Test Setup – Central Oce Services permission.
1. To launch the wizard and start the installation on a Windows device that meets the COS - SD system
requirements, sign in to Portal site, select MY APPLICATIONS–General Information–Downloads, and
click the Central Oce Services (COS) Installer icon ( ) to download the
COS - SD installer
(coinstaller.
exe).
2. After the le is downloaded, double-click on the coinstaller.exe le to start the installation wizard. When the
Setup - Central Oce window displays, click Next to continue.
3. The Installation Folder window displays. You must indicate where to install the COS - SD software and where
to store downloaded content.
• The default location for the COS - SD software is C:\Program Files\CentralOce and the
default location for the COS - SD software to store downloaded test content is C:\Program Files\
CentralOce\content_fs.
• Click Next to select the default locations or Browse... to select dierent locations. DRC recommends
using the default locations.
4. The Proxy Host window displays. This window allows you to specify a separate proxy server for the
COS - SD. This step is optional.
• If you are not planning to use a proxy server, leave the eld blank and click Next.
• If you are planning to use a proxy server, enter the URL of the server in the Proxy Host eld and click
Next. If your COS - SDs and Testing Devices are already using a proxy server, you do not need to use the
COS - SD to restrict trac to or from the Internet and you do not need to set up another proxy server for
the COS - SD.
5. The Ready to Install window displays. The window indicates the amount of disk space the installation will
require. Ensure there is a sucient amount of disk space to continue with the installation. Click Install to
continue or Cancel to exit the installation.
6. The Installing Central Oce window displays, indicating the progress of the installation.
Note: The installation process can take 5–10 minutes.
7. The Congure Service Ports window displays. On this window you specify the port to use for Content
Hosting (labeled as the Base port). The COS application uses the base port to determine which ports to
use for the Content Downloading, Relay, and Restricted Proxy services (labeled the Additional ports).
The ports are four consecutive numbers, but you need to enter only the base port number in the Base port
eld. After you specify the base port, COS automatically selects the next three consecutively numbered
ports. COS requires four port numbers even if the device being congured will not use all of them.
The default port values are 55222, 55223, 55224, and 55225. You may select alternate ports, but DRC
recommends using the default ports. Make sure the ports you select are properly allowlisted (for more
allowlisting information, see Network Requirements for Testing Computers in Volume I: Introduction to
Online Testing).

Install COS - SD Software Install COS - SD Software
on Windows Deviceson Windows Devices
Page 52
Quick Tour: Installing COS - SD Software on Windows Devices (cont.)
8. After you select your base ports, click Test to verify that the ports selected are available on the device.
• If the Installer dialog box indicates that the ports are available, click OK and Next (or click Cancel to
exit the installation).
• If the Installer dialog box indicates that the ports are not available, select a dierent base port and
repeat this step until you have ports that are available.
Important: The ports you select may be blocked at the time of testing despite being available during
installation. At testing time, verify that these ports are available and allowlisted on your COS - SD’s rewall.
If the ports are blocked and/or not allowlisted, the Testing Device will encounter a Connection Error that will
prevent it from being used for testing.
To avoid conicts and to verify that no other device is using these ports, you can enter the command
netstat -a from a command prompt to display a list of the ports currently being used.
9. The Completing the Central Oce Wizard window displays.
Important: From the Completing the Central Oce Wizard window highlight, copy, and save the URL
that displays—you can use it to resume the process at this point (if necessary) without reinstalling the
COS - SD software.
Click Finish in the Completing the Central Oce Wizard window. To complete the process of conguring
your COS - SD, see “Quick Tour: Creating a Central Oce Services Conguration” on page 64.

Install COS - SD Software Install COS - SD Software
on Windows Deviceson Windows Devices
Page 53
Manually Updating COS - SD Software on Windows Devices
DRC sends COS - SD software updates automatically at regular intervals. If a COS - SD is turned o when
DRC releases an update, the COS - SD will not receive the update until the next time it is turned on at night.
Perform the following steps if you need to manually update the COS - SD software on a Windows machine.
1. From the Program Files folder of the COS - SD, double-click the Central Oce folder.
2. Double-click the maintenancetool.exe le.
3. On the Setup - Central Oce screen, check Update components and click Next.
4. A message displays indicating the results of the update. Click Quit to nish.
Uninstalling the COS - SD Software on Windows Devices
To uninstall the COS - SD software from a Windows machine, perform the following steps.
1. From Program Files folder of the COS - SD, double-click the Central Oce folder.
2. Double-click the maintenancetool.exe le.
3. When the Setup - Central Oce screen displays, verify that Remove all components is selected and
click Next.
4. On the Ready to Uninstall screen, click Uninstall. The process takes a few minutes.
Removing Outdated Test Administration Content from the COS - SD
You can remove out-of-date content from past test administrations within the COS - SD.
Test administration content can be added and removed by checking and unchecking desired administration
checkboxes and accommodations.
To manually remove or verify removal of outdated content, navigate to the C:\Program Files\CentralOce\
content_fs location in the COS - SD and remove the folders that reference test administrations that are out of
date.

Page 54
COS ‑ SD macOS Installation
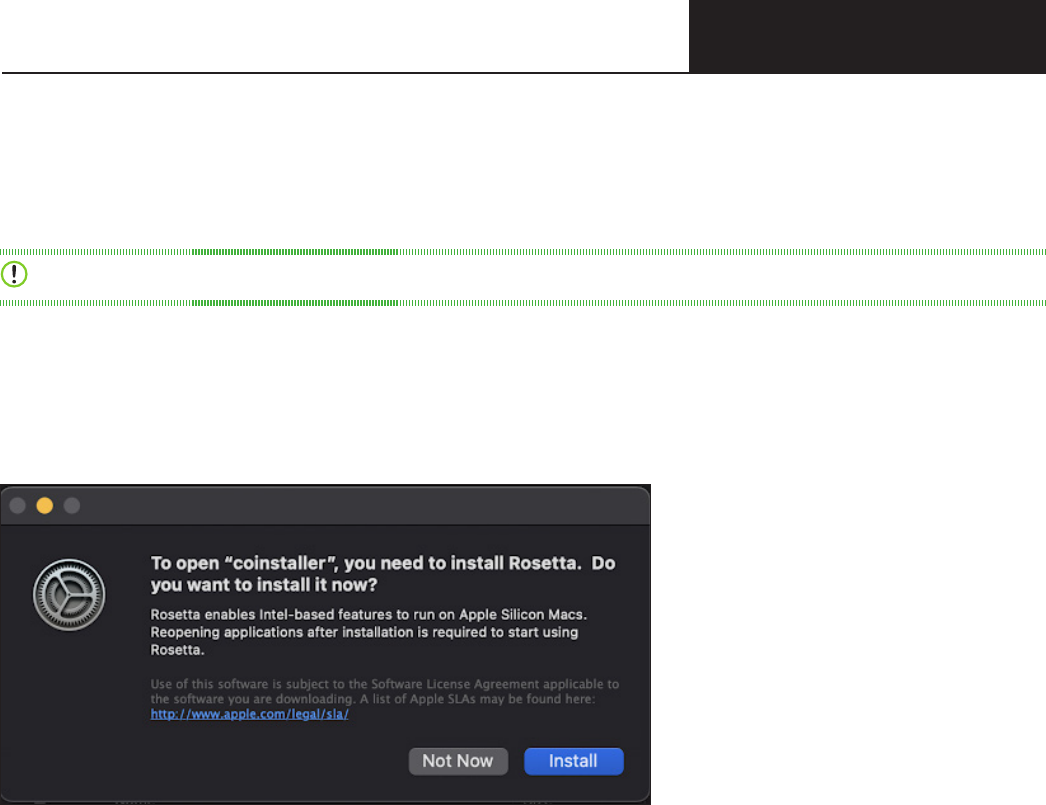
Install COS - SD Software Install COS - SD Software
on macOS Deviceson macOS Devices
Page 55
Quick Tour: Installing COS - SD Software on macOS Devices
This Quick Tour describes how to install the COS - SD software on a macOS device. DRC provides an easy-
to-use wizard to install the COS - SD software.
Important: To access COS, you must have the Test Setup – Central Oce Services permission.
Rosetta Software and COS - SD Software for macOS Devices
If you are testing using a macOS device that has an M1 chip, the Rosetta software must be installed on the
device before you install the COS - SD software. If the Rosetta software is not installed, during the
installation process you will be prompted to install it (see the image below).
Keep the following items in mind if you need to install the Rosetta software on your Mac device.
• Application (Intel) means that the app supports only Intel processors and needs Rosetta to work on any
Mac device with Apple Silicon processors.
• Application (Universal) means that the app supports both Apple Silicon processors and Intel processors
and uses Apple Silicon processors by default.

Install COS - SD Software Install COS - SD Software
on macOS Deviceson macOS Devices
Page 56
Quick Tour: Installing COS - SD Software on macOS Devices (cont.)
1. To launch the wizard and start the installation on a Mac (macOS) device that meets the COS - SD
system requirements, sign in to Portal site, select MY APPLICATIONS–General Information–
Downloads, and click the Central Oce Services (COS) Installer download icon ( ) for macOS to
download the COS installer for Mac.
2. After you have downloaded the le, double-click on the le to open it, and double-click the coinstaller
application le to launch the wizard.
Note: You must be a Mac System Administrator to install the COS - SD software from this le.
3. The Setup - Central Oce window displays for the Central Oce Installation Wizard.
Note: On most installation windows, you can click Go Back to return to the previous window, Continue
to proceed to the next window, and Cancel to cancel the installation.
Click Continue.
4. The Installation Folder window displays. You must indicate where to install the COS - SD software and
where to store downloaded content.
The default location for the COS - SD software is /Applications/CentralOce and the default location
for the COS - SD software to store downloaded content is /Applications/CentralOce/content_fs.
You can use the Browse button to select dierent locations. DRC recommends that you use the default
location.
When you are ready, click Continue.
5. The Proxy Host window displays. This window allows you to specify a separate proxy server for the
COS - SD. This step is optional.
• If you are not planning to use a proxy server, leave the eld blank and click Continue.
• If you are planning to use a proxy server, enter the URL of the server in the Proxy Host eld and
click Continue.
6. The Ready to Install window displays. The window indicates the amount of disk space the installation
will require and the components that will be installed as part of the COS - SD software.
Click Install to continue (or click Go Back or the red circle to exit the installation).
7. After you enter your name and password and click Install Software, the installation begins.
8. The Installing Central Oce window displays, indicating the progress of the installation. Click Hide
Details to hide the details of the installation process or Show Details to reveal them.
Note: The installation process can take 5–10 minutes.
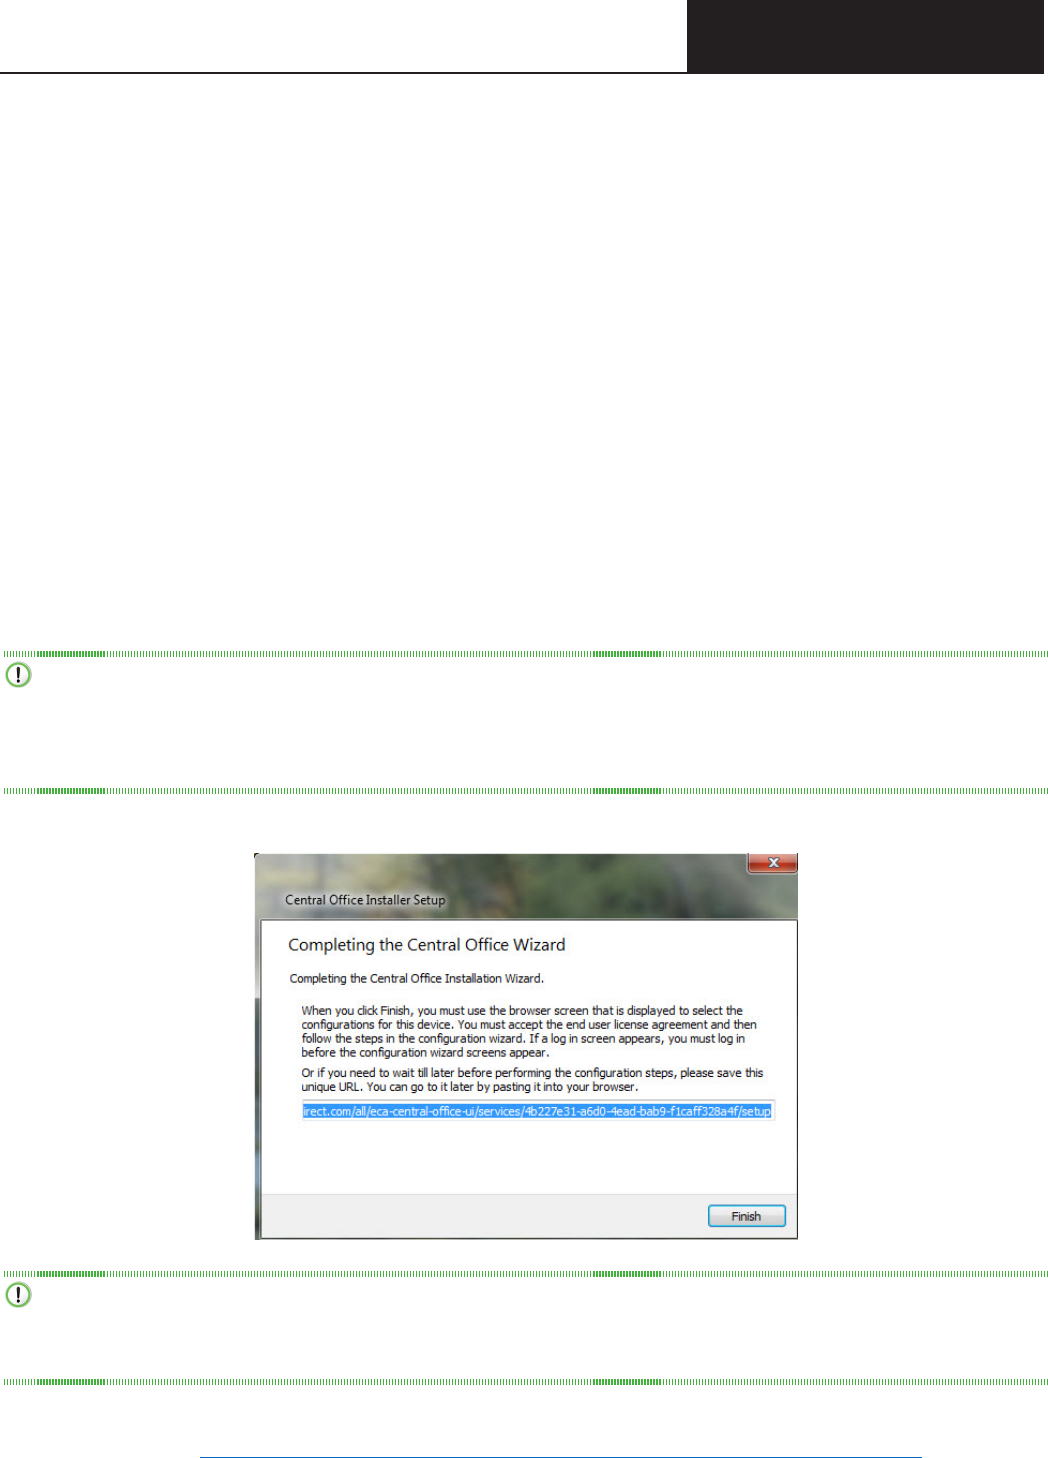
Install COS - SD Software Install COS - SD Software
on macOS Deviceson macOS Devices
Page 57
9. The Congure Service Ports window displays. From this window you can specify the port to use for Content
Hosting (labeled as the Base port). The COS application uses the base port to determine which ports to use
for the Content Downloading, Relay, and Restricted Proxy services (labeled the Additional ports).
The ports are four consecutive numbers, but you need to enter only the base port number in the Base
port eld. After you specify the base port, COS automatically selects the next three consecutively
numbered ports. COS requires four port numbers even if the device being congured will not use all
of them. The default port values are 55222, 55223, 55224, and 55225. You may select alternative port
numbers as long as four consecutive numbers are available. Make sure the ports you select are properly
allowlisted (for more allowlisting information, see Network Requirements for Testing Computers in
Volume I: Introduction to Online Testing). DRC recommends using the default ports.
10. After you select your ports, click Test to verify that the ports selected are available on the device.
• If the Installer dialog box indicates that the ports are available, click OK and then click Continue.
• If the Installer dialog box indicates that the ports are not available, select a dierent base port and
repeat this step until you have ports that are available.
Important: The ports you select may be blocked at the time of testing despite being available during
installation. At testing time, verify that these ports are available and are open on your COS - SD’s rewall.
If the ports are blocked the Testing Device will encounter a Connection Error that will prevent it from being
used for testing.
11. The Completing the Central Oce Wizard window displays.
Important: From the Completing the Central Oce Wizard window, highlight, copy, and save the URL
that is displayed. You can use it to resume the process at this point (if necessary) without reinstalling the
COS - SD software.
Click Finish in the Completing the Central Oce Wizard window. To complete the process of conguring
your COS - SD, see “Quick Tour: Creating a Central Oce Services Conguration” on page 64.
Quick Tour: Installing COS - SD Software on macOS Devices (cont.)

Install COS - SD Software Install COS - SD Software
on macOS Deviceson macOS Devices
Page 58
Manually Updating COS - SD Software on macOS Devices
DRC COS - SD software updates automatically at regular intervals. If a COS - SD is turned o when DRC
releases an update, the COS - SD will not receive the update until the next time it is turned on at night.
Perform the following steps if you need to manually update the COS - SD software on a macOS device.
1. From the COS - SD, select Applications–Central Oce–maintenancetool.
2. Enter your Mac Administrator login information.
3. On the Setup - Central Oce screen, select Update components and click Continue.
4. When the update process is complete, a message displays indicating the results of the update.
Click Done.
Uninstalling the COS - SD Software for macOS Devices
To uninstall the COS - SD software from a macOS device, perform the following steps.
1. From the COS - SD, select Applications–Central Oce–maintenancetool.
2. Enter your Mac Administrator login information.
3. On the Setup - Central Oce screen, select Remove all components and click Continue.
4. On the Ready to Uninstall screen, click Uninstall.
5. If necessary, reenter your macOS Administrator login information. The process takes a few minutes.
6. When the process is complete, click Done.

Page 59
COS ‑ SD Linux Installation
Install COS - SD Software Install COS - SD Software
on Linux Deviceson Linux Devices
Page 60
Quick Tour: Installing COS - SD Software on Linux Devices
This Quick Tour describes how to install the COS - SD software on a Linux device. DRC provides an
easy-to-use wizard to install the COS - SD software.
Important: To access COS, you must have the Test Setup – Central Oce Services permission.
1. To launch the wizard and start the installation, on a Linux device that meets the COS - SD system
requirements sign in to Portal site, select MY APPLICATIONS–General Information–Downloads,
and click the Central Oce Services (COS) Installer icon ( ) to download the COS installer.
2. After the le is downloaded, start a terminal session and navigate to your Downloads directory by using
the cd command. Verify that the coinstaller le is in the Downloads directory by using the ls command.
3. After you have downloaded the installation le, you must make the downloaded le executable. Enter
the following command (all Linux commands are case-sensitive), and press Enter to convert the
coinstaller le to an executable le:
chmod a+x coinstaller
4. If the conversion was successful, enter the following command to run the le and start the installation:
sudo ./coinstaller
The sudo command gives you temporary administrator privileges.
5. If prompted, enter your administrator password. Linux will launch the wizard to start the installation.
6. When the Setup - Central Oce window displays, click Next to continue or Quit to exit the installation.
7. The Installation Folder window displays. Indicate where to install COS and where to store downloaded
content.
Click Next to select the default locations or Browse... to select dierent locations. DRC recommends
using the default locations.
8. The Proxy Host window displays. You can use this window to specify a separate proxy server for the
COS - SDs.
• If you plan to use a proxy server, enter the URL of the proxy server in the Proxy Host eld.
• If you do not plan to use a proxy server, leave the eld blank.
Click Next.
9. The Ready to Install window displays. Click Install.
10. During the installation, a window displays indicating the progress of the installation. If necessary, click
Cancel to end the installation process.
11. When the installation is completed, the Creating Maintenance Tool window displays. This window
indicates the status of the Maintenance Tool installation. When it is installed, click Next.
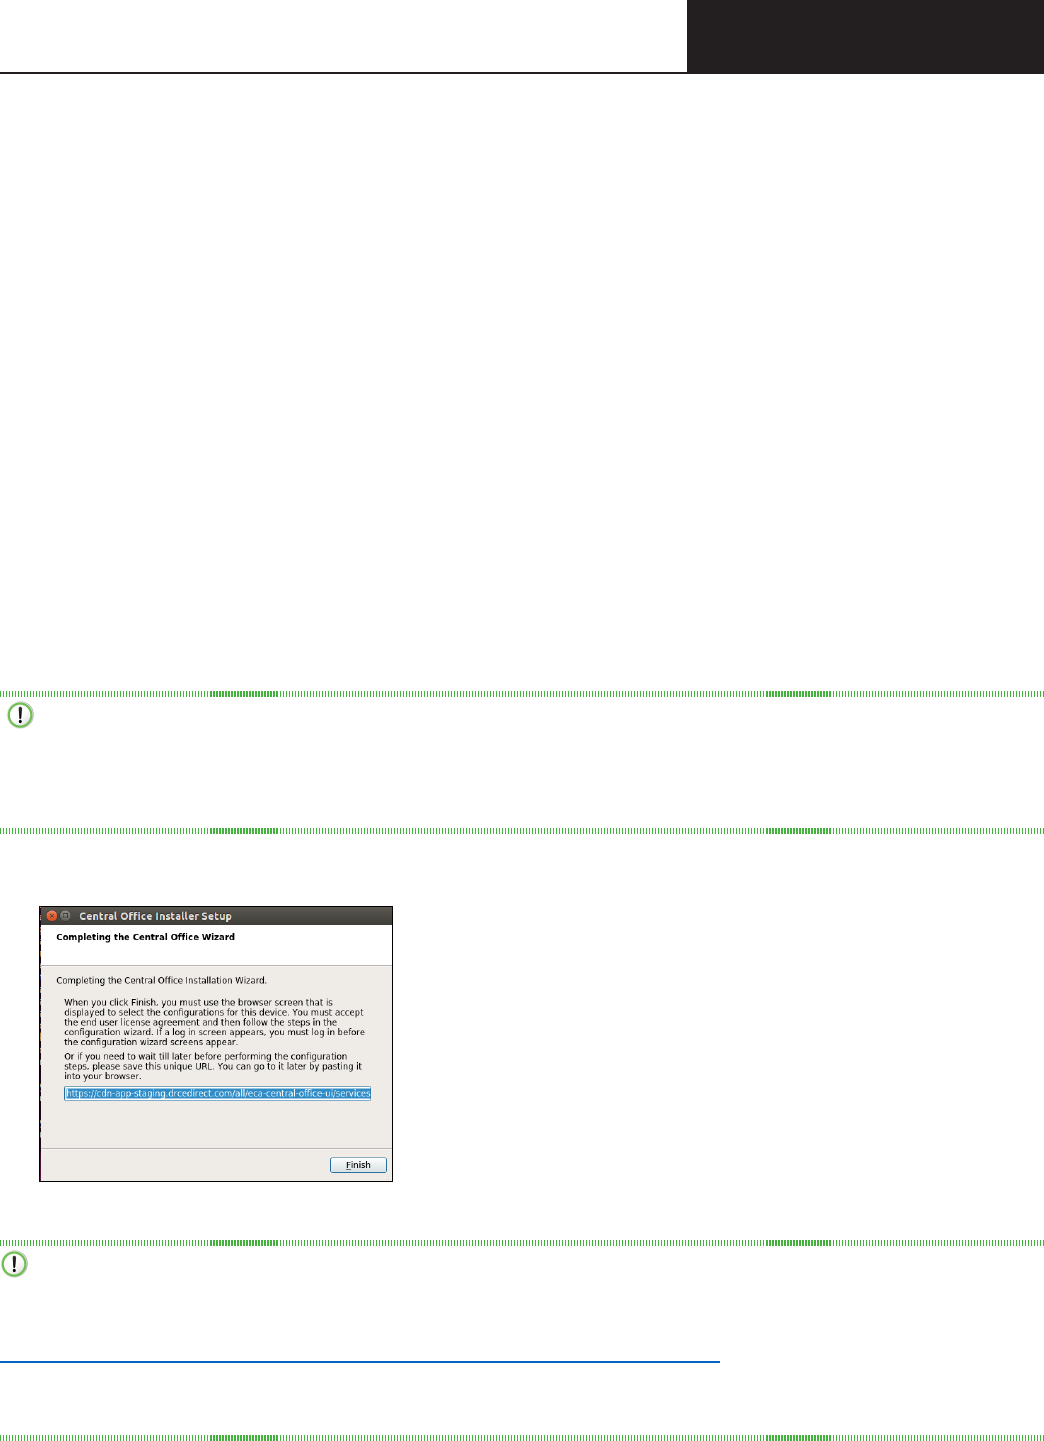
Page 61
Install COS - SD Software Install COS - SD Software
on Linux Deviceson Linux Devices
Quick Tour: Installing COS - SD Software on Linux Devices (cont.)
12. The Congure Service Ports window displays. On this window you can specify the port to use for
Content Hosting (labeled the Base port). COS uses the base port to determine which ports to use for
the Content Management, Relay, and Restricted Proxy services (labeled as Additional ports). Although
there are four consecutive numbers, you need to enter only the base port number in the Base port eld.
After you specify the base port, COS automatically selects the next three consecutively numbered
ports. For example, if you specify 11223 for the base port, COS attempts to use ports 11224, 11225, and
11226.
Note: COS requires four port numbers even if the device being congured will not use all of them.
DRC recommends using the default values: 55222, 55223, 55224, and 55225.
13. After you select your ports, but before you click Next, click Test to verify that the ports selected are
available on the device.
• If the Installer dialog box indicates that the ports are not available, select a dierent base port and
repeat this step until you nd ports.
• If the Installer dialog box indicates that the ports are available, click OK and Next or click Cancel to
exit the installation.
Important: The ports you select may be blocked at the time of testing despite being available during
installation. At testing time, verify that these ports are available and allowlisted on your COS - SD’s
rewall. If the ports are blocked and/or not allowlisted, the Testing Device will encounter a Connection
Error that will prevent it from being used for testing.
14. The Completing the Central Oce Wizard window displays.
Important: From the Completing the Central Oce Wizard window, highlight, copy, and save the
URL that is displayed. (If necessary, you can use it to resume the process at this point without reinstalling
COS.) Paste the URL into a Chrome browser and use it to sign on to Portal site. See
"Quick Tour: Creating a Central Oce Services Conguration" on page 64 to complete the process.
After you paste the URL and sign on, you can click Finish.

Install COS - SD Software Install COS - SD Software
on Linux Deviceson Linux Devices
Page 62
Manually Updating COS - SD Software on Linux Devices
DRC COS - SD software updates automatically at regular intervals. If a COS - SD is turned o when DRC
releases an update, the COS - SD will not receive the update until the next time it is turned on at night.
If necessary, you can manually update the COS - SD software on a Linux machine by performing the
following steps.
1. Start terminal mode from the COS - SD.
2. Navigate to the COS - SD directory /opt/CentralOce.
3. Enter the command sudo ./maintenancetool.
4. On the Setup - Central Oce screen, click Update Components and then click Next. When the update
process is complete, a message displays indicating the results of the update.
Uninstalling Central Oce Services for Linux
To uninstall COS from a Linux machine, perform the following steps.
1. Start terminal mode from the COS - SD.
2. Navigate to the COS - SD directory /opt/CentralOce.
3. Enter the command sudo ./maintenancetool.
4. On the Setup - Central Oce screen, verify that Remove all components is selected and then click
Next.
5. On the Ready to Uninstall screen, click Uninstall. The process takes a few minutes.
Note: The process may leave log or conguration les in the installation directory or the user home
folder. You can ignore these les or delete them using the rm command.

Page 63
Creating a COS Conguration

Creating a Creating a
COS CongurationCOS Conguration
Page 64
Quick Tour: Creating a Central Oce Services Conguration
After you have installed COS software on a COS - SD, you must create an initial COS Conguration to use
COS with your Testing Devices. This Quick Tour describes how to create the initial COS Conguration.
DRC provides the Congure Central Oce Services page to help you with this process.
To access the Congure Central Oce Services page, you must log in to page. When you nish installing
the COS - SD software, the Central Oce Setup Sign In window displays. Sign in to the DRC INSIGHT
Portal by entering your username and password and clicking Log In.
Note: If this is the rst time you’ve logged in to the Portal, the End User License Agreement for DRC - SD
Software window displays. Read the agreement, check the I Agree checkbox, and click Accept to continue.
When the Congure Central Oce Services page displays, you are ready to create the COS Conguration.
If the Congure Central Oce Services page does not display, enter or paste the URL that you saved or
copied when you installed the COS - SD software.
1. On the Congure Central Oce Service page, enter the name for the COS - SD into the Service Device
Name eld to help you identify it in the COS Dashboard. The name displays anytime you view the
device in COS. If you do not name the COS - SD, only the Device ID generated by DRC displays.
Important: For COS - SDs that are part of a pool of devices (including load-balanced pools), if you
have already congured a COS - SD and want to use the same COS Conguration for this COS - SD, you
can reply Yes to Use an existing COS Conguration? For more information, refer to Creating COS Service
Device Pools in the COS Online Help.
2. Enter the name of the COS Conguration you are creating in the Conguration Name eld.
• To use a proxy host server, check the Use Proxy Host checkbox and enter the server name (or IP
address) and port number, separated by a colon, followed by a forward slash (/), in the Proxy Path
eld. To use a restricted proxy host, after you complete the COS Conguration, you must update it
and activate the restricted proxy host (for more information on using a proxy host or restricted proxy
host, refer to the COS Online Help).
3. Select a testing program from the Testing Program lter. Then click Select a Site and start typing a
district name, school name, or site code in the Site Search lter. Click Select when you locate the district
or school name to which you want to register the COS Conguration and its associated COS - SDs and
Testing Devices.
Important: You can select a site for which you have access as dened by the Central Oce Services
permission. If you add the wrong location, you can click Remove (to the right of the location) to remove it.
Click Add Site to add your testing program location.
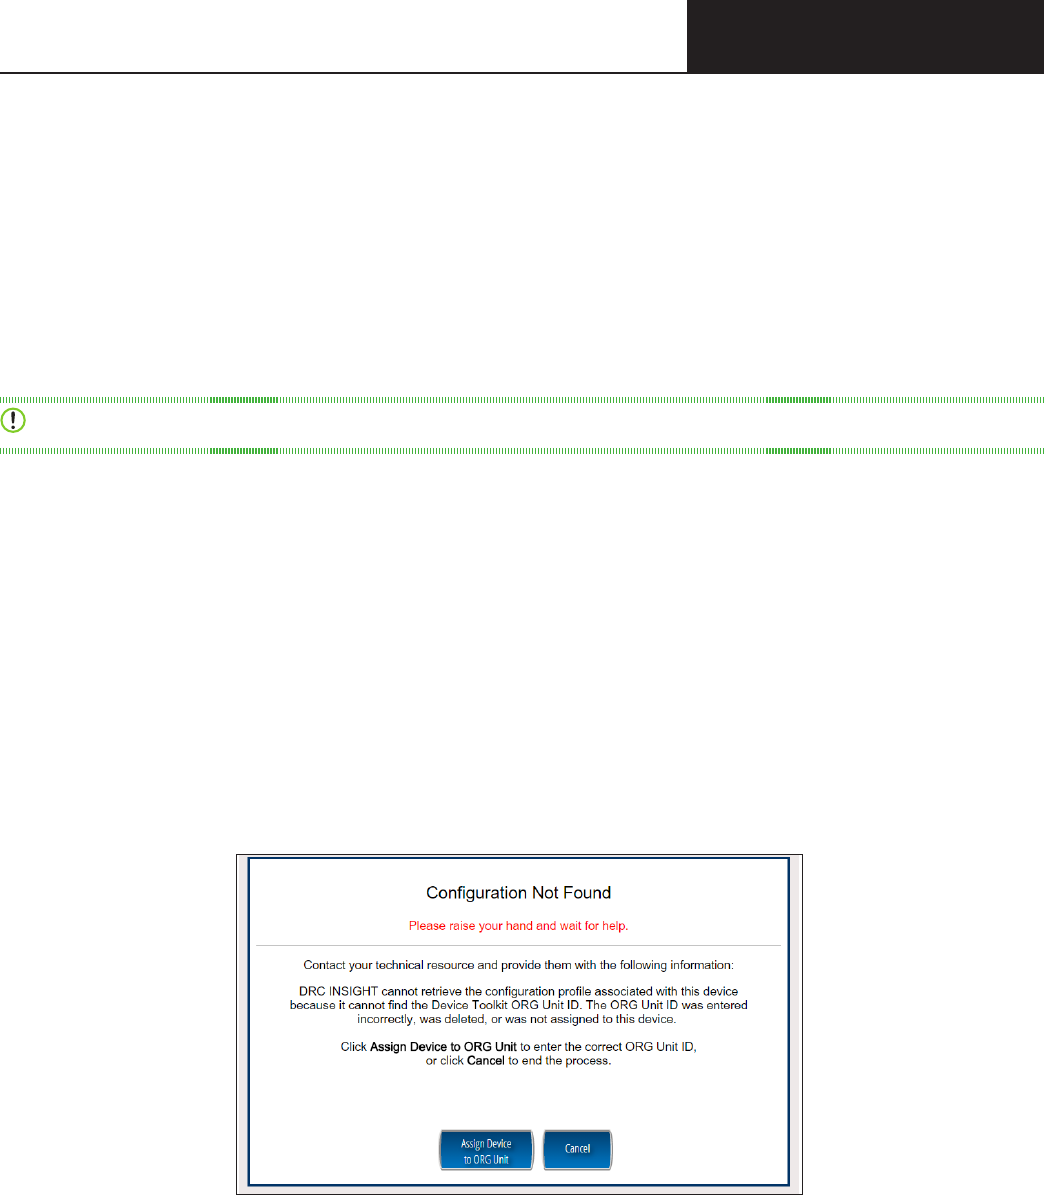
Creating a Creating a
COS CongurationCOS Conguration
Page 65
4. To enable Content Management, check the Enable Content Management checkbox, the Admin
checkbox (if unchecked), and the checkbox for the correct testing administration(s). Indicate whether
you need TTS/HVA (audio) and/or VSL (video) test content by checking the appropriate checkboxes
based on your state’s requirements for the test administration. The test content for the selected
administrations and accommodations will be downloaded automatically to your COS - SD. To save
space on the COS - SD, do not select unneeded administrations or accommodations.
5. If you enabled Content Management, check the Enable Content Hosting checkbox to activate Content
Hosting.
Important: Content Management must be enabled to activate Content Hosting.
6. Click Complete. When the Conrm Conguration dialog box displays, review your COS Conguration.
If it is correct, click Save. If you need to make changes, click Edit Conguration.
7. The COS Conguration that you just created is displayed in the COS Dashboard. Copy and save the
Org Unit ID. You use this ID to register your devices for testing in Step 10.
8. Chose what to do depending on whether DRC INSIGHT is already installed on the Testing Device.
• If DRC INSIGHT is not installed, install it on the Testing Device (see Volume III: DRC INSIGHT).
• If DRC INSIGHT is installed, you can use the version of DRC INSIGHT that is installed.
9. Start DRC INSIGHT on the Testing Device. Because the Testing Device is not registered with COS, the
Conguration Not Found screen is displayed when you start DRC INSIGHT. Click Assign Device to
Org Unit.
Quick Tour: Creating a Central Oce Services Conguration (cont.)
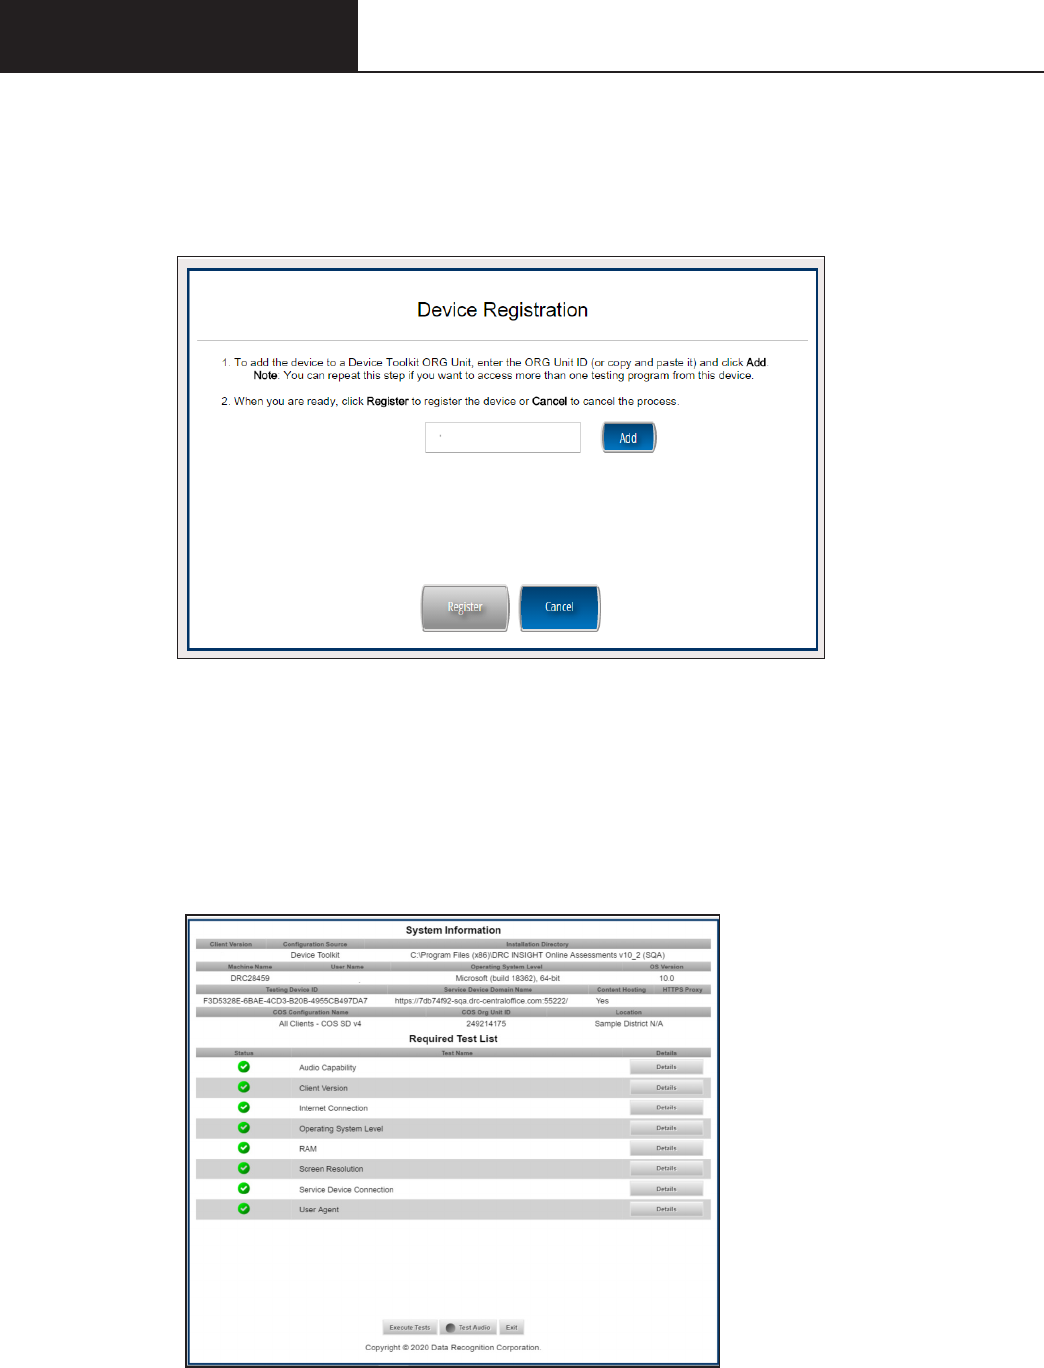
Creating a Creating a
COS CongurationCOS Conguration
Page 66
Quick Tour: Creating a Central Oce Services Conguration (cont.)
10. When the Device Registration page displays, enter or paste the device’s Org Unit ID that you saved in
Step 7 and click Add. After you have added the Org Unit ID, click Register. After the Testing Device is
successfully registered, it will be displayed on the COS Testing Devices page.
11. Depending on what you specied when you installed DRC INSIGHT, either the System Information
Page of the System Readiness Check or the main DRC INSIGHT landing page displays. If you need
to start the System Readiness Check, click the check mark in the lower-left corner of the main DRC
INSIGHT screen. When prompted, enter 7745 for the access code and click Submit.
12. When the System Readiness Check displays, verify that the icons in the Required Test List section are
green, which indicates whether everything is set up correctly (for more information, refer to the various
System Readiness Check topics in Volume III: DRC INSIGHT).
13. Click Exit to exit the System Readiness Check and display the main DRC INSIGHT landing page.
123456789

Page 67
Volume III: DRC INSIGHT

Page 68
Introduction
Page 69
IntroductionIntroduction
About This Guide
This user guide is part of a multivolume set that describes how to congure, install, manage, and troubleshoot
DRC INSIGHT online testing. This volume, Volume III: DRC INSIGHT, describes how to congure, install,
manage, and troubleshoot the DRC INSIGHT software. It contains installation information for the various
environments that support DRC INSIGHT and describes how to use the System Readiness Check to verify
that your Testing Devices are ready for testing.
Important: Throughout this user guide, the Information icon ( ) indicates important information or
crucial tips.
DRC INSIGHT
The main component of DRC INSIGHT, the DRC INSIGHT Secure Application, is the secure web-browser
testing interface installed on each Testing Device.

Page 70
DRC INSIGHT Windows Installation

Page 71
DRC INSIGHT Windows DRC INSIGHT Windows
InstallationInstallation
What’s Covered in This Section
This section describes the DRC INSIGHT installation process in a Windows environment. The various
DRC INSIGHT installation options, as well as the processes of starting, stopping, and uninstalling DRC
INSIGHT, are covered in this section and described in the topics listed below.
Quick Tour: Installing the DRC INSIGHT Online Assessments App for Windows
Describes how to download and install the DRC INSIGHT Online Assessments App directly to the
Windows Testing Device that you are using to access the App store. You must perform this installation
interactively; you cannot install the App silently (non-interactively).
Quick Tour: Installing DRC INSIGHT for Windows OS Interactively
Describes how to download the DRC INSIGHT installation le and install DRC INSIGHT on one or more
Testing Devices interactively by using the DRC INSIGHT installation wizard.
Installing DRC INSIGHT From a Command Line or Silently
Describes how to download the DRC INSIGHT installation le and install DRC INSIGHT on one or more
Testing Devices silently (non-interactively).
Starting, Stopping, and Uninstalling DRC INSIGHT
Describes various ways to start, stop, and uninstall DRC INSIGHT.
Important:
• To make the DRC INSIGHT installation process easier, DRC recommends that you install the Central Oce
Services (COS) Service Device (COS - SD) before you use the COS interface to create COS Congurations and
before you install DRC INSIGHT.
• You must have administrator privileges to install and update DRC INSIGHT in a Windows Server environment.
Multiple Testing Programs
If you plan to test across multiple testing programs, you can use a COS - SD and the same set of DRC
INSIGHT Testing Devices to access these programs. COS makes it easy to combine multiple testing
programs into a single COS Conguration by using COS - SDs with Content Management.
• You can install a COS - SD and DRC INSIGHT on the same Windows, macOS, or Linux computer.
• For details, refer to the Technical Bulletins, Conguring a COS Service Device and DRC INSIGHT on
a Single Windows PC for Online Testing and Conguring a COS Service Device and DRC INSIGHT on
a Single macOS Computer for Online Testing on Portal site by navigating to MY APPLICATIONS–
General Information–Documents.
• You can have content for multiple testing programs on the same COS - SD.
• You can use DRC INSIGHT to access multiple testing programs from the same Testing Device.
• You can access the dierent testing programs using the DRC INSIGHT desktop shortcut. When you
start DRC INSIGHT, a page displays that lists the testing programs from which you can select.

Page 72
DRC INSIGHT Windows DRC INSIGHT Windows
InstallationInstallation
Quick Tour: Installing the DRC INSIGHT Online Assessments App for
Windows
This Quick Tour describes how to download and install the DRC INSIGHT Online Assessments App and
register the Windows computer as a Testing Device.
1. Navigate to the Microsoft App store using a supported browser.
2. Search for DRC INSIGHT Online Assessments and click Get when the DRC INSIGHT Online
Assessments App download window displays.
3. After the download is complete, click Launch to start the DRC INSIGHT Online Assessments App.
4. The Conguration Not Found page displays. To successfully register the Windows computer as
a Testing Device with DRC INSIGHT, locate the Testing Device’s Org Unit ID from the COS
Conguration. When you have the Org Unit ID (you can copy and paste it), click Assign Device to Org
Unit.
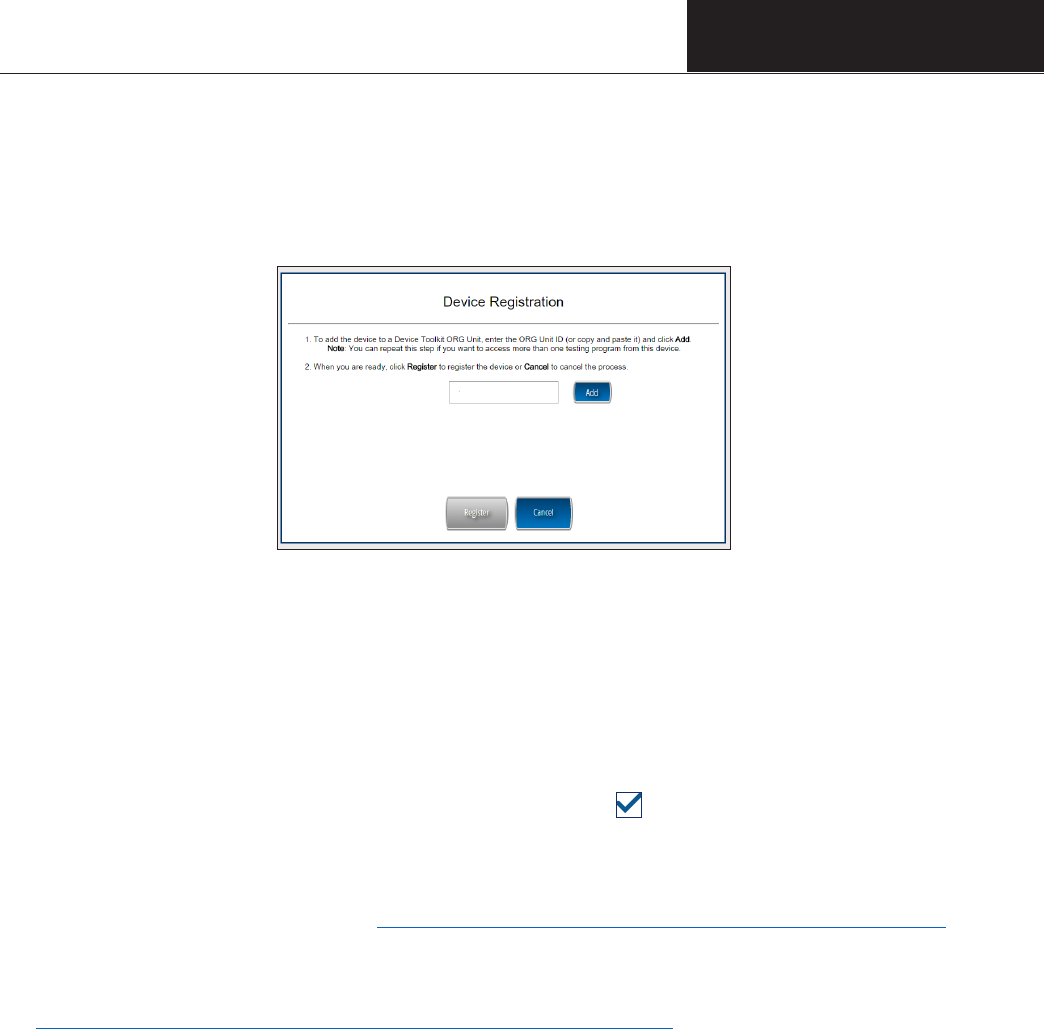
Page 73
DRC INSIGHT Windows DRC INSIGHT Windows
InstallationInstallation
Quick Tour: Installing the DRC INSIGHT Online Assessments App for
Windows (cont.)
5. When the Device Registration page displays, enter or paste the Testing Device’s Org Unit ID and click
Add. When the Register button is enabled, click Register.
6. When the Testing Device is successfully registered with DRC INSIGHT, if a single testing program
is associated with the COS Conguration, its landing page displays. If multiple testing programs are
associated with the COS Conguration, a page displays that you can use to select the testing program.
After you make your selection, the landing page for the testing program displays.
From the landing page in the DRC INSIGHT Online Assessments App, you can try the Test Practice or
Test Demo, or sign in to a take a test using your DRC INSIGHT log-in information.
7. To start the System Readiness Check, click the check mark ( ) in the lower-left side, enter 7745 (the
System Readiness Check access code), and click Submit. The System Information screen displays for
the System Readiness Check and indicates whether the Testing Device has sucient screen resolution,
Internet connectivity, memory (RAM), and other technical specications needed to perform online
testing for the testing program (see “What the System Readiness Check Displays” on page 109).
8. Click Execute Tests to verify that the Testing Device and any COS - SDs are congured correctly and
click Details next to any test for which you need more information (see
“Resolving System Readiness Check Required Tests” on page 113).
9. When you are ready, click Exit.
123456789
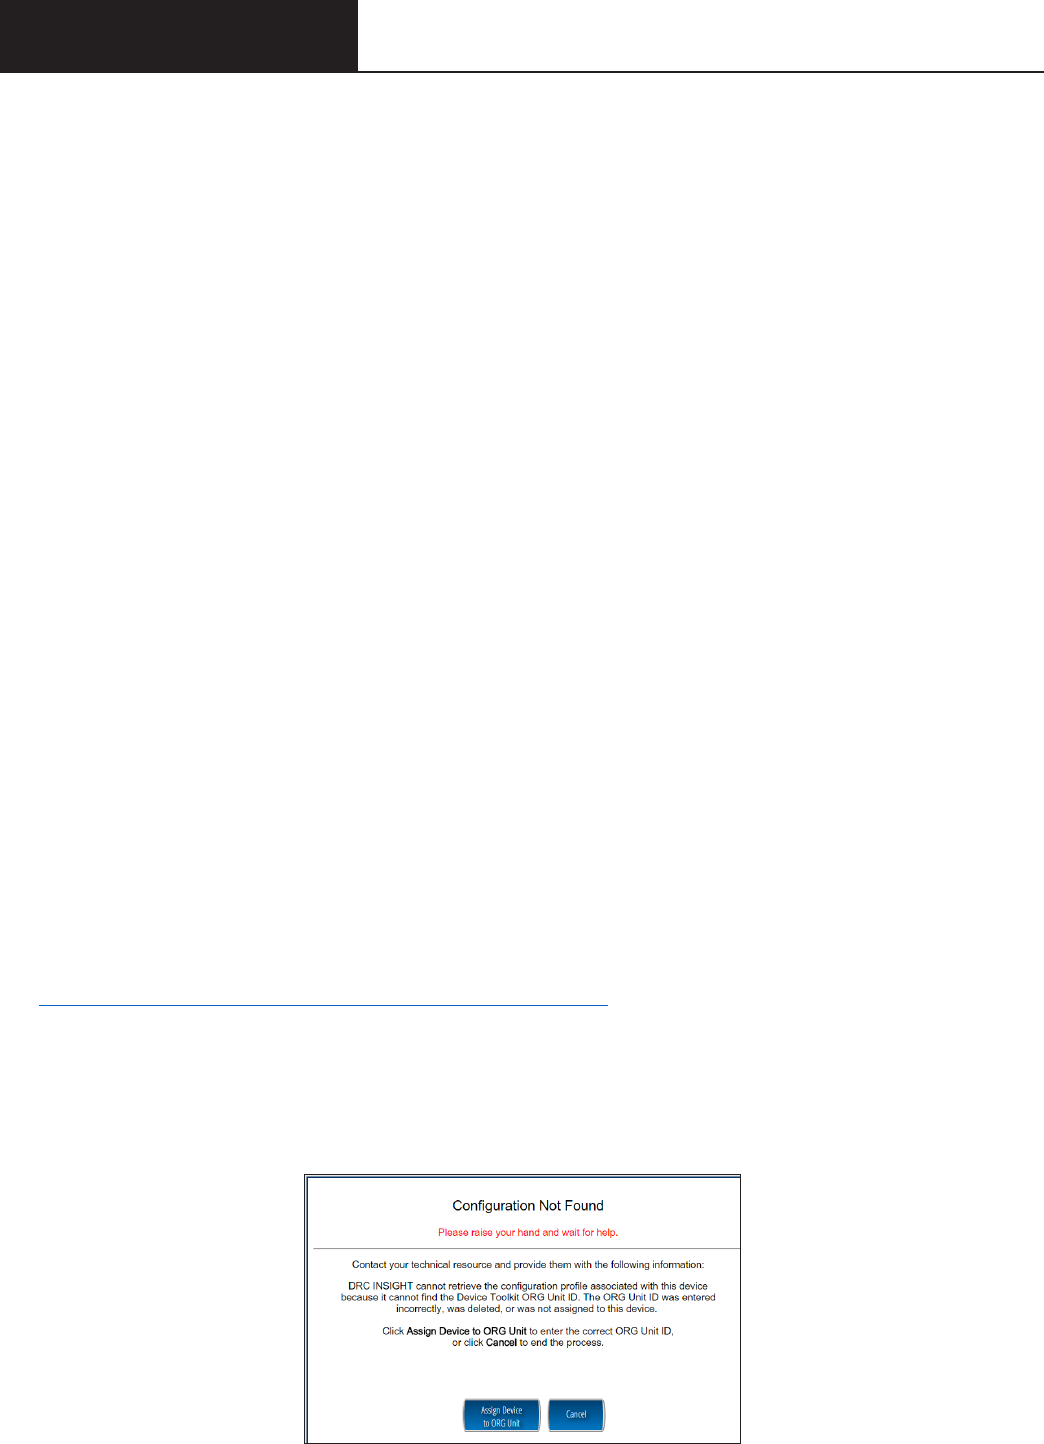
Page 74
DRC INSIGHT Windows DRC INSIGHT Windows
InstallationInstallation
Quick Tour: Installing DRC INSIGHT for Windows OS Interactively
This Quick Tour describes how to install DRC INSIGHT for Windows. DRC provides an easy-to-use
wizard to install the software.
1. To launch the wizard and start the installation, navigate to Portal site, sign in, and download the DRC
INSIGHT installer.
2. After you have downloaded the installer, click the DRC_INSIGHT_Setup.msi icon to start an
installation. When the Welcome to the DRC INSIGHT Online Learning System Setup Wizard window
displays, click Next to continue.
Note: On most installation windows, you can click Back to return to the previous window or Next to
proceed to the next window. Some windows display other options.
3. The License Agreement window displays. To continue the installation, read the agreement and select
the option I accept the terms in the License Agreement. (If you do not accept the agreement, the
installation ends.) Click Next to continue when the Next button is active.
4. The Congure Shortcuts window displays. Use this window to indicate which shortcuts the installation
process should create. DRC recommends that you select both shortcuts.
After you have made your selections, click Next to continue.
5. The Ready to Install window displays. Click Back to review or change your settings, Install to start the
installation, or Cancel to cancel the process.
6. While DRC INSIGHT is being installed, a progress window indicates the status of the installation. If
necessary, you can click Cancel to end the installation process.
7. When the installation nears completion, the Completing the DRC INSIGHT Online Learning System
Setup Wizard window displays, indicating that DRC INSIGHT is almost installed.
Specify whether to launch the System Readiness Check (the default value). The System Readiness
Check veries that the testing computer has sucient screen resolution, Internet connectivity, memory
(RAM), and other technical specications needed to perform online testing (see
“What the System Readiness Check Displays” on page 109).
Make your selections and click Finish to register the device with DRC INSIGHT.
8. The Conguration Not Found page displays. To successfully register the Testing Device with DRC
INSIGHT, locate the Testing Device’s Org Unit ID from the COS Conguration. When you have the
Org Unit ID (you can copy and paste it), click Assign Device to Org Unit.

Page 75
DRC INSIGHT Windows DRC INSIGHT Windows
InstallationInstallation
Quick Tour: Installing DRC INSIGHT for Windows OS Interactively (cont.)
9. When the Device Registration page displays, enter or paste the Testing Device’s Org Unit ID and click
Add. When the Register button is enabled, click Register.
When the Testing Device is registered, the System Readiness Check displays for the COS
Conguration’s testing program. If the COS Conguration is associated with more than one testing
program, a page displays that you can use to select your testing program. The System Readiness Check
displays for the testing program you selected.
10. When the System Readiness Check launches, the System Information screen displays. You can see
details about each System Readiness Check test, execute the tests, and view the results.
Click Execute Tests to verify that the Testing Device and any COS - SDs are congured correctly.
Click Details next to any test you need more information about (see “Resolving System Readiness
Check Required Tests” on page 113). When you are ready, click Exit.
11. When the Testing Device is successfully registered with DRC INSIGHT, if a single testing program
is associated with the COS Conguration, its landing page displays. If multiple testing programs are
associated with the COS Conguration, a page displays that you can use to select the testing program.
After you make your selection, the landing page displays.
Within the DRC INSIGHT App, you can try the Test Practice or Test Demo, or sign in to a take a test.
In addition, you can sign in to the System Readiness Check by clicking the check mark ( ) in the
lower-left side and entering 7745, the System Readiness Check access code. The System Readiness
Check veries that the Testing Device has sucient screen resolution, Internet connectivity, memory
(RAM), and other technical specications needed to perform online testing (see “What the System
Readiness Check Displays” on page 109).
12. The installation adds a single shortcut to your desktop. Use the shortcut to sign in to the Test Practice,
try the Test Demo, view sample test items, or sign in to the Online Tools Training (OTT), or test using
your DRC INSIGHT log-in information.
123456789
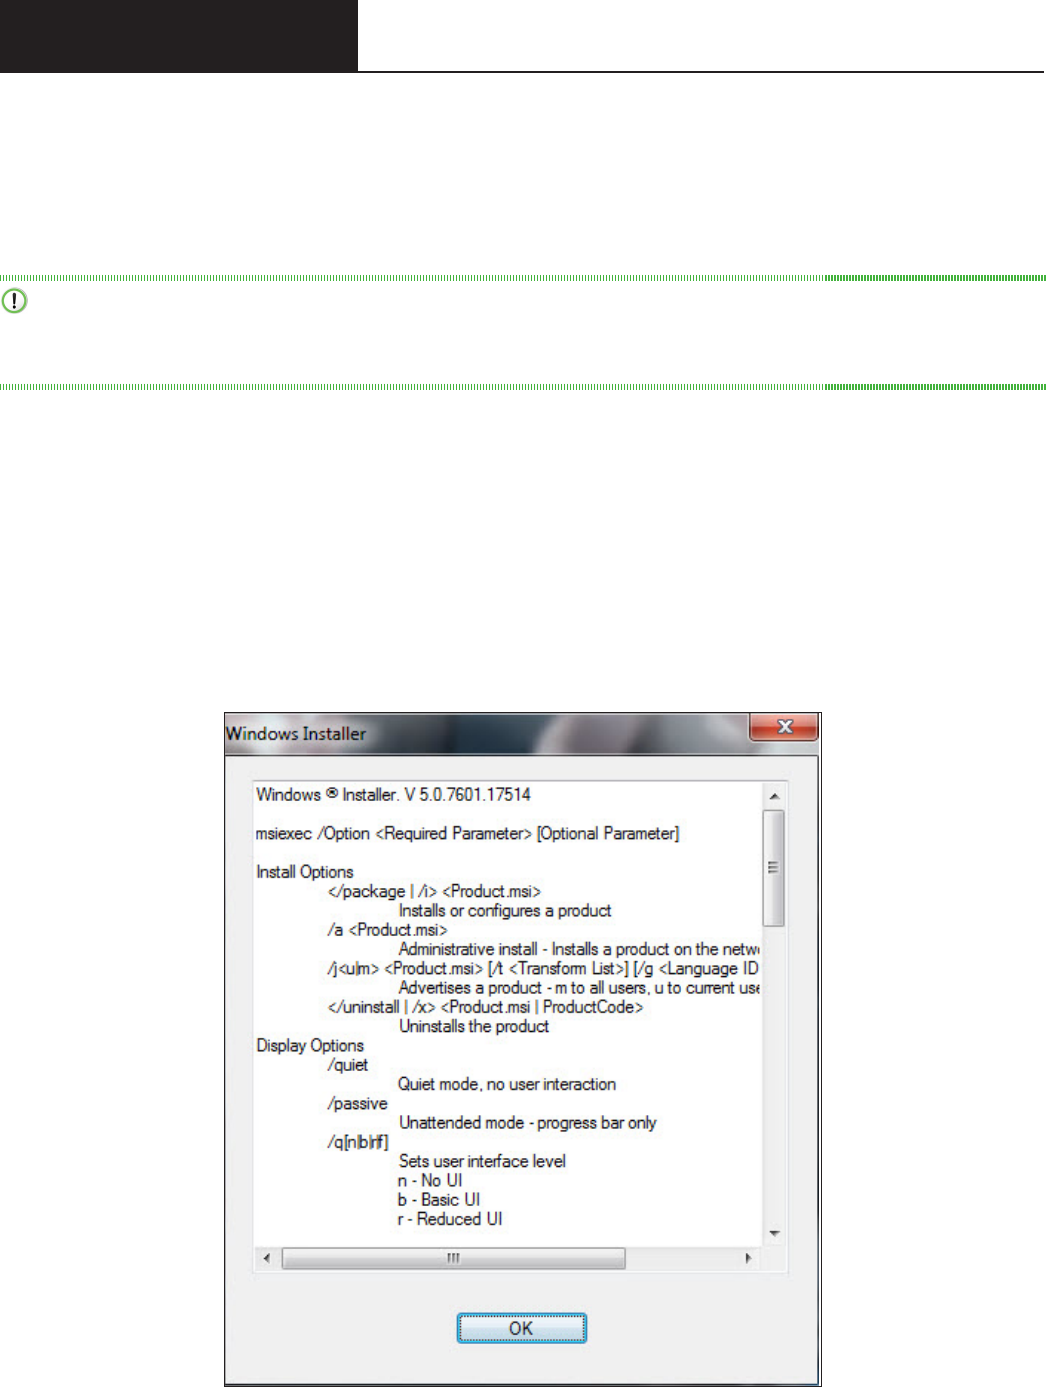
Page 76
DRC INSIGHT Windows DRC INSIGHT Windows
InstallationInstallation
Installing DRC INSIGHT from a Command Line or Silently
This section describes how to install DRC INSIGHT from a command line and how to install DRC
INSIGHT silently (non-interactively). After installing DRC INSIGHT, start DRC INSIGHT to register the
Testing Device with its COS Conguration. (You can do this manually, or automatically using a script or
device management software.)
Important: Register the Testing Device before applying any desktop protection software, such as Deep
Freeze, to avoid having the device re-register with the COS Conguration every time DRC INSIGHT is
launched.
Installing DRC INSIGHT from a Command Line
1. To install DRC INSIGHT from a command line, navigate to Portal site, sign in, and download the
Windows DRC INSIGHT installation le, DRC_INSIGHT_Setup.msi, to the C: drive.
2. Execute the DRC INSIGHT setup command—DRC_INSIGHT_Setup.msi—using the specic options
(see below) you want to use. To display a list of the command line options, use the /h (help) parameter
with the setup command by selecting Run... and specifying DRC_INSIGHT_Setup.msi -h.
The following gure shows a list of the standard options. Refer to the Windows Installer Software
Development Kit for detailed information about the command line syntax.
Page 77
DRC INSIGHT Windows DRC INSIGHT Windows
InstallationInstallation
Installation Command Syntax and Example
The following is the syntax for the install program command:
DRC_INSIGHT_Setup.msi <properties> <MSI switches>
Note: All properties are passed in a key=value format (see below).
Examples
The following are examples of commands used to install DRC INSIGHT, with and without a proxy host,
using an Org Unit ID of 123456789.
Important: Do not copy and paste this information—it is meant for example only.
msiexec.exe /i DRC_INSIGHT_Setup.msi /qn https_proxy="https://10.1.1.1:55222" ou_
ids="123456789"
msiexec.exe /i DRC_INSIGHT_Setup.msi /qn ou_ids="123456789"
https_proxy
is the path to the proxy host (if specied).
ou_ids is the Org Unit ID number to which the device is assigned. This parameter points to the specic
COS Conguration information for COS - SD content, district and school ID, proxy server information,
and automatic update information. It is used to register the device with DRC INSIGHT.
Note: For more information about the MSIEXEC properties and switches that you can use with the
installation application, refer to the Microsoft Command-Line Options page.
Page 78
DRC INSIGHT Windows DRC INSIGHT Windows
InstallationInstallation
Installing DRC INSIGHT Silently Using Orca
To install DRC INSIGHT silently using Orca, perform the following steps:
1. Navigate to Portal site, sign in, and download the Windows DRC INSIGHT installer, DRC_INSIGHT_
Setup.msi, to the C: drive.
2. Download a copy of ORCA to your Program Files folder.
3. Right-click Orca.exe and select Open.
4. Browse to the DRC_INSIGHT_Setup.msi le and open it.
5. Select Property
6. Use the Property column to sort the display.
7. Locate the OU_IDS eld and enter the Org Unit ID with no quotation marks or spaces (see the example
below).
OU_IDS 123456789
8. If you are using a proxy host, locate the HTTPS PROXY eld and enter the full proxy address with no
spaces (see the example below).
HTTPS PROXY https://10.1.1.1.:55
9. Save the le and exit Orca.
Important: Save the le using Save, not Save As.
10. Use the following command to run the updated installer:
msiexec.exe /i DRC_INSIGHT_Setup.msi /qn

Page 79
DRC INSIGHT Windows DRC INSIGHT Windows
InstallationInstallation
Starting, Stopping, and Uninstalling DRC INSIGHT
This section describes various ways to start, stop, and uninstall DRC INSIGHT.
Starting DRC INSIGHT
You can start DRC INSIGHT from a Windows computer using the desktop shortcut, the Windows Start
menu, or Windows Explorer. For 64-bit Windows, start Windows Explorer and select the installation drive–
Program Files–DRC INSIGHT Online Assessments–DRCInsight.exe for DRC INSIGHT.
Stopping DRC INSIGHT
If DRC INSIGHT becomes unresponsive on a Windows computer, can stop it by using the Windows Task
Manager.
1. Start the Task Manager, by pressing Ctrl–Alt–Delete and selecting Task Manager.
2. When the Task Manager window displays, select DRCInsight.exe in the Processes tab and click End
Task.
If DRC INSIGHT becomes unresponsive on a Windows 10 computer, can stop it by pressing ALT–F4.
Uninstalling DRC INSIGHT
You can uninstall DRC INSIGHT from a Windows machine by using the Control Panel, the Start menu,
or silently using a command.Note: If you cannot remove DRC INSIGHT, please contact DRC Customer
Service.
Control Panel
To uninstall DRC INSIGHT using the Control Panel, select Uninstall a Program, select DRC INSIGHT
Online Learning System–DRC Online Assessments, right-click, and select Uninstall.
Start Menu
To uninstall DRC INSIGHT using the Start menu, select All Programs–DRC INSIGHT Online
Assessments–DRC INSIGHT Uninstaller and click Yes when the Windows Installer dialog box displays.
Command
To uninstall DRC INSIGHT silently, use the following command:
msiexec.exe /x DRC_INSIGHT_Setup.msi /qn

Page 80
DRC INSIGHT macOS Installation
Page 81
DRC INSIGHT DRC INSIGHT
macOS InstallationmacOS Installation
What’s Covered in This Section
This section describes the DRC INSIGHT installation process in a macOS environment. The rst part of
this section provides basic information about installing DRC INSIGHT interactively using the installation
wizard. Then, the section provides information about installing DRC INSIGHT using a software
deployment tool and uninstalling DRC INSIGHT.
Important: To make the DRC INSIGHT installation process easier, DRC recommends that you install
the COS - SD before you use the COS interface to create COS Congurations and before you install
DRC INSIGHT.
Multiple Testing Programs
If you plan to test across multiple testing programs, you can use a COS - SD and the same set of DRC
INSIGHT Testing Devices to access these programs. COS makes it easy to combine multiple testing
programs into a single COS Conguration by using COS - SDs with Content Management.
• You can install a COS - SD and DRC INSIGHT on the same computer.
For details, refer to the Technical Bulletins, Conguring a COS Service Device and DRC INSIGHT on
a Single Windows PC for Online Testing and Conguring a COS Service Device and DRC INSIGHT on
a Single macOS Computer for Online Testing on Portal site by navigating to MY APPLICATIONS–
General Information–Documents.
• You can have content for multiple testing programs on the same COS - SD.
• You can use DRC INSIGHT to access multiple testing programs from the same Testing Device.
• When you start DRC INSIGHT, a page displays that lists the testing programs from which you can
select.
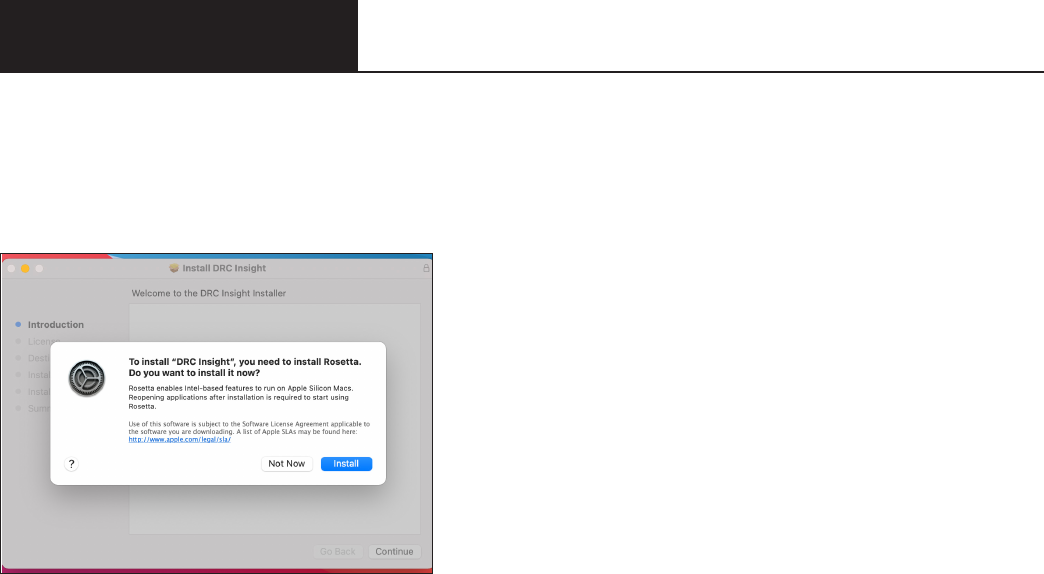
Page 82
DRC INSIGHT DRC INSIGHT
macOS InstallationmacOS Installation
Rosetta Software and DRC INSIGHT Software for macOS Devices
If you are testing using a macOS device that has an M1 chip, the Rosetta software must be installed on the
device before you install DRC INSIGHT. If the Rosetta software is not installed, during the installation
process you will be prompted to install it (see the image below).
Keep the following items in mind if you need to install the Rosetta software on your macOS device.
• Application (Intel) means that the app supports only Intel processors and needs Rosetta to work on any
macOS device with Apple Silicon processors.
• Application (Universal) means that the app supports both Apple Silicon processors and Intel processors
and uses Apple Silicon processors by default.
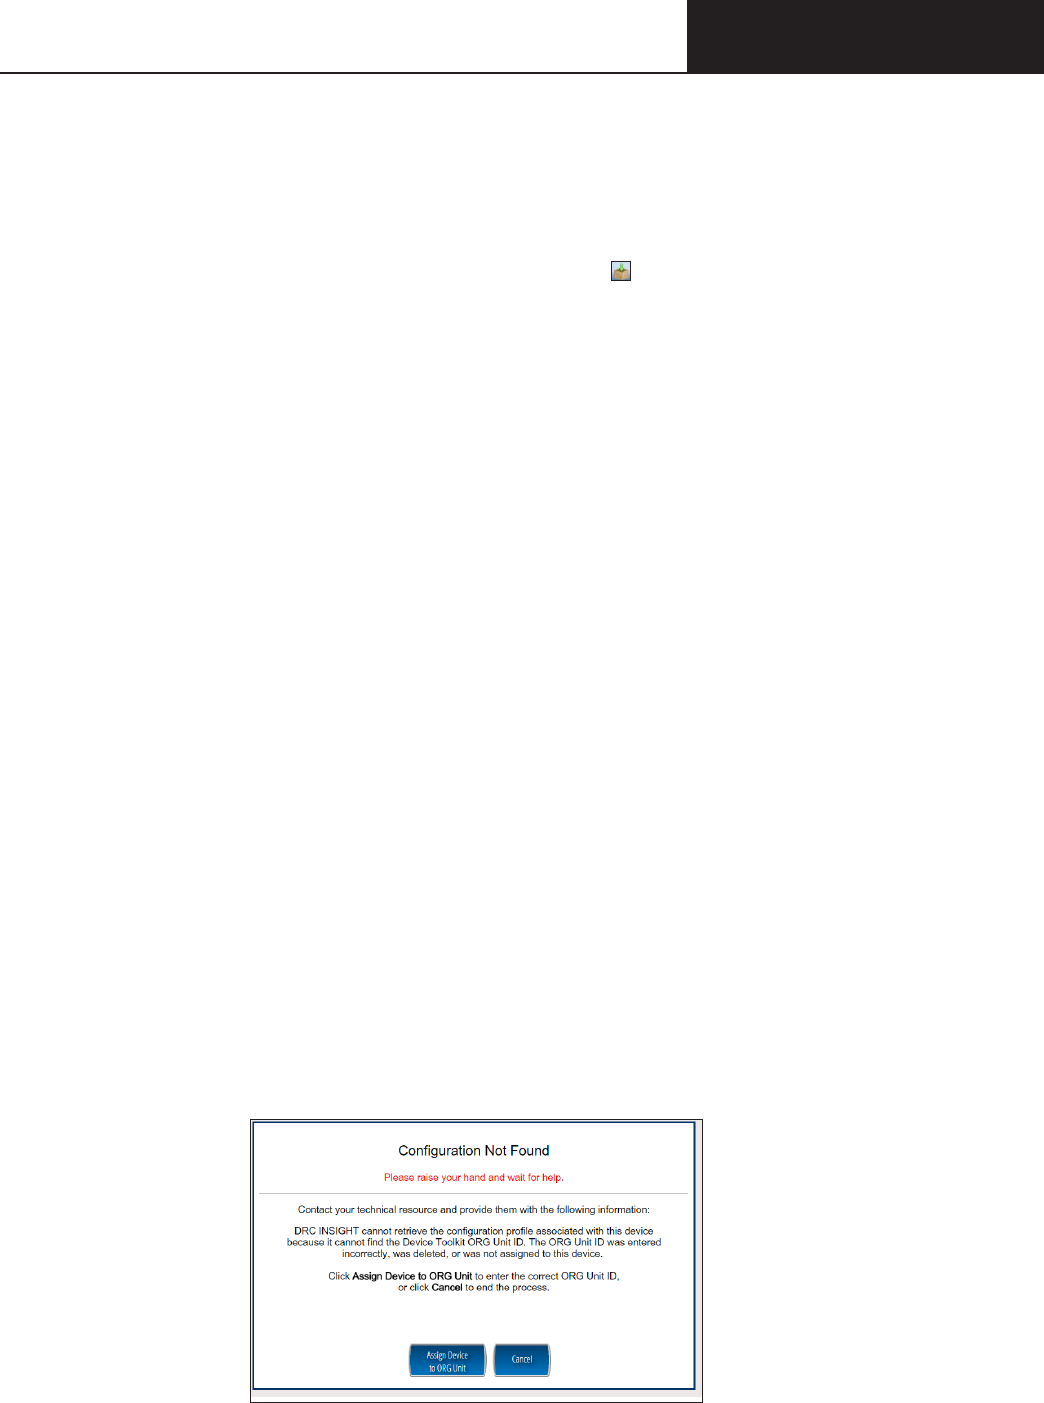
Page 83
DRC INSIGHT DRC INSIGHT
macOS InstallationmacOS Installation
Quick Tour: Installing DRC INSIGHT for macOS
This Quick Tour describes how to install DRC INSIGHT on a macOS device. DRC provides an easy-to-use
wizard to install the software.
1. Sign in to Portal site, select MY APPLICATIONS–General Information–Downloads, and click the
DRC INSIGHT macOS Installer (macOS) Download icon (
).
2. After you have downloaded the installer, click on the drc_insight_setup_xx.x.x.pkg icon to start an
installation.
Note:
• You must be a macOS System Administrator to install DRC INSIGHT.
• The actual .pkg le will include a version number. Use the version number from the .pkg le name
as the current version.
3. The Welcome screen displays for the DRC INSIGHT Online Learning System Setup Wizard. Click Next to
continue.
4. The License Agreement window displays. To continue the installation, read the agreement and select
the option I accept the terms in the License Agreement. (If you do not accept the agreement, the
installation ends.)
5. The Standard Install window displays, indicating the amount of disk space the installation will require.
Click Install.
6. The Standard Install on “Mac version” window displays. You can change the installation location or use
the default location. To use the default location, click Install.
7. After you enter your name and password and click Install Software, the installation begins.
8. During the installation, a window indicates the progress of the installation.
9. After the installation, a window indicates the status of the installation. If the installation is successful,
click Close. Otherwise, if necessary, click Go Back to change your installation options.
10. The Conguration Not Found page displays. To successfully register the Testing Device with DRC
INSIGHT, locate the Org Unit ID from the COS Conguration. When you have the Org Unit ID (you
can copy and paste it), click Assign Device to Org Unit.
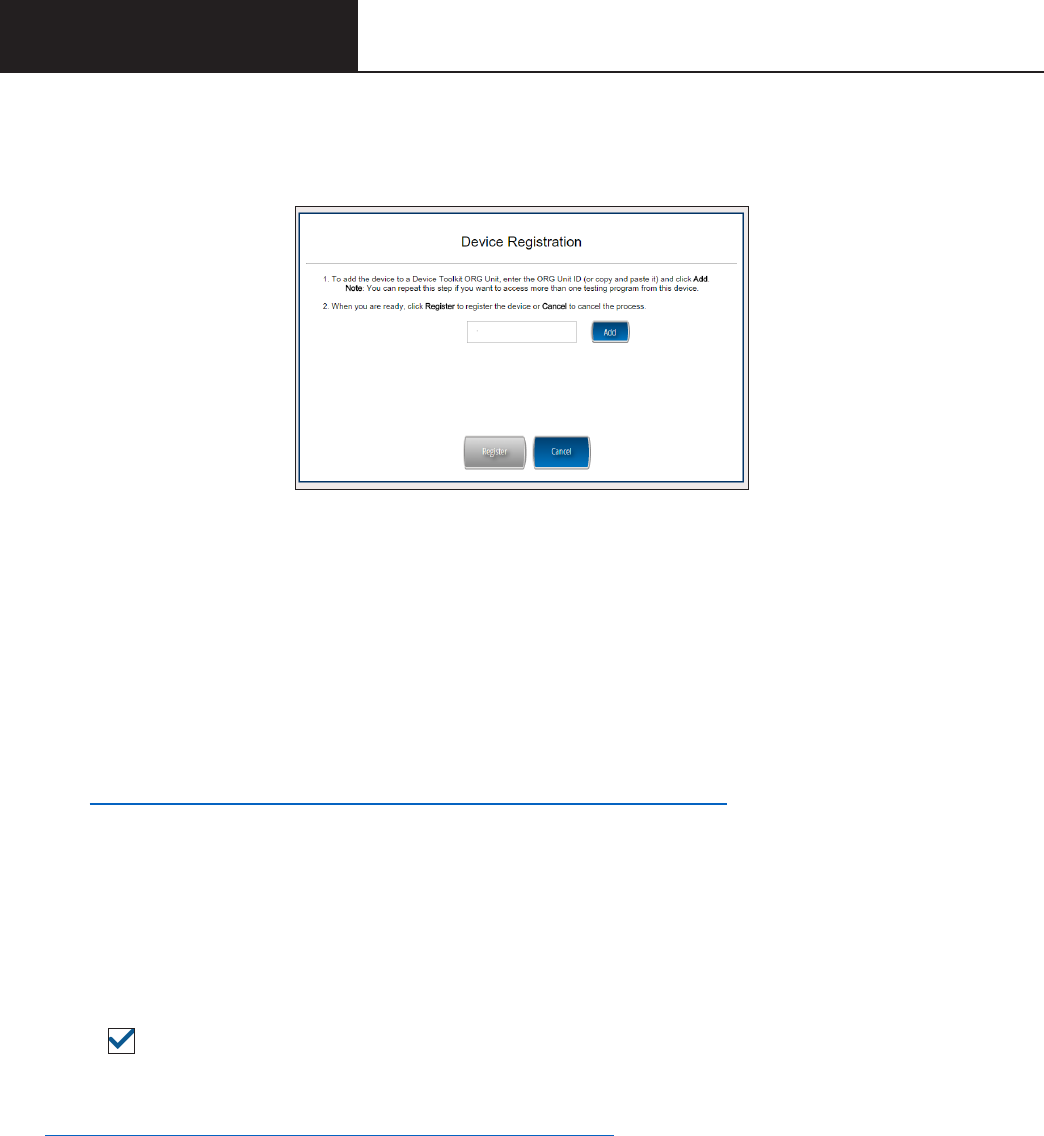
Page 84
DRC INSIGHT DRC INSIGHT
macOS InstallationmacOS Installation
11. When the Device Registration page displays, enter or paste the Org Unit ID and click Add.
When the Register button is enabled, click Register. When the Testing Device is registered, the System
Readiness Check displays for the COS Conguration’s testing program. If the COS Conguration is
associated with more than one testing program, a page displays that you can use to select your testing
program. The System Readiness check displays for the testing program you selected.
12. When the System Readiness Check launches, the System Information screen displays. You can see
details about each System Readiness Check test, execute the tests, and view the results.
Click Execute Tests to verify that the Testing Device and any COS - SDs are congured correctly.
Click Details next to any System Readiness Test to see more information about the status of the test
(see “Resolving System Readiness Check Required Tests” on page 113). When you are ready, click
Exit.
13. When the Testing Device is successfully registered with DRC INSIGHT, if a single testing program
is associated with the COS Conguration, its landing page displays. If multiple testing programs are
associated with the COS Conguration, a page displays that you can use to select the testing program.
After you make your selection, the landing page displays.
Within the DRC INSIGHT App, you can sign in to the System Readiness Check by clicking the check
mark ( ) in the lower-left side and entering 7745, the System Readiness Check Access Code. The
System Readiness Check veries that the testing computer has sucient screen resolution, Internet
connectivity, memory (RAM), and other technical specications needed to perform online testing (see
“What the System Readiness Check Displays” on page 109).
14. After installation, launch the application from the Launchpad, via Spotlight, or from the Applications
folder, and sign in to the Test Practice, try the Test Demo, view sample test items, sign in to the Online
Tools Training (OTT), or test using your DRC INSIGHT log-in information
123456789
Quick Tour: Installing DRC INSIGHT for macOS (cont.)

Page 85
DRC INSIGHT DRC INSIGHT
macOS InstallationmacOS Installation
Managing DRC INSIGHT
This section describes how to install DRC INSIGHT using a software deployment tool, how to start and
stop DRC INSIGHT, and how to uninstall DRC INSIGHT.
After installing DRC INSIGHT, start DRC INSIGHT to register the Testing Device with its COS
Conguration. (You can do this automatically using a script or device management software, or you can do
this manually.)
Important: Register the device before applying any desktop protection software, such as Deep Freeze,
to avoid having the device re-register with the COS Conguration every time DRC INSIGHT is launched.
Installing DRC INSIGHT Using a Software Deployment Tool
The following example shows how to install DRC INSIGHT on a macOS device using the Apple Remote
Desktop software.
Note: The Apple Remote Desktop software is used for this example, but the process is similar with other
software deployment tools.
1. If there is an old version of DRC INSIGHT, remove the old version and install and congure the DRC
INSIGHT Secure Application on the computer from which you will be distributing the software (see
“Quick Tour: Installing DRC INSIGHT for macOS” on page 83).
Important: To ensure that testers can access the correct le folders on the testing computers, you may
need to adjust the permissions on the le folders you will be copying before you distribute them to the
testing computers.
2. Start the Apple Remote Desktop software and select the following directory in a Copy Items window
from the Apple Remote Desktop administrator’s computer.
/Applications/DRC INSIGHT Online Assessments
Note: You may need to adjust the destination locations and permissions depending on testers’
permissions.
3. Copy the le folders to your list of destination computers.
4. Verify the installation by running the System Readiness Check on the computers on which you installed
the software.

Page 86
DRC INSIGHT DRC INSIGHT
macOS InstallationmacOS Installation
Starting DRC INSIGHT
You can start DRC INSIGHT on a testing computer by using the Launchpad, via Spotlight, or from the
Applications folder by double-clicking Applications–DRC INSIGHT Online Assessments–DRCInsight
Online Assessments.app.
Stopping DRC INSIGHT
If DRC INSIGHT becomes unresponsive, you can stop it using the key combination, Command–Q.
Uninstalling DRC INSIGHT
You can uninstall DRC INSIGHT using the Applications folder by double-clicking Applications–DRC
INSIGHT Online Assessments–DRC Uninstaller.app. Click Ye s when the Warning dialog box displays,
enter your Mac Administrator login information, and click OK. The process automatically uninstalls the
program.
Note: You can also run the uninstall process silently.

Page 87
DRC INSIGHT Linux Installation
Page 88
DRC INSIGHT Linux DRC INSIGHT Linux
InstallationInstallation
What’s Covered in This Section
This section describes the DRC INSIGHT installation process in a Linux environment. The rst part of
this section provides basic information about installing DRC INSIGHT interactively using the installation
wizard. Then, the section provides information about installing DRC INSIGHT from a terminal or a
command line, and information about uninstalling DRC INSIGHT with the Synaptic Package Manager or
by command.
Note: You should be familiar with Linux concepts such as terminal mode/session/window, the Synaptic
Package Manager software, and the Ubuntu Software Center. For any commands entered from a Linux
terminal session, the combination of backslash space (\ ) indicates a space.
Important: To make the DRC INSIGHT installation process easier, DRC recommends that you install
the COS - SD before you use the COS interface to create COS Congurations and before you install DRC
INSIGHT.
Installation Prerequisite
The Gnome desktop environment is required to install DRC INSIGHT on a Linux computer (see “Installing
the GNOME Desktop Environment” on page 90).
Multiple Testing Programs
If you plan to test across multiple testing programs, you can use a COS - SD and the same set of DRC
INSIGHT Testing Devices to access these programs. COS makes it easy to combine multiple testing
programs into a single COS Conguration by using COS - SDs with Content Management.
• You can install a COS - SD and DRC INSIGHT on the same computer.
• You can have content for multiple testing programs on the same COS - SD.
• You can use DRC INSIGHT to access multiple testing programs from the same Testing Device.
• You can access the dierent testing programs using the same DRC INSIGHT desktop shortcut. When
you start DRC INSIGHT, a page displays that lists the testing programs from which you can select.

Page 89
DRC INSIGHT Linux DRC INSIGHT Linux
InstallationInstallation
Installing 32-bit Java Libraries
Important: On some 64-bit Linux systems, you must install the 32-bit Java libraries for the DRC
INSIGHT installation program to run. To install these libraries, enter the following commands from a
terminal session.
sudo ‑i
cd /etc/apt/sources.list.d
echo “deb http://old-releases.ubuntu.com/ubuntu/ raring main restricted universe multiverse”
>ia32‑libs‑raring.list
apt‑get update
apt‑get install ia32‑libs
If the apt-get install ia32-libs command fails, enter the following commands.
sudo dpkg ‑‑add‑architecture i386
sudo apt‑get update
sudo apt‑get install ia32‑libs

Page 90
DRC INSIGHT Linux DRC INSIGHT Linux
InstallationInstallation
Installing the GNOME Desktop Environment
The GNOME desktop environment is required before you can install DRC INSIGHT on a Linux computer.
Follow these steps to install the GNOME desktop environment.
1. Press Ctrl+Alt+T to open a terminal window.
2. Type the following commands at the prompt and press Enter. The rst command (before the semicolon)
updates Ubuntu. The second command installs the GNOME desktop environment.
sudo apt‑get update; sudo apt‑get install gnome‑session‑fallback
3. Type your password and press Enter.
4. The installation progress displays, including a message that indicates how much disk space is used for
GNOME. When asked if you want to continue, type y and press Enter.
5. When the installation is complete, at the prompt type exit and press Enter to close the terminal window.
6. Click the upper-right corner of the screen to display the System menu. Select Log Out to end the
session.
7. On the Login screen, click the Ubuntu icon.
8. A list of available desktop environments displays. Select the GNOME Flashback option for Metacity.
9. The Login screen displays. Enter your password and press Enter to log in. After successfully logging in
to GNOME, you can begin installing DRC INSIGHT on the computer.
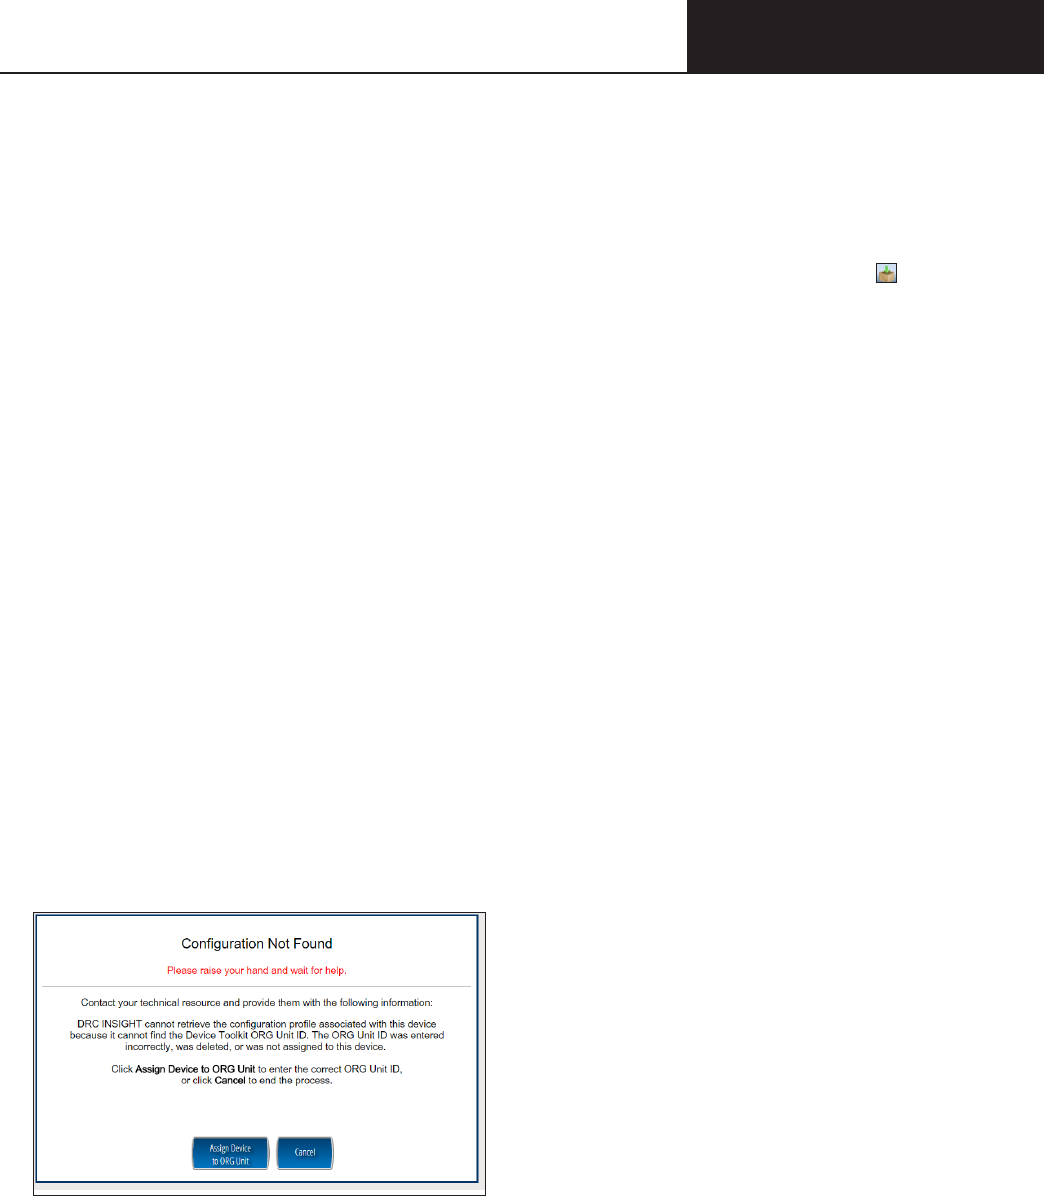
Page 91
DRC INSIGHT Linux DRC INSIGHT Linux
InstallationInstallation
Quick Tour: Installing DRC INSIGHT for Linux
This Quick Tour describes how to install DRC INSIGHT for Linux. DRC provides an easy-to-use wizard to
install the software. In a Linux environment, you use the Ubuntu Software Center to run the wizard.
1. To launch the wizard and start the installation, sign in to Portal site, select MY APPLICATIONS–
General Information–Downloads, and click the DRC INSIGHT Linux Installer icon ( ) to download
the DRC INSIGHT setup le, DRC_INSIGHT_Setup_amd64.deb (for 64-bit versions of Linux), to the
Downloads directory on your testing computer.
2. The Opening DRC_INSIGHT_Setup_amd64.deb dialog box displays.
Select Open with Ubuntu Software Center (default) if it is not selected and click OK.
Note: Some browsers do not display a dialog box and download the installation le directly.
3. When the Ubuntu Software Center window displays, click Install.
4. The Authenticate dialog box displays. Select your username from the drop-down menu, enter your
password, and click Authenticate.
5. The DRC License Agreement window displays. Check the I accept the license agreement checkbox
and click Forward. The DRC INSIGHT installation starts.
6. While DRC INSIGHT is installing, a window indicates the status of the installation.
7. After DRC INSIGHT is installed, navigate to the directory where you installed it and double-click the
DRC INSIGHT Online Assessments icon to start DRC INSIGHT and register the Testing Device.
8. The Conguration Not Found page displays. To successfully register the Testing Device, locate the Org
Unit ID from the COS interface. When you have the Org Unit ID (you can copy and paste it from the
COS interface), click Assign Device to Org Unit.
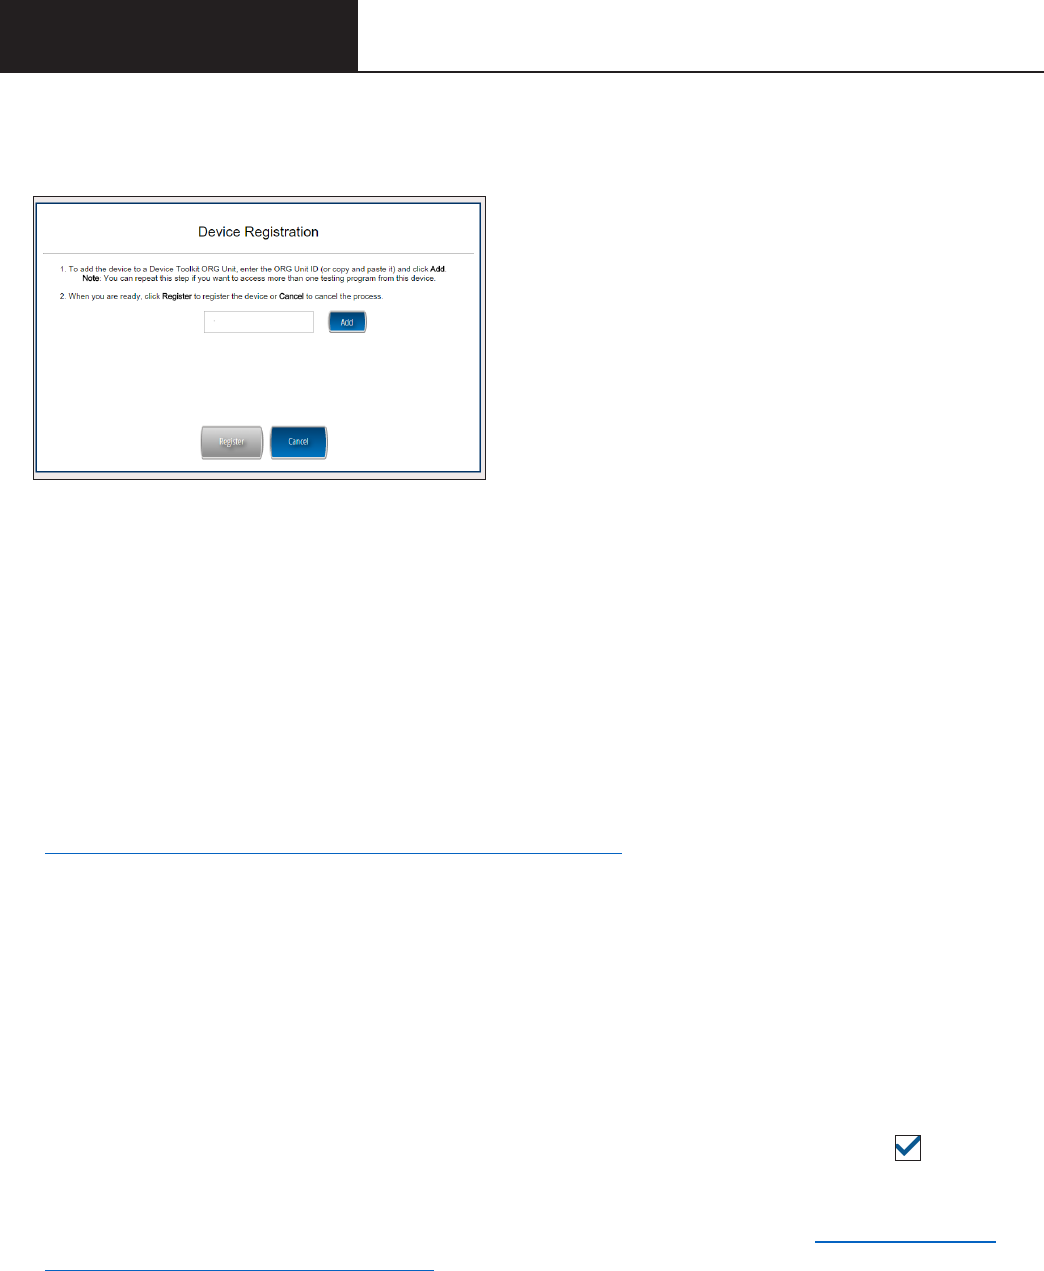
Page 92
DRC INSIGHT Linux DRC INSIGHT Linux
InstallationInstallation
Quick Tour: Installing DRC INSIGHT for Linux (cont.)
9. When the Device Registration page displays, enter the Org Unit ID (or copy and paste it) and click Add.
When the Register button is enabled, click Register. When the Testing Device is registered, the System
Readiness Check for the COS Conguration’s testing program displays.
Note: If the COS Conguration points to more than one testing program, a page displays that you can
use to select your testing program. The System Readiness Check displays for the testing program you
selected.
10. When the System Readiness Check launches, the System Information screen displays. You can see
details about each System Readiness Check test, execute the tests, and view the results.
Click Execute Tests to verify that the Testing Device and any COS - SDs are congured correctly.
Click Details next to any test to see more information about the test (see
“The System Readiness Check Required Tests” on page 112). When you are ready, click Exit.
11. Conrm that the Testing Device is successfully registered with DRC INSIGHT. When the Testing
Device is registered, one of two pages displays:
If you congured a single testing program, the landing page displays. If you congured more than one
testing program, a page displays that you can use to select the testing program. After you make your
selection, the landing page displays.
Within the DRC INSIGHT App,
In addition, you can sign in to the System Readiness Check by clicking the check mark ( ) in the
lower left side and entering 7745, the System Readiness Check Access Code. The System Readiness
Check veries that the testing computer has sucient screen resolution, Internet connectivity, memory
(RAM), and other technical specications needed to perform online testing (see “What the System
Readiness Check Displays” on page 109).
123456789
Page 93
DRC INSIGHT Linux DRC INSIGHT Linux
InstallationInstallation
Managing DRC INSIGHT
This section describes how to install DRC INSIGHT using terminal mode or a command line, and how to
uninstall DRC INSIGHT with the Synaptic Package Manager or by command.
After installing DRC INSIGHT, start DRC INSIGHT to register the device with its COS Conguration.
(You can do this automatically by using a script or device management software, or manually.)
Important: Register the device before applying any desktop protection software, such as Deep Freeze,
to avoid having the device re-register with the COS Conguration every time DRC INSIGHT is launched.
Installing DRC INSIGHT Using Terminal Mode
To install DRC INSIGHT in terminal mode, do the following:
1. Sign in to Portal site, select MY APPLICATIONS–General Information–Downloads. When the
Test Setup General Information page displays, click on the Linux Installer icon to download the DRC
INSIGHT setup le, DRC_INSIGHT_Setup_amd64.deb (for 64-bit machines), to your testing computer.
Note: Depending on the web browser you are using, a pop-up window may display. If it does, click
Save File. Other browsers automatically download the installation le to your Downloads directory.
2. Open a terminal session and navigate to your Downloads directory.
3. Enter the command sudo dpkg -i DRC_INSIGHT_Setup_amd64.deb and press Enter.
4. Tab to the Yes eld under I accept the license agreement and press Enter.
Installing DRC INSIGHT from a Command Line
The DRC INSIGHT installation places a silent install shell script (silent_installer.sh) in the Install directory.
You can use the silent_installer.sh le to silently install DRC INSIGHT in a Linux environment. Move the
silent_installer.sh le to the directory where the DRC INSIGHT installation le is located.
Installation Command Syntax and Example
The following is the syntax for the install program command:
silent_installer.sh <properties>
The following is an example of the command you would run using the terminal from the folder in which
both the installation le and the silent_installer.sh le are located. In this example, we install the software in
silent mode, pointing to Org Unit 123456789.
sudo ./silent_installer.sh ‑o 123456789

Page 94
DRC INSIGHT Linux DRC INSIGHT Linux
InstallationInstallation
Uninstalling DRC INSIGHT Using the Synaptic Package Manager
The Synaptic Package Manager is a graphic Linux tool to help you uninstall and remove software packages.
You can install the Synaptic Package Manager by using the Ubuntu Software Center. Follow these steps to
uninstall DRC INSIGHT.
1. Start the Synaptic Package Manager by clicking the Synaptic Package Manager icon in Applications.
2. From the Synaptic Package Manager, search for the string drc in the Quick Filter window.
3. Select drc-insight and right-click. In the drop-down menu, select Mark for Complete Removal.
4. A red icon with a white x inside it displays next to drc-insight. On the Synaptic Package Manager
toolbar, click Apply.
5. The Apply the following changes? dialog box displays. Select To be completely removed (including
conguration les) and click Apply.
6. The Synaptic Package Manager uninstalls DRC INSIGHT.
Uninstalling DRC INSIGHT Manually
In a Linux environment, the command line tool for adding, removing, and updating software packages is
apt-get. To remove DRC INSIGHT, you can use the following command in terminal mode:
sudo apt-get remove drc-insight
Note: After you have uninstalled DRC INSIGHT, you can remove any remaining les or folders by using
the rm command (see below). If you have any questions, please contact DRC Customer Service.
Cleanup
The Linux apt-get uninstall command may leave les behind, such as the drcconguration.json le. If this
le still exists when you attempt a new installation, the settings for the new installation will not take eect.
Use the following command from a Linux terminal session to fully uninstall DRC INSIGHT and remove its
les.
sudo rm –rf /opt /\ DRC\ Online\ Assessments/
Note: For commands entered from a Linux terminal session, the combination of backslash space (\ )
indicates a space.

Page 95
Installing DRC INSIGHT on iPad
Devices
Page 96
Installing DRC INSIGHT Installing DRC INSIGHT
on iPad Deviceson iPad Devices
What’s Covered in This Section
This section describes the process of installing DRC INSIGHT for iPad devices in an iOS or iPadOS
environment. It provides detailed information about installing DRC INSIGHT and registering it to work
with COS.
DRC INSIGHT and the Apple App Store
Important: The DRC INSIGHT App (the INSIGHT App) for iPads is available from the
Apple App Store.
Distributing and Registering DRC INSIGHT
There are two main parts to the process of installing DRC INSIGHT on an iPad device to test with the DRC
INSIGHT App: distribution and registration.
• To distribute (deploy) the DRC INSIGHT App, you have two options:
• You can assign the DRC INSIGHT App using Managed distribution, Mobile Device Management
(MDM) software and the Apple Volume Purchase Program.
• You can download the DRC INSIGHT App from the Apple App Store directly from an iPad.
• MDM software can secure, monitor, manage, and support mobile devices deployed across mobile
operators, service providers, and enterprises.
• To register the iPad to work with DRC INSIGHT and COS - SDs, you have two options:
• If your MDM software supports the Managed App Configuration feature, you can use the MDM
software to deploy the DRC INSIGHT configuration to register your iPad automatically. Y
ou can
centrally configure multiple iPad devices using the MDM software. This is the preferred method of
distributing the same configuration file to multiple iPads. It is easier and introduces fewer errors to
register multiple iPads automatically than to manually register each iPad device.
• If your MDM software does not support the Managed App Configuration feature (or you did not use
MDM software to download the INSIGHT App), you can use the MDM software to distribute the
DRC INSIGHT App to multiple iPad devices, but you must manually register each iPad to the COS
Configuration.

Page 97
Installing DRC INSIGHT Installing DRC INSIGHT
on iPad Deviceson iPad Devices
Cross-Website Tracking
Important: For all iPad devices, the Cross-Website Tracking settings must be enabled on the device
after DRC INSIGHT is installed.
To manually enable Cross-Website Tracking, perform the following steps on each iPad
To enable Cross-Website Tracking, perform the following steps on each iPad:
1. Navigate to Settings.
2. Tap DRC INSIGHT.
3. Toggle Allow Cross-Website Tracking to on.
Preparing iPads for Testing
The following is a summary of the process of installing and registering DRC INSIGHT on multiple iPads
using MDM software. This summary assumes that you have already installed and set up the MDM software
and have registered all the iPads using MDM software.
Note: Some sub-steps are included in the event that you are not using MDM software.
Important: There are many versions of MDM software. To deploy and register your DRC INSIGHT
iPad software automatically, your MDM software must support the Managed App Conguration feature.
This feature is necessary to perform step 1a. Otherwise, after you deploy DRC INSIGHT, you must register
each iPad manually.
The process of manually installing and registering the DRC INSIGHT App is not recommended. Because it
is both time-consuming and labor-intensive, this approach is only practical for testing with a small number
of iPads. For more information, see the Assessment with iPad document.
1. Deploy DRC INSIGHT
A. With a Conguration File
In your application deployment, choose the DRC INSIGHT App in the Apple App Store and locate
the conguration le (ios.plist) you created using the COS interface (see Volume II: Central Oce
Services [COS]).
Deploy the DRC INSIGHT executable and conguration les to your iPads using your MDM
software.
B. Without a Conguration File
In your application deployment, choose the DRC INSIGHT App in the Apple App Store and deploy
it to your iPads using your MDM software.

Page 98
Installing DRC INSIGHT Installing DRC INSIGHT
on iPad Deviceson iPad Devices
Preparing iPads for Testing (cont.)
Preparing the iPad for Testing without MDM Software
To install and register the DRC INSIGHT App manually on a single iPad without MDM software, as part
of step 1b, manually download the DRC INSIGHT App from the Apple App Store by performing the
following steps:
C. On the iPad, launch the Apple App Store.
D. Search for DRC INSIGHT.
E. When you locate the DRC INSIGHT App, select Get to download it.
2. Pair an External Keyboard
To use an external keyboard, manually pair each iPad with an external keyboard.
Note: Both wired and wireless keyboards are supported for testing.
3. Launch the DRC INSIGHT App
DRC INSIGHT is automatically placed in Assessment Mode regardless of whether you use MDM
software to deploy it. When DRC INSIGHT launches, you are prompted to lock DRC INSIGHT in
Assessment Mode. Select Yes for Assessment Mode. If you select No, DRC INSIGHT closes.
A. With a Conguration File
When you launch DRC INSIGHT, the iPad is automatically registered with a COS Conguration. If
a single testing program is congured, the DRC INSIGHT landing page displays. If multiple testing
programs are congured, you can select one from the list.
B. Without a Conguration File
When you launch DRC INSIGHT, the iPad is not automatically registered with a COS Conguration.
A eld displays that requests the Org Unit ID for the device. Enter the Org Unit ID in the eld and
click Save to register the iPad. If a single testing program is congured, the DRC INSIGHT landing
page for that assessment displays. If multiple testing programs are congured, you can select one
from a list.
Page 99
Installing DRC INSIGHT Installing DRC INSIGHT
on iPad Deviceson iPad Devices
Viewing the DRC INSIGHT Conguration on an iPad
Perform the following steps on an iPad to start the System Readiness Check and view the iPad’s DRC
INSIGHT conguration.
1. Press DRC INSIGHT to start DRC INSIGHT.
2. When DRC INSIGHT displays, press the System Readiness Check check mark link [ ] in the lower
left corner and enter 7745, the four-digit System Readiness Check access code, to display the System
Information page. You can view your DRC INSIGHT conguration information (read-only) from this
page.
Note: Within the DRC INSIGHT App, you can try the Online Tools Training (OTT) and sign in to take a
test.
3. Click Execute Tests to verify that the iPad is ready for testing. If there are errors, you must resolve them
and repeat steps 2 and 3. To make conguration changes, you must use the COS interface.
4. If your iPad is ready for testing, click Exit. To use an external Bluetooth
keyboard, pair the iPad with a
keyboard and relaunch the DRC INSIGHT App.
iPad Timeout Issue Due to Content & Privacy Restrictions
Important: Some iPad testers have experienced a timeout that can occur when an iPad is congured
with Content & Privacy Restrictions enabled. In this situation, specic settings on the iPad may be
blocking test content from DRC. Note that this iPad ltering is dierent from any network ltering that may
be in place.
To correct this problem, perform the following tasks on the iPad.
1. Navigate to Settings.
2. Tap Screen Time.
3. Tap Content & Privacy Restrictions.
4. Tap Content Restrictions.
5. Tap Web Content.
6. If Limit Adult Websites or Allowed Websites Only is checked, under ALWAYS ALLOW, tap Add
Website and add each of the following websites to the list:
• wbte.drcedirect.com
• drc-centraloce.com
• drcedirect.com
7. Tap Save and restart the iPad.
Note: If multiple iPads are congured with Content & Privacy Restrictions enabled, this updated
conguration can be “pushed” to multiple iPads at once by using MDM software. For detailed information,
refer to your MDM software documentation.

Page 100
Installing DRC INSIGHT on
Chrome OS Devices

Page 101
Installing DRC INSIGHT Installing DRC INSIGHT
on Chrome OS Deviceson Chrome OS Devices
What’s Covered in This Section
This section describes the DRC INSIGHT installation and conguration process for Chrome OS devices. It
provides detailed information about installing DRC INSIGHT and conguring it using the COS interface.
DRC provides the COS interface software that you can use to congure and install COS - SDs with the
Chrome OS devices in your environment. You use this software after you have registered your Chrome OS
with your Google domain account (for more information about registering Chrome OS devices, see
https://support.google.com/a/answer/182433).
Setting Up DRC INSIGHT on Chrome OS Devices
The following is an overview of the process of installing, conguring, deploying, and registering DRC
INSIGHT on your Chrome OS devices. You set up COS Congurations using the COS interface, generate a
chromeos.json le, and install and deploy DRC INSIGHT. When you start DRC INSIGHT, the Chrome OS
device is registered with DRC INSIGHT through the COS Conguration.

Page 102
Installing DRC INSIGHT Installing DRC INSIGHT
on Chrome OS Deviceson Chrome OS Devices
DRC INSIGHT Installation Overview
To test using DRC INSIGHT, you can connect to a COS - SD for hosting and other functions. The following
is a brief overview of the process of installing DRC INSIGHT and conguring a Chrome OS device.
1. To use a COS - SD, install one or more COS - SDs on desktop or laptop computers that have static IP
addresses (if you use the machine’s IP address to connect to the COS - SDs) and will be available around
the clock.
2. Sign in to Portal site using a supported browser (see Volume II: Central Oce Services [COS]) and use
the Central Oce Services link to start COS.
3. Use the URL DRC provides to install the DRC INSIGHT App on your Chrome OS devices from the
Google administration website.
4. Using Chrome management, upload the chromeos.json le that you generated from the COS interface.
5. Launch INSIGHT on the Chrome OS device. Run the System Readiness Check to verify that the
Chrome OS device can connect to the COS - SD and is ready for testing. If necessary, use the COS
interface to recongure the COS Conguration, and restart the DRC INSIGHT software to update the
Chrome OS device’s COS Conguration.
6. Test the congurations and monitor the log les for issues.
Chrome OS Devices and COS - SD Software
A COS - SD is used primarily to host and manage test content. For various reasons, Chrome OS devices do
not provide a suitable environment for a COS - SD. As a result, you should install the COS - SD software on
a Windows PC, Mac (macOS) computer, or Linux machine (see Volume II: Central Oce Services [COS])
and connect to the COS - SD when you install DRC INSIGHT on the Chrome OS device.
Important: Verify that the maximum number of Chrome OS devices in any Chrome management
subgroup does not exceed the COS - SD maximum for your COS Conguration. If you attempt to test with
more than the maximum number of devices, the results will be unpredictable.
For more information, see the latest version of the DRC INSIGHT System Requirements at Portal site by
navigating to MY APPLICATIONS–General Information–Documents and clicking View System
Requirements.
Multiple Testing Programs
You can use DRC INSIGHT to access multiple testing programs from the same device. You can access these
testing programs using the same DRC INSIGHT desktop shortcut. When you start DRC INSIGHT, a page
displays that lists the dierent testing programs from which you can select.
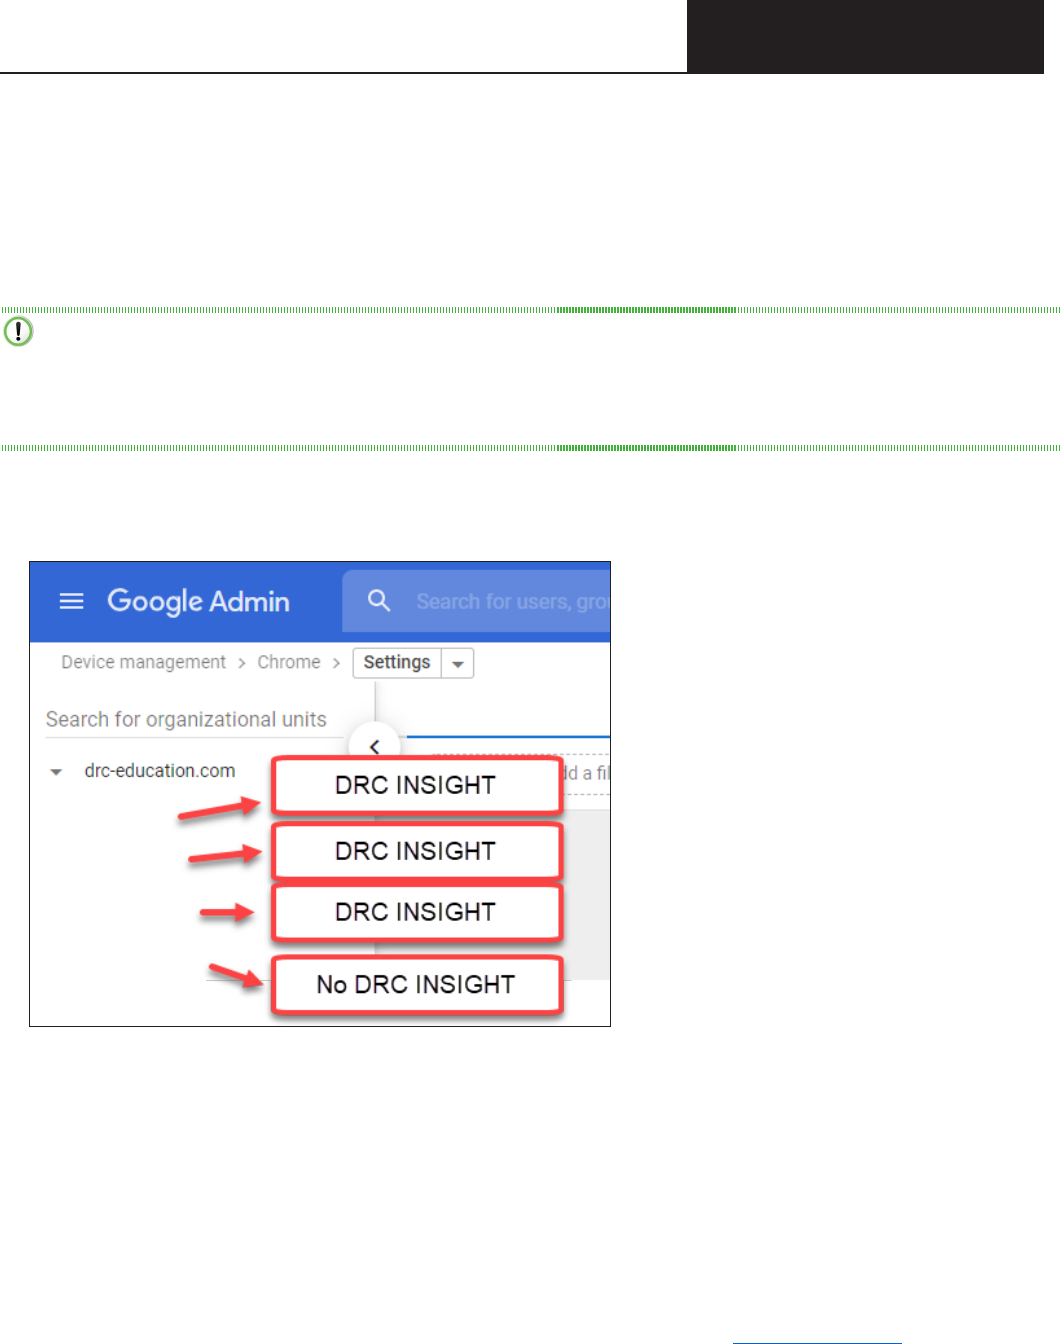
Page 103
Installing DRC INSIGHT Installing DRC INSIGHT
on Chrome OS Deviceson Chrome OS Devices
Example of Chrome OS Device Setup and Conguration for DRC INSIGHT
The following is a high-level example of how to set up a Chrome OS device environment in Google to
complement DRC INSIGHT and Single App Kiosk Mode. DRC assumes that users have registered their
Chrome OS devices within the Google Admin Console as part of their initial implementation. For secure
testing, Google species that users must get Chrome device management software for each Chrome device
and enroll each Chrome device in the school’s domain.
Important: The instructions in this section assume that you have already set up your Chrome
environment using the Chrome device management software. The details of this process are outside the
scope of this guide. For more information, see https://support.google.com/chrome/a and Chrome OS Device
Questions in Volume IV: Troubleshooting.
1. Log in to your Google Admin account at http://admin.google.com.
2. Identify which organizations or sub-organizations should have DRC INSIGHT (see below).
3. Enroll Chrome OS devices and identify each device by the device’s serial number. You can add notes to
help identify each device (see the example with notes below).
Device Serial Number YH4B922AB01005R
Notes: Chrome OS device assigned to Sample School, Grade 4, Asset number 12345
4. Move the Chrome OS devices to the appropriate sub-organizations.
Note: Remember, the Google device administration organizations (i.e., organization units) are not the
same as the COS interface Org Units, and a Chrome OS device’s serial number is not the same as the
Chrome OS Device ID that COS creates for the Chrome OS device (see COS Online Help).
Teachers
K-6 Students
7-12 Students
Sta - General

Page 104
Installing DRC INSIGHT Installing DRC INSIGHT
on Chrome OS Deviceson Chrome OS Devices
Quick Tour: Installing and Deploying the DRC INSIGHT Secure App to
Chrome Devices
This Quick Tour describes how to install the DRC INSIGHT App on one or more Chrome devices using
COS and the updated Chrome management in the Google Admin Console.
Important:
• You must
have set up and congured your Chrome environment in the Google Admin Console to
complement DRC INSIGHT Secure App and Single App Kiosk Mode.
• If you plan to use Chrome devices that were previously registered with a COS Conguration and the
COS Conguration and Device ID are still applicable, you do not need to follow this process and
re-register your Chrome OS devices with COS. When DRC INSIGHT is launched, it will locate the
Device ID from the COS Conguration and use the associated COS Conguration.
• If you want the Chrome testing devices to automatically connect to a COS Conguration, download
the chromeos.json le information from the appropriate COS Conguration’s Deployment tab (for
more details, refer to the COS Online Help.) You will need this information for Step 22.
1. Deploy the DRC INSIGHT COS Congurations to each Chrome device being used for testing using
COS. To start the COS application and register the Chrome device, sign in to Portal site and select MY
APPLICATIONS–Central Oce Services.
The COS application displays in your browser. Use this application to create COS Congurations to
group, organize, and categorize your Chrome devices for testing. For each device, identify its COS
Conguration. When you launch the device, it uses the settings identied for the COS Conguration to
which the device is assigned (see COS Online Help).
2. Select a Testing Program from the drop-down menu and a site (district or school) using the eld. The
COS Dashboard displays (see COS Online Help).
3. In a new window, or new tab, log in to https://admin.google.com with an administrator prole.
4. Select Devices.
5. Select Chrome.
6. Select Settings.
7. Select Device.
8. Under Device settings, the Google Parent and Child organizational units are displayed on the left side of
the page. Select the proper organization level from the ORGANIZATIONS list to be able to deploy the
DRC INSIGHT App to everyone who will use it for testing.
• Option A - DRC INSIGHT Secure App can be added to the parent organization resulting in it being
added to all Chrome testing devices in each of the child organizations. Use this approach if all
testing devices are in the same COS conguration with the same COS Org Unit ID.
• Option B - DRC INSIGHT Secure App can be added to a specic child organization. Use this
approach if the Chrome testing devices in each of the child organizations use a dierent COS
Conguration with dierent COS Org Unit ID.

Page 105
Installing DRC INSIGHT Installing DRC INSIGHT
on Chrome OS Deviceson Chrome OS Devices
9. Verify that the following settings are selected within Device Settings:
• Under Sign-In settings, verify that User data is set to Do not erase local user data.
• Under Device update settings, verify that Release channel is set to Stable channel.
• Under Keyboard Language verify that US keyboard is selected.
Important: This setting prevents development or beta versions of software from being distributed to your
Chrome devices during a Google Chrome update process.
• Under Kiosk settings, verify that Managed guest session is set to Do not allow managed guest sessions.
10. Under Kiosk settings, click the apps & extensions page link.
11. Scroll to the bottom of the page and hover over the yellow, circle “+” button.
12. Hover over and click the top icon—Add Chrome app or extension by ID.
13. Click the drop-down menu and select From a custom URL.
14. Enter DRC’s Universal Extension ID: nickmpjdfebcopckkfjmblnmijbiom
Note: The DRC Universal Extension ID is replacing client-specic IDs and must be used for all testing
starting in the 2020–21 school year. For more information, see the Technical Bulletin Adding the INSIGHT
Universal Chrome OS Device App ID on Portal site by navigating to MY APPLICATIONS–General
Information–Documents.
15. Enter the following URL: https://clients2.google.com/service/update2/crx
16. Click Save.
17. Search for the newly installed DRC INSIGHT Secure App using DRC’s Universal Extension ID.
18. Verify that Auto-launch app is set to None.
19. Click the installed App to open the Kiosk Settings window.
20. Verify that Allow App to Manage Power is turned o.
21. Verify that Allow Virtual Keyboard is turned o.
22. Chose what to do now based on whether you want the Chrome testing devices to automatically connect to a
COS Conguration.
• If you do not want the device to automatically connect to a COS Conguration, leave the Policy for
extensions eld blank (the default value).
• If you want the devices to automatically connect to a COS Conguration, copy and paste the
chromeos.json le information that you downloaded from the appropriate COS Conguration’s
Deployment tab into the Policy for extensions eld.
23. Click Save. The DRC INSIGHT Secure App for ChromeOS will be installed as a Kiosk application the next
time the policy is reloaded, based on your site’s settings.
Quick Tour: Installing and Deploying the DRC INSIGHT Secure App to
Chrome Devices (cont.)

Page 106
Installing DRC INSIGHT Installing DRC INSIGHT
on Chrome OS Deviceson Chrome OS Devices
Using the System Readiness Check on a Chrome OS Device
When you start the System Readiness Check on a Chrome OS device, the Device ID and Org Unit ID
display in the header elds on the System Information page.
• The Chrome OS device’s Device ID displays in the Testing Device ID eld.
• The district and school in which the Chrome OS device is registered display in the Location eld.
• The Chrome OS device’s COS Org Unit ID displays in the COS Org Unit ID eld.

Page 107
The System Readiness Check

Page 108
The System The System
Readiness CheckReadiness Check
What’s Covered in This Section
This section discusses how to use the System Readiness Check to help you troubleshoot issues that might
occur when DRC INSIGHT is being installed or when DRC INSIGHT is running.
The System Readiness Check is installed when you install DRC INSIGHT, and it performs a series of tests
you can use to easily diagnose and prevent or correct most errors. It veries that a Testing Device meets all
the necessary hardware and software requirements for testing, indicates any checks that the Testing Device
failed, and provides suggestions for success.
Starting the System Readiness Check
To start the System Readiness Check from a device, do the following:
1. Start DRC INSIGHT on the device.
2. When the main DRC INSIGHT testing page displays, click the check mark ( ) in the lower-left corner
of the page.
3. When you are prompted, enter 7745, the four-digit System Readiness Check access code.
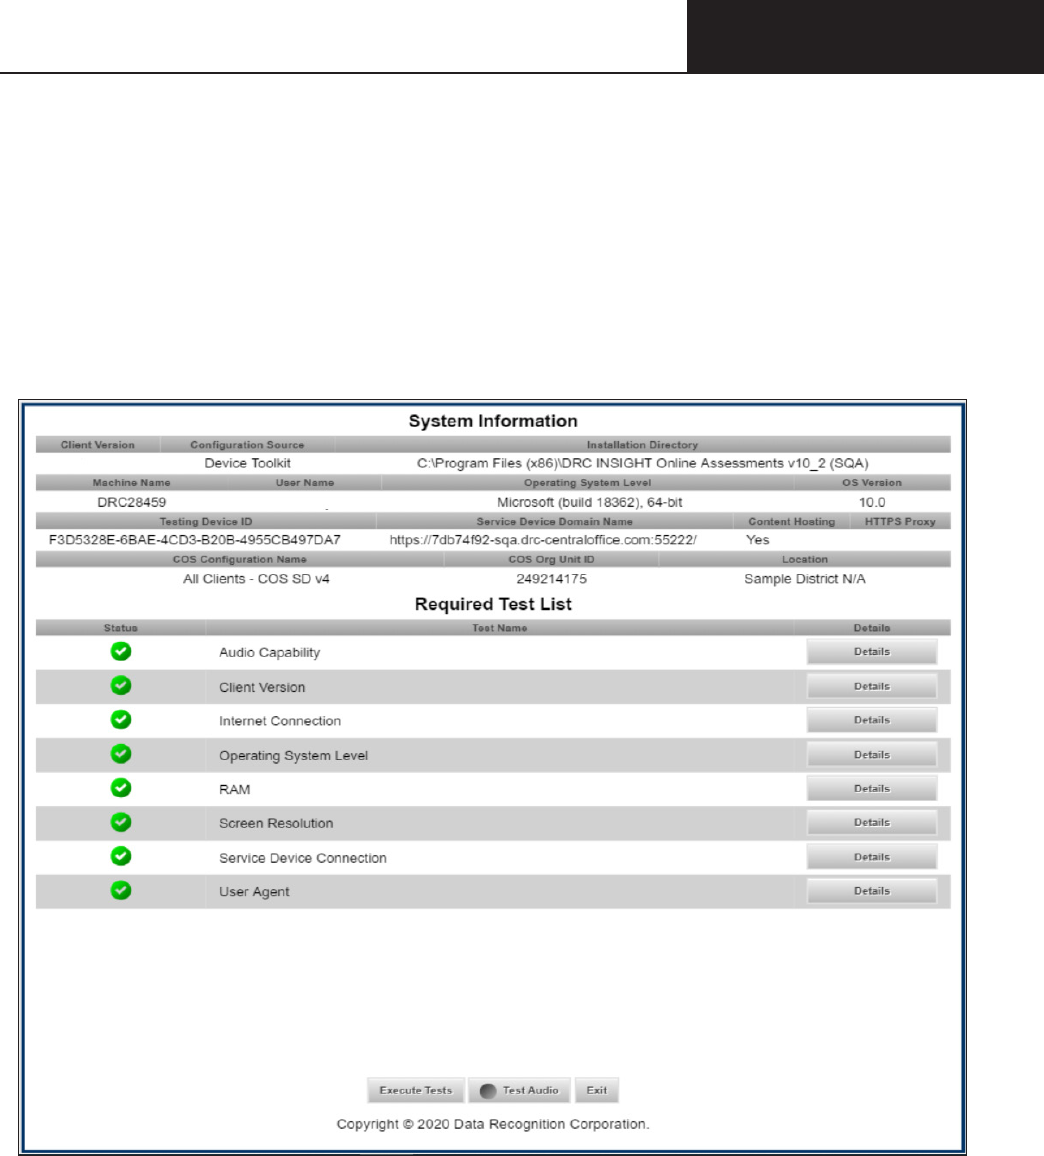
Page 109
The System The System
Readiness CheckReadiness Check
What the System Readiness Check Displays
After installing DRC INSIGHT, use the System Readiness Check (shown below) to determine whether your
Testing Device meets system requirements and to troubleshoot issues. When you start the System Readiness
Check from a device, it displays information about the device’s software and conguration, including the
results of the tests it ran to determine whether the device is ready for online testing.
The elds, buttons, icons, and tests you can access from the System Readiness Check and some
troubleshooting information are described in this section.

Page 110
The System The System
Readiness CheckReadiness Check
Field Description
Client Version
The version of DRC INSIGHT software
Conguration Source
The source of the device’s COS Conguration information
Installation Directory
The directory where DRC INSIGHT is installed
Machine Name
The name of the Testing Device
User Name
The name of the user logged in to the Testing Device
Operating System Level
The operating system level installed on the Testing Device
OS Version
The operating system version installed on the Testing Device
Testing Device ID
The Testing Device’s ID (assigned by DRC)
Service Device Domain Name
The COS - SD’s domain name (assigned by DRC)
Content Hosting
The eld that indicates whether Content Hosting is congured
HTTPS Proxy
The URL of the secure proxy server (if one is congured)
COS Conguration Name
The user-created name of the COS Conguration to which the Testing Device
is assigned
COS Org Unit ID
The unique ID generated by COS that COS uses to register the device with
DRC INSIGHT
Location
The testing location within the COS Conguration associated with the T
esting
Device
The System Readiness Check Fields
The following table describes the information contained in the various elds that display in the System
Readiness Check.
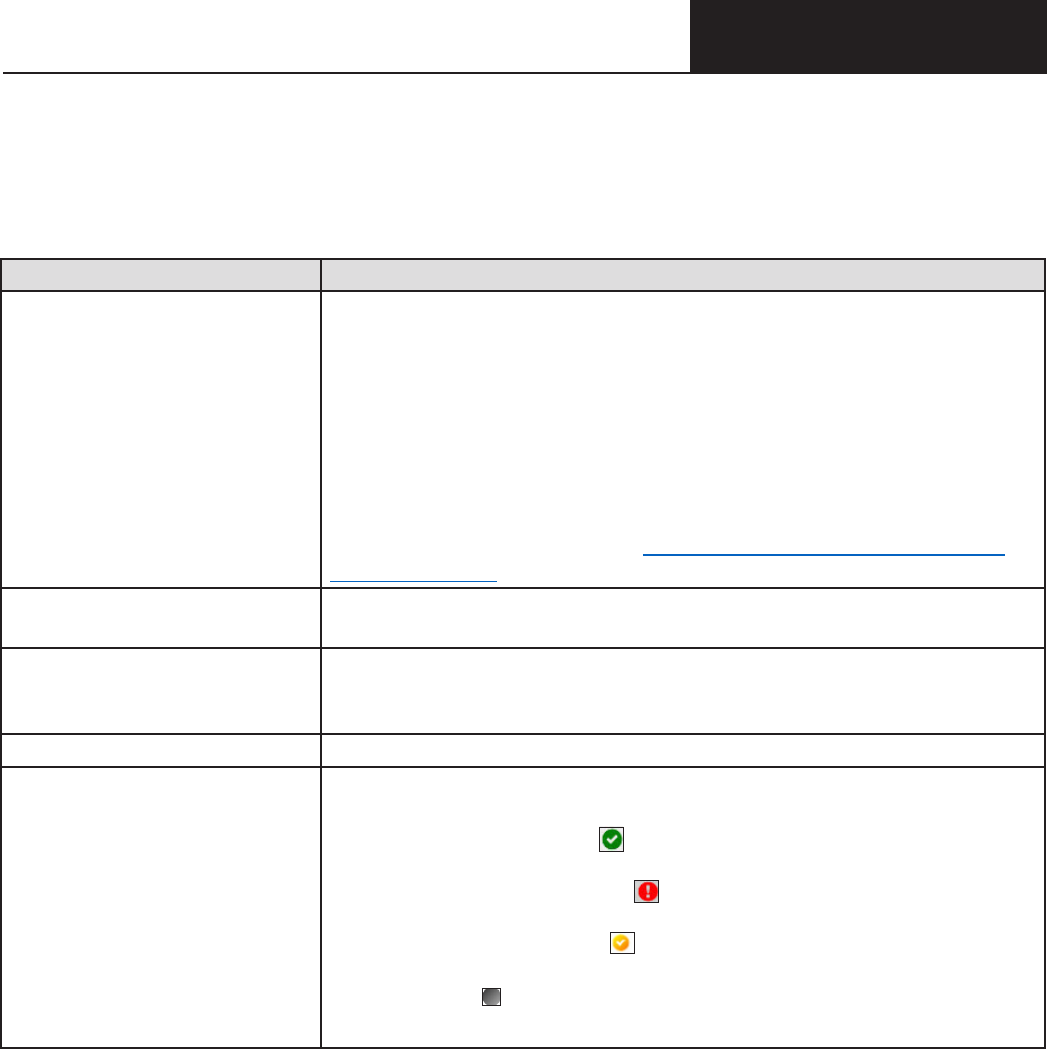
Page 111
The System The System
Readiness CheckReadiness Check
The System Readiness Check Buttons and Icons
Use the buttons on the System Readiness Check to display details about tests, execute tests, test audio
functionality, or exit the System Readiness Check. The icons that display indicate the status of the tests. The
following table describes these buttons and icons.
Button or Icon Description
Details
You can display details about the System Readiness Check before and after a
test.
• If you click Details before you execute the test, a window displays a
description of the test.
• If you click Details after you execute a test, a window displays the results
of the test.
For a description of these tests, see “The System Readiness Check Required
Tests” on page 112.
Execute Tests
When you click Execute Tests, the System Readiness Check runs all of the tests
from the required test list and displays the results.
Test Audio
When you click Test Audio, the system veries whether the audio portion of
the Testing Device is working. You must have a microphone congured and
attached to the computer to run this test.
Exit
When you click Exit, the System Readiness Check closes.
System Readiness Test Status Icons
The following icons indicate the status of a system readiness test.
• A green check mark icon (
) indicates that the Testing Device passed the
test.
• A red exclamation point icon ( ) indicates that the Testing Device failed
the test.
• A yellow check mark icon ( ) indicates that the status of the item requires
further review.
• A grey icon ( ) indicates that the test is not applicable to the COS
Conguration.
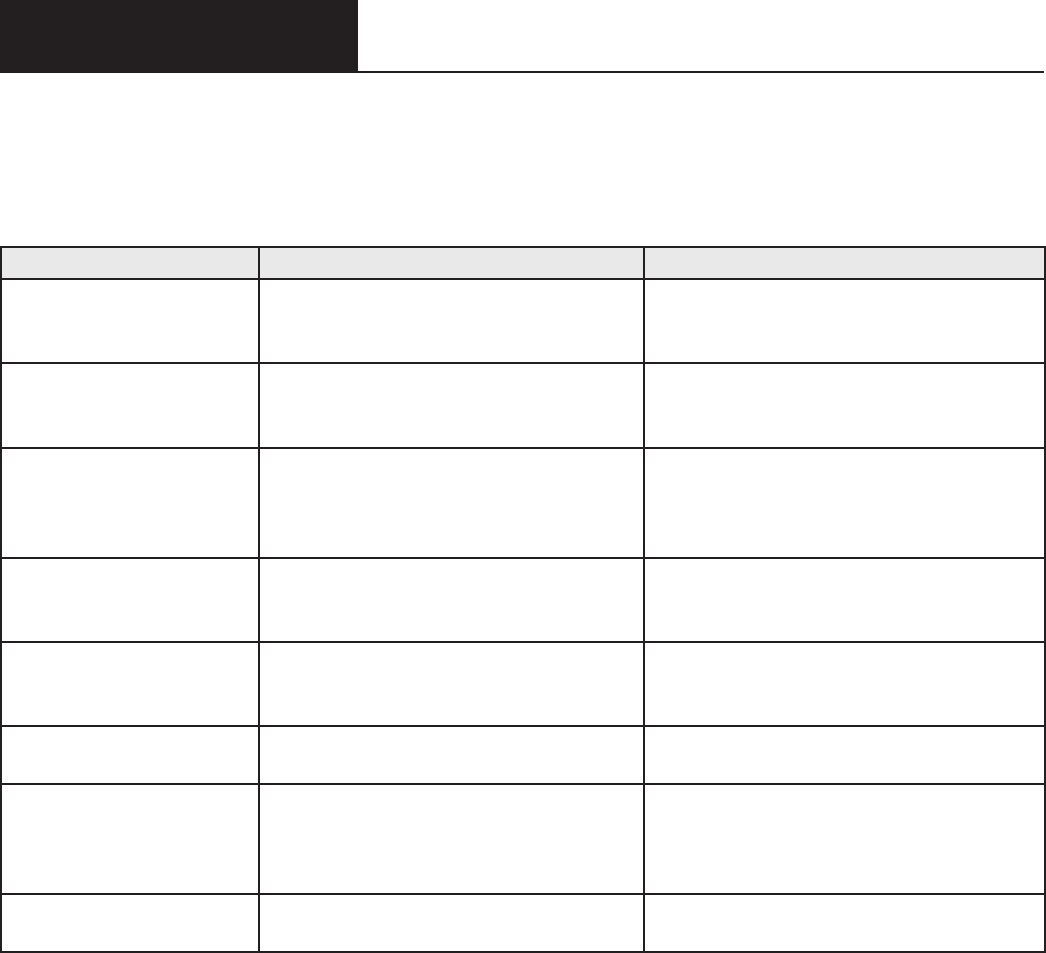
Page 112
The System The System
Readiness CheckReadiness Check
Test Description Required to Pass
Audio Capability
Veries that the Testing Device has the
audio capability needed for online testing
and/or tutorials
The device must have one or more audio
channels and be able to play audio les.
Client Version
Veries that the version of the DRC
INSIGHT software will work with the
secure browser
The base level of the DRC INSIGHT
software must be up to date.
Internet Connection
Veries that the Testing Device is
connected to the Internet and that the
connection speed is fast enough for
testing
The device and the DRC INSIGHT Secure
Application must have a ping (connection)
time of no more than 2.5 seconds.
Operating System Level
Veries that the operating system is
supported and at a level required for
online testing
See the latest version of the DRC INSIGHT
System Requirements for the supported
operating systems.
RAM
Veries that the Testing Device has
enough memory for online testing
See the latest version of the DRC INSIGHT
System Requirements for the supported
Testing Devices.
Screen Resolution
Veries that the screen width and height
are sucient to display the online tests
A minimum screen size of 1024 x 768
pixels is required.
Service Device
Connection
Veries that the DRC INSIGHT test
engine software on the Testing Device
can connect to the COS Service Device
(COS - SD)
The connection to the COS - SD must be
working.
User Agent
Veries that the web browser will work
for the unsecured tests
An up-to-date Chrome browser is required.
The System Readiness Check Required Tests
The System Readiness Check performs a series of required tests to determine whether a Testing Device is
ready for online testing. The following table describes each test and the minimum requirements to pass.

Page 113
The System The System
Readiness CheckReadiness Check
Resolving System Readiness Check Required Tests
This section describes various issues you may experience when you run the System Readiness Check tests.
It also describes the steps to take to resolve these issues.
Issue 1. Audio Capability Error
This test veries that the Testing Device has the audio capability needed for online testing. If this test fails,
verify that the device’s sound card is working and that the Testing Device has a valid playback device.
Issue 2. Client Version Error
The DRC INSIGHT software is not the latest version. You must download the latest version. If you are
prompted to update your software, please reach out to your local technology coordinator or IT.
Issue 3. Internet Connection Error
The Testing Device cannot reach the DRC servers through the Internet. This issue is usually a rewall
or proxy issue. Make sure that everything is allowlisted correctly (see Network Requirements for Testing
Computers in Volume I: Introduction to Online Testing).
Starting or Running the System Readiness Check
If the error occurs when you are starting or running the System Readiness Check, do the following:
1. Verify that you have no bandwidth issues and that you can reach the DRC servers. The Windows
environment does not always capture proxy settings correctly. Usually, Windows uses the Internet
Explorer Internet settings.
2. Contact your Internet Service Provider (ISP) and verify that it is not ltering or throttling your
connection with DRC.
3. Verify that you have allowlisted all the DRC addresses.
Issue 4. Operating System Level Error
This test veries that DRC INSIGHT is running on a supported operating system. If the device is running
a supported operating system, the test veries that your setup meets the minimum system requirements. In
addition to supported versus unsupported operating systems warnings, there is also a warning if the device is
using an operating system version that is currently in Best Eort Support.
If this test fails, you must upgrade to a supported operating system level (see the latest version of the DRC
INSIGHT System Requirements).

Page 114
The System The System
Readiness CheckReadiness Check
Resolving System Readiness Required Tests (cont.)
Issue 5. RAM Error
This test veries that the device’s memory meets the minimum system requirements. If this test fails, you
must upgrade the amount of memory in the device to meet the minimum system requirements (see the latest
version of the DRC INSIGHT System Requirements).
Issue 6. Screen Resolution Error
This test veries that the screen width and height settings meet the minimum system requirements.
If it fails, the device’s resolution is not high enough to meet the minimum system requirements. You must
change the screen resolution (see the latest version of the DRC INSIGHT System Requirements).
Issue 7. COS Service Device Connection Error
The Testing Device cannot connect to the COS - SD. Review the Service Devices tab for the COS
Conguration to which the COS - SD is assigned to determine why the COS - SD is not available
(see COS Online Help).
Issue 8. User Agent Error
This test veries that the web browser is correct for online testing. If necessary, update your browser to a
level that is supported for online testing.

Page 115
Volume IV: Troubleshooting

Page 116
Introduction
About This Guide
This user guide is part of a multivolume set that describes how to congure, install, manage, and
troubleshoot DRC INSIGHT online testing. This volume, Volume IV: Troubleshooting describes tools and
testing information to help you troubleshoot your testing environment and verify that it is ready for testing.
This guide discusses how to use some of the testing tools, including Online Tools Training (OTT). This
guide also contains Frequently Asked Questions (FAQs), Hints, and Tips for online testing. In addition,
the guide explains the various error messages that you may encounter while working with Central Oce
Services (COS) and DRC INSIGHT and provides information to help resolve them.
Important: Throughout this user guide, the Information icon ( ) indicates important information or
crucial tips.
Page 117
System RequirementsSystem Requirements
Page 117
IntroductionIntroduction

Page 118
Working with DRC INSIGHT

Page 119
Working with DRC Working with DRC
INSIGHTINSIGHT
What’s Covered in This Section
This section describes tools that you can use to help prepare for and become familiar with the online testing
environment.
Online Tools Training (OTT)
This topic describes the OTT, a series of sample test questions to help introduce students to the testing tools
available in the online environment.
The Monitor Setting Verication Test
This topic describes the Monitor Setting Verication Test, which is available in Portal site and helps you
determine whether the monitor settings for a Testing Device are congured for optimal testing.
The Testing Site Capacity Estimator
This topic describes the Testing Site Capacity Estimator, a tool that you can download to estimate test
loading times as well as the time required for a testing computer to save a test response and retrieve the next
question.

Page 120
Working with DRC Working with DRC
INSIGHTINSIGHT
Online Tools Training (OTT)
OTT is a set of sample test questions to introduce testers to the tools available during testing and prepare the
testers for online assessments. This training allows testers to try the features of the testing software before
the actual test.
OTT is not designed to cover test content—the goal is to instruct testers about using the testing application,
not to assess skills. The sample OTT questions demonstrate the features of the testing environment, and the
OTT tests are not scored.
The appropriate site personnel should review the OTT tests before the testers begin the test administration.
All testers who will be testing online should have at least one opportunity to review OTT tests for their
subjects and/or grades.
To try OTT, do the following:
1. Follow one of these steps depending on the type of Testing Device being used.
• From a Windows computer, select All Programs–DRC INSIGHT Online Assessments–DRC
INSIGHT Online Assessments (or click the DRC INSIGHT Online Assessments desktop
shortcut).
• From a macOS device, select Applications–DRC INSIGHT Online Assessments–DRC INSIGHT
Online Assessments.app (or click the DRC INSIGHT Online Assessments desktop shortcut).
• From a Linux machine, select opt/DRC INSIGHT Online Assessments/DRC INSIGHT Online
Assessments.
• From an iPad device, press DRC INSIGHT to start the DRC INSIGHT App.
• From a Chrome OS device, click on the DRC INSIGHT App.
2. When DRC INSIGHT launches, if you congured a single testing program, the main page for that
testing program displays. If you congured more than one testing program, a page displays that you can
use to select the testing program. After you make your selection, the main page displays. From that page,
click or select Online Tools Training.
3. Select a subject by clicking on it.
4. Enter the username and password provided on the screen and click Sign In.
5. Follow the instructions on the screen to take the practice tests and use the test tools.
Note: There are no restrictions for accessing OTT; students are allowed to access it as often as
necessary.
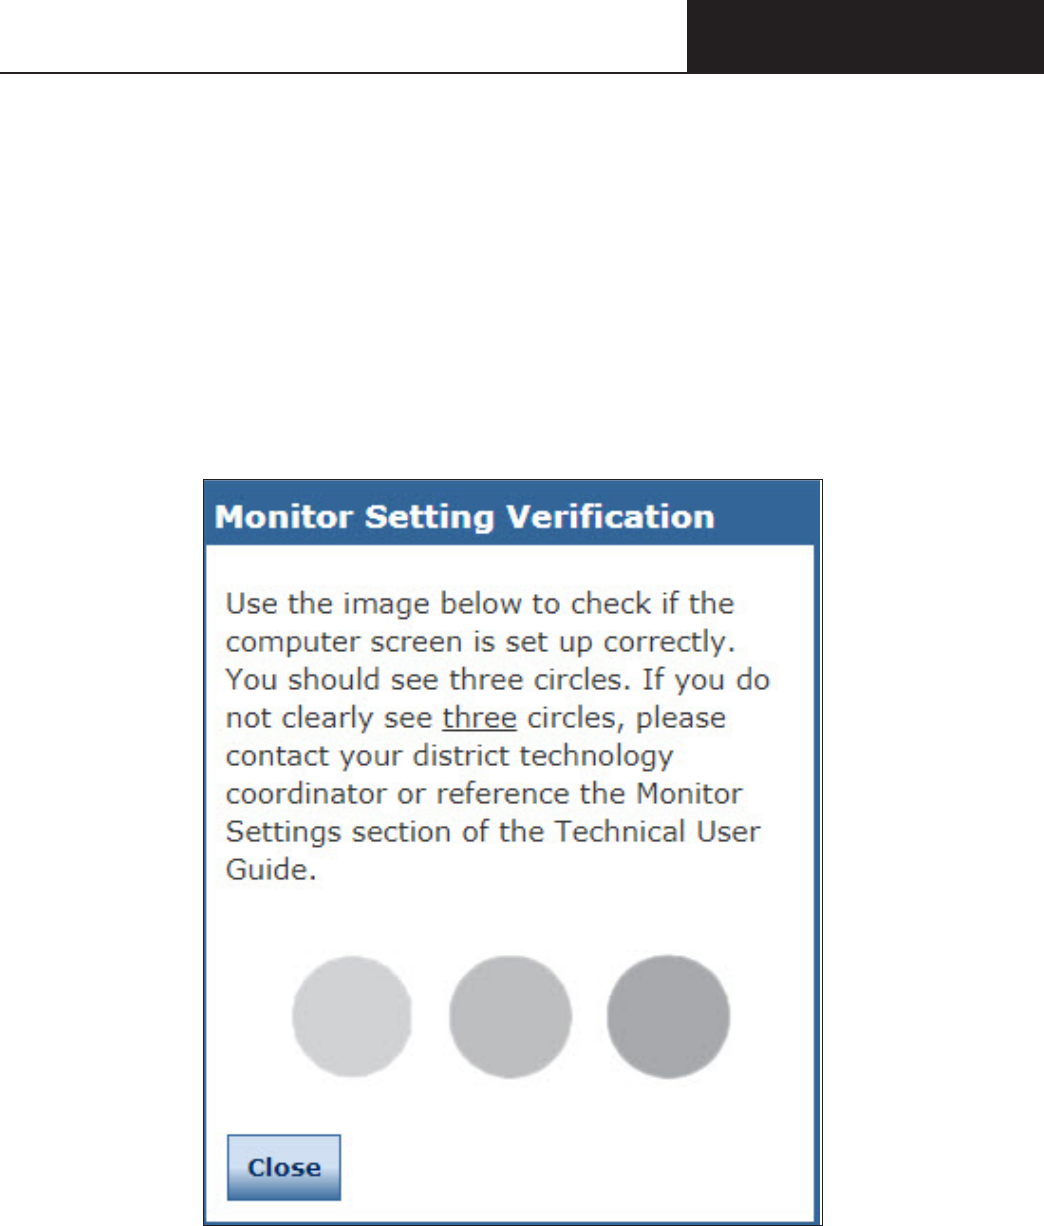
Page 121
Working with DRC Working with DRC
INSIGHTINSIGHT
The Monitor Setting Verication Test
After you sign in to start a test, a screen similar to the following is displayed to help determine whether your
monitor is set up correctly to display the online tests.
If you do not see three shaded circles on the monitor, a student will have diculty answering some of the
online questions. To resolve the problem, you must modify the brightness and/or contrast settings for the
testing computer’s monitor until three circles are displayed clearly.
You can run the Monitor Setting Verication test by signing in to Portal site, selecting MY
APPLICATIONS–General Information–Downloads, and clicking the Monitor Setting
Verication button.
Page 122
Working with DRC Working with DRC
INSIGHTINSIGHT
Changing the Monitor’s Contrast or Brightness
There are many ways to change the contrast or brightness of your monitor depending on the operating
system, the computer, the graphics card, and the type of monitor you are using. The following are some
ideas to try to change the contrast or brightness. For a specic hardware conguration, you also can try
searching the Internet using a search phrase such as changing the contrast for operating system x or
monitor y.
Windows Operating System
• On a laptop computer, look for a black-and-white circle on the keyboard. This function key changes the
contrast.
• On a desktop computer, look for an option on the monitor, or monitor menu, to change the contrast and
brightness.
• Identify the type of graphics card—NVIDIA, Intel, or ATI—and locate options for your graphics card
from the Control Panel: Control Panel–System Properties–graphic cards tab.
• Locate a menu called Monitor Settings, Color, or Graphic Settings and change the contrast (be sure to
check Advanced Settings). If you can’t nd a Contrast option, look for Gamma, Saturation, or Hue.
• Right -click on the desktop to bring up menu options for Intel and ATI cards.
Note: ATI’s menu option is called Catalyst Control Center; Intel’s option is called Intel Graphics Media
Accelerator Driver.
• Select the folder c:\Program Files\graphics card, where graphics card is Intel, NVIDIA, or ATI.
Important: If the Windows High contrast system setting is set to On, during testing the online keypad
will display blank keys (because the keys are white numbers on a white background). To resolve this issue,
search for High contrast under Settings and toggle the High contrast setting to O. You also can use the key
combination Alt–left Shift–Print Screen to turn this setting o.
macOS
• To change the brightness, use the keyboard buttons or select Apple button–System Preferences–
Accessibility–Monitor and use the Change the Brightness slider.
• To increase the contrast, use the following key combination:
Command key + Option key + Ctrl key + . (period)
• To decrease the contrast, use the following key combination:
Command key + Option key + Ctrl key + , (comma)

Page 123
Working with DRC Working with DRC
INSIGHTINSIGHT
Changing the Monitor’s Contrast or Brightness (cont.)
Linux
For Linux desktop monitors, check the settings in the Monitor menu options.
iPad Devices
For iPad devices, refer to your iPad documentation.
Chrome OS Devices
For Chrome OS devices, refer to the Google Chrome Help or documentation.

Page 124
Working with DRC Working with DRC
INSIGHTINSIGHT
The Testing Site Capacity Estimator
The Testing Site Capacity Estimator is an Excel spreadsheet le that you can download to estimate the
following times:
• The time it will take to initially download the test engine software, the software that helps manage the
delivery of the test, based on the number of students who test at the same time.
• The times a student will wait for both a xed-form test and a Computer Adaptive Test (CAT) to load,
with and without Content Hosting congured.
• The time required for a student to receive the next xed-form or CAT test question when the student is
nished with a question (the time required for the testing computer to save the test response and retrieve
the next question).
The following is a high-level summary of the process of downloading and using the Testing Site Capacity
Estimator to estimate testing speeds:
1. Download the Testing Site Capacity Estimator (Capacity Estimator) from Portal site at MY
APPLICATIONS–General Information–Downloads. When the download is complete, open the
Testing Site Capacity Estimator.
2. Fill out the various input elds, including estimates for the number of students testing and responding
at the same time, the average connection speed for testing devices, and the amount of bandwidth that is
available for testing. Use the Testing Site Capacity Estimator’s online help options for more information
regarding these elds.
Note: You may need to verify with your Internet Service provider (ISP), or other technical source, the
various ISP connection speeds at your site.
3. Press Enter to update the elds and review the results.
4. Repeat steps 2 and 3 by re-entering various input values to estimate dierent testing scenarios.
For more detailed information, refer to the Testing Site Capacity Estimator’s online help.

Page 125
FAQs, Hints, and Tips

Page 126
Appendix BAppendix B
Page 126
FAQsFAQs
What’s Covered in This Section
This section contains a list of FAQs and helpful hints and tips regarding conguring, installing, and using
DRC INSIGHT and the COS - SD software. The questions and answers are technical in nature and cover
information about the following environments:
• Windows
• macOS
• Linux
• iPadOS devices
• Chrome OS devices
The FAQs, Hints, and Tips are divided into various categories. In addition, the Common Technical
Questions and Answers section covers the common technical support issues you may encounter and
provides tips, techniques, and workarounds to resolve them.

Page 127
Appendix BAppendix B
Page 127
FAQsFAQs
Q1. If a COS - SD fails during the testing window, is there a way to provide an alternate COS - SD or
to redirect?
A: Because a COS - SD is congured using COS Congurations, it is possible to quickly switch COS - SDs
if necessary. Use COS to select the COS Conguration in which the device is congured, add the new
COS - SD to the COS Conguration, and then restart DRC INSIGHT on the Testing Device. When DRC
INSIGHT restarts, it automatically uses the new COS - SD. You may want to remove the old COS - SD.
Important: Moving or changing a COS - SD while actively testing can negatively impact the student testing
experience.
Q2. Do we use a .msi le for installation?
A: The DRC INSIGHT and COS - SD installation le types vary by operating system:
• The Windows version uses a .exe le for the COS - SD and a .msi le for DRC INSIGHT.
• The macOS version uses a .dmg le for the COS - SD and a .pkg le for DRC INSIGHT.
• The Linux version uses a .sh le for the COS - SD and a .deb le for DRC INSIGHT.
The iPad version uses an App Store app and a .plist le for DRC INSIGHT.
• The Chrome version uses a .txt le to hold the DRC INSIGHT App ID and URL.
Q3. Do we have to have a COS - SD in each school, or can it be on a shared district server? Which
approach do you recommend?
A: It depends on your network’s capacity and reliability. With a dedicated COS - SD, you can ooad about
50% of the trac from the Internet to your COS - SD.
Because Testing Devices need uninterrupted connectivity to the COS - SD, we recommend one
COS - SD per school. You may be able to share a COS - SD if you have enough network capacity.
Q4. Do we need to go to each tester’s computer to update the Secure Browser?
A:
• YES
○ If you use Windows (with DRC INSIGHT version 13 or 13.0.1) or Mac (with DRC INSIGHT
version 13) testing devices and typically have a non-Admin user update each testing device
manually after launching DRC INSIGHT Secure Browser.
• NO
○ If you use ChromeOS, iPadOS or Linux
○ If you update multiple Windows or Mac testing devices using deployment software
○ If you manually run the DRC INSIGHT application installer on a single workstation at a time
General Questions

Page 128
Appendix BAppendix B
Page 128
FAQsFAQs
Q5. How are test responses received?
A: The tester logs in to DRC INSIGHT and connects to the DRC Servers. Tests are sent directly from DRC
and responses are sent directly to DRC (see Volume I: Introduction to Online Testing).
Q6. How do I test that a COS - SD is working?
A: You can verify the status of a COS - SD from the COS Dashboard (see COS Online Help).
Q7. Can we install DRC INSIGHT on one central server/computer and use shortcuts, or other links, to
share it for testing across dierent machines?
A: No. DRC assumes that DRC INSIGHT is installed on each computer that will be used for testing. Any
other conguration is unsupported and may produce unexpected results.
Q8. The sound for Text-To-Speech (audio) does not work. What should I do?
A: Verify that the TTS/HVA check box is checked for the testing program in the Content Management
tab of your COS Conguration, that you enabled Content Management, and that you enabled Content
Hosting in the Content Hosting tab. Before you begin testing, conrm that audio is working and that the
volume is turned up on the Testing Device (see Volume III: DRC INSIGHT).
Q9. Is there a way to conrm that testing devices are setup correctly and properly connecting to the
COS - SD?
A: When using DRC INSIGHT for training with the “Online Tools Training” link, the test engine bypasses
the COS - SD and gets content from DRC Servers. To verify that the testing devices are properly
congured with the COS - SD, select “Test Sign In” rather than “Online Tools Training” and then use
the same generic Username and Password information provided on the sign-in page of the “Online Tools
Training” to login to the training. Using this method, the training will use the COS - SD in the COS
Conguration to present the test content.
General Questions (cont.)

Page 129
FAQsFAQs
Question: How do I update test forms on a COS - SD?
To check and/or update your test forms, do the following:
1. From Portal site, navigate to your testing program and select Central Oce Services.
2. Select a testing program and site.
3. From the Congurations page, select the Org Unit in which the COS - SD is congured.
4. Select the Content Management tab to open the Content Management page. The various test
administrations are listed in the Admin column.
• If the test administration has a check mark next to it, you do not need to do anything. COS checks in
with the DRC servers several times every hour and automatically uploads content to the COS - SD.
• If the test administration does not have a check mark next to it, place a check mark next to it and
click Update Conguration.
Note: Depending on your network, the update can take a while. You can select the Service Devices
tab to view the update progress of the COS - SD in the Status column.
• If a new administration is discovered during the check-in process, it will be listed. If you want
to update the new administration with TTS/HVA or VSL les, place a check mark next to the
appropriate accommodation and click Update Conguration.
Note: When you check an accommodation checkbox, a large amount of audio and/or video les will
be downloaded. If no tester requires the accommodation, do not check the checkbox.
5. Click Update Conguration. For details about this process, see Working with Content Management in
COS Online Help.
Common Technical Questions and Answers
This section describes tips, techniques, workarounds, and detailed resolutions to common technical support
issues you may encounter.
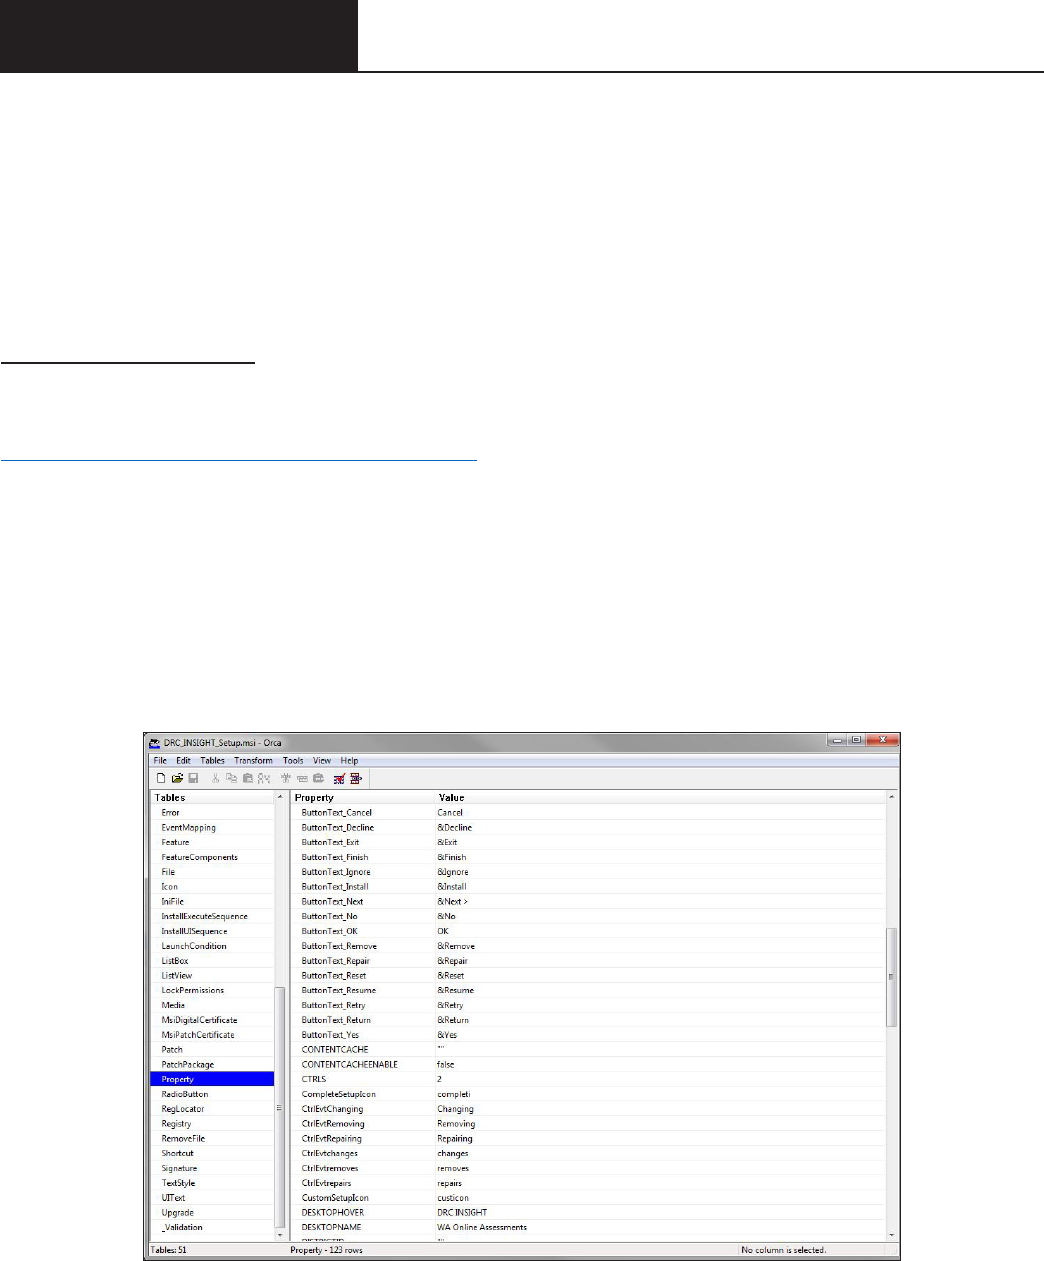
Page 130
FAQsFAQs
Question: Can I mass deploy test software to all student computers?
Yes, but the details vary depending on which technology you use for deployment and the operating system
to which you deploy. Basically, you can congure the installation software using arguments (i.e., parameters
or special variables you supply as input) when you deploy the software in silent (non-interactive) mode. For
technical details, see the Modifying the Setup File topic below.
Modifying the Setup File
You can modify the DRC_INSIGHT_Setup.msi installation le to install your software on many machines
using dierent installation settings. To modify the le, you need the Orca installer package from the
Windows SDK for Windows Installer Developers.
Download the .ISO le, extract the les, and double-click on Orca.msi to install the Orca.exe le.
To modify the setup le, do the following:
1. Start ORCA.
2. Select File–Open and open the MSI installer.
3. Select Property–Table to open the Property table (see the gure below). Make all your changes in this
table.
Common Technical Questions and Answers (cont.)

Page 131
FAQsFAQs
4. Change the necessary properties. The following are the dierent properties you can change. To make a
change, double-click on the value of the property, enter your value, and click Enter.
Important: Make sure there are no spaces before your input—do not put spaces in front of any attribute
that you modify.
ouIds
The numeric Org Unit ID generated by COS.
httpsproxy
The URL and secure port of the proxy host server. Depending on your conguration, this
URL can start with either http:// or https://.
5. After you make your changes, save the le and overwrite the original DRC_INSIGHT_Setup.msi le.
Note: The actual .msi le will include a version number (in the examples below, the version number is
12.0.0-190). Use the number from the .msi le name as the current version number in the command lines
below.
Silent Install Example
The following example shows the syntax you would use to install DRC INSIGHT silently on a Windows 10
machine. Run this command as an Administrator.
drc_insight_setup_ 12.0.0-190.msi /qn
Silent Uninstall Example
The following example shows the syntax you would use to uninstall DRC INSIGHT silently on a
Windows 10 machine. Run this command as an Administrator.
msiexec /x drc_insight_setup_ 12.0.0‑190.msi /qn
Common Technical Questions and Answers (cont.)

Page 132
Appendix BAppendix B
Page 132
FAQsFAQs
The Testing Site Capacity Estimator
Q1. Q: What is the Testing Site Capacity Estimator?
A: The Testing Site Capacity Estimator is an Excel spreadsheet le that is available in the INSIGHT
Portal under General Information-Downloads. It is designed to help districts and schools estimate
the time it will take students to download the tests and move to the next question after they send a
response. These time estimates are based on the following factors:
• Whether COS - SDs with Content Hosting and Content Management turned on are being used on
the network or at the site.
• The site’s knowledge of the bandwidth provided by their Internet Service Provider (ISP), and the
bandwidth provided by the Local Area Network (LAN) and Wide Area Network (WAN).
• The estimated average connection speed that Testing Devices have to the network.
• The estimated percentage of total bandwidth that is available for testing.
This tool helps sites plan their testing more eectively based on factors such as their network trac,
the number of students testing at the same time, and the type of test: a xed-form test, with or without
accommodations, or a Computer-Adaptive Test (CAT).
Important: The exams are xed-form only—CAT forms are not used.

Page 133
FAQsFAQs
Page 133
FAQsFAQs
iPad Questions
Q1. Can I install a COS - SD on an iPad or Chrome OS device?
A: No. A COS - SD is used primarily to host and manage test content. For various reasons, tablet devices
(such as iPads) and Chrome OS devices, do not provide a suitable environment for a COS - SD. As a
result, you must install the COS - SD software on a Windows, Mac (macOS), or Linux computer and
connect to the COS - SD when you install DRC INSIGHT on the tablet device.
Q2. Can the DRC INSIGHT iPad App be distributed without Mobile Device Management (MDM)
software using iTunes or other software/methods?
A: Currently, the DRC INSIGHT App for iPads is available in the Apple App Store.
Q3. Does DRC recommend any particular version of MDM software?
A: No, there are many versions of MDM software, any of which will distribute DRC INSIGHT. To
congure DRC INSIGHT using the MDM software, you must use a version that supports the Managed
App Conguration feature.
Q4. Is an external keyboard required for testing with iPads?
A: No.
Q5. Is custom installation of the Apple virtual (internal) keyboard supported for testing?
A: Yes—the virtual keyboard is not displayed automatically during testing but can be toggled on using an
iPad function key. Be sure that testers are using only an English keyboard.

Page 134
FAQsFAQs
Page 134
FAQsFAQs
Chrome OS Device Questions
Chrome OS devices can be a secure platform for administering assessments. When set up properly, these
devices meet K–12 education testing standards. If congured according to Google specications, Chrome
OS devices can be set to disable testers’ ability to browse the web during an exam and to disable external
storage, screenshots, and the ability to print. Google details scenarios for setting up Chrome OS devices for
secure assessment within the Chrome Enterprise and Education Help.
If you need help setting up your Google Administrator account or enrolling Chrome OS devices, please
contact Google directly.
Q1. Of the secure testing scenarios provided by Google, which one did DRC select and why?
A: DRC developed the Chrome OS DRC INSIGHT application to meet the specications of Google’s
Scenario 1 for delivery of secure assessments. Although each scenario prepares a Chrome OS device
for secure testing, DRC selected Scenario 1, in which the tester takes an exam on the Chrome OS
device using the DRC INSIGHT App in Single App Kiosk mode. While the tester tests, the DRC
INSIGHT App runs in a secure full-screen mode. After the tester exits the test, the Chrome OS device
can be used for any purpose, secure or otherwise—the Chrome OS device is only secured during
testing with the DRC INSIGHT App.
Scenario 1
DRC specically selected Scenario 1 because of the following reasons:
• It is the only scenario that allows for fully secure assessment delivery via Single App Kiosk mode.
• It allows the DRC INSIGHT App to communicate securely with a COS - SD.
• It does not require locking down the device and dedicating it for assessment purposes. Students can
use the Chrome OS device for other purposes when the DRC INSIGHT App is not being used for
testing.
• It is the only scenario that provides testers a full-screen environment.
Scenario 2
In contrast, Google’s Scenario 2 includes a restricted sign-in feature for secure assessment delivery,
which assumes that the Chrome OS device will be used solely for testing purposes. When this feature
is enabled, non-assessment sign on is not allowed. When this feature is disabled, test administrators
must maintain separate student proles—assessment and non-assessment—to allow for additional
restrictions needed during assessment sessions.
Scenario 2 requires a higher level of administration oversight (e.g., creating accounts twice). It also
requires manual management of security permissions, making it prone to user error that is dicult to
detect. Additionally, it requires taking the test in the Chrome browser or manually launching a non-
kiosk application (placing the user into a desktop session in which they have access to one URL).
Finally, the Chrome OS device must be cleared of data (wiped) upon exiting the test.

Page 135
FAQsFAQs
Page 135
FAQsFAQs
Q2. Does DRC require users to log in to each Chrome OS device and write down the Device ID?
A: No. For unregistered Chrome OS devices, use COS to create DRC Org Units, download the
conguration le (.zip) using Chrome device management, and copy and paste the chromeos.json le
information that you downloaded from the appropriate COS Conguration’s Deployment tab in the
Policy for extensions eld. When the user starts the DRC INSIGHT App on the Chrome OS device,
the Chrome OS device will be registered. The deployment le (zip), which holds the chromeos.json
le, is generated using the Deployment tab within the COS Conguration.
On a Chrome OS device that is already registered with COS and has an applicable COS Conguration
and Device ID, when DRC INSIGHT is launched, it locates the Device ID from COS and uses the
associated COS Conguration.
Note: The System Readiness Check (available through a link on the DRC INSIGHT App main testing
page) displays the Device ID on the System Information page.
Q3. Why does DRC require Google Apps for Education and Google Administrator accounts?
A: The DRC INSIGHT Chrome OS App requires Single App Kiosk mode to launch and ensure a secure
testing environment on Chrome devices. Google Apps for Education and Chrome device management
allow Chrome administrators to manage kiosk apps for multiple Chrome devices from a central
console. This is the best approach to managing these devices in terms of eciency and security.
DRC assumes that users have registered their Chrome OS devices as part of the initial
implementation. Google species two additional requirements for secure testing using either of the
scenarios described in Q1:
• Google administrators must use Chrome device management to manage their Chrome devices
from a single location.
• Google administrators must enroll each device in the school’s domain.
Q4. How is installing DRC INSIGHT dierent from installing other testing applications that
districts may be using?
A: The DRC INSIGHT Chrome OS App is congured to be secure and deployed using Chrome device
management. It is also congured to work with the COS - SD using the COS Conguration. For
a dierent application, the process would not necessarily use a secure app or a COS - SD. These
processes rely on a Chrome OS device user account or other settings to restrict access. Since there is
no secure testing app for the Chrome OS device, these processes require a workaround to secure the
testing sessions.
Q5. Does the deployment or installation of DRC INSIGHT require the Chrome OS devices to be
dedicated to testing for the duration of the assessment window?
A: No, Chrome OS devices are not dedicated to testing, but the secure DRC INSIGHT Chrome OS App
is. The DRC INSIGHT Chrome OS App is the secure testing environment that the tester accesses
using a unique test ticket. After a tester has nished a test and exits the DRC INSIGHT Chrome OS
App, the tester can execute other applications and use the Chrome OS device for other purposes. Test
Administrators are responsible for monitoring testing and ensuring the testers are properly ending and
submitting their tests.
Chrome OS Device Questions (cont.)

Page 136
FAQsFAQs
Page 136
FAQsFAQs
Q6. Does Google provide a method to deploy secure testing congurations to Chrome OS devices?
A: Yes, Google has a feature that allows users to “push” a secure testing conguration using Chrome
device management.
Q7. How do I congure Chrome OS devices to work with DRC INSIGHT?
A: DRC provides COS to congure and manage your Chrome OS devices after you have registered them
in your Chrome domain.
Q8. Can I use DRC INSIGHT on a touch-enabled Chrome OS device?
A: Yes, DRC supports certain touch-enabled devices (for details, see the latest version of the DRC
INSIGHT System Requirements).
Chrome OS Device Questions (cont.)

Page 137
FAQsFAQs
Page 137
Hints and TipsHints and Tips
General Hints and Tips
The following are general hints and tips for testing with iPad and Chrome OS devices.
• Be sure to have a strong network connection through either Wi-Fi or direct Internet connectivity.
• Make sure each device’s keyboard is set to US English.
• Make sure all devices are either fully charged or plugged in.
• Note that an optical drive is not required.
• Note that while you are running the DRC INSIGHT application, the system operates in Single App
Kiosk mode.
• Remember that DRC INSIGHT is displayed in landscape mode only.
iPad Hints and Tips
The following are hints and tips for testing with iPad devices.
• Use two ngers plus three taps to navigate DRC INSIGHT–Show Version.
• iPad devices have a Sleep mode setting. In Sleep mode, the screen goes black. Users can touch any key
to re-activate the screen or press their home key and type in the device passcode (if applicable). The
DRC INSIGHT timeout warning is not visible when an iPad is in Sleep mode. To disable Sleep mode,
select Settings–General–Auto–Lock and then select Never.
Note: School iPad proles may not permit you to select Never.
• Some smaller graphing and dragging elements may be dicult to track because the user’s nger covers
the item.
• The pinch-to-zoom in/out iOS gesture is supported; the swipe iOS gesture is not supported.
• The internal keyboard is not displayed during testing. You can toggle it on using the appropriate iPad
function key.
• The Audio starting point does not turn red when your nger gets close to touching it.

Page 138
FAQsFAQs
Page 138
Hints and TipsHints and Tips
Chrome OS Device Hints and Tips
The following are hints and tips for testing with Chrome OS devices.
• Verify that the Chrome OS device is connecting to the testing site’s (school’s) Wi-Fi network. If a
Chrome OS device is connecting to a guest Wi-Fi network, it may be “seen” as a guest computer and
could cause/receive content connection errors during testing.
• You must enroll a Chrome OS device in your Google domain account before using it with DRC
INSIGHT. As part of the enrollment process, Google uses the concept of Org Units. These are not the
same Org Units that DRC uses in COS.
To prepare for the Chrome OS device administration, please ensure that you have enrolled all your
Chrome OS devices in the Google Device Manager software. This software helps you manage your
device congurations.
For more information about managing Chrome OS devices and setting up your basic Chrome OS
environment, see About ChromeOS device management.
If you need help setting up your Google Administrator account or enrolling Chrome OS devices, please
contact Google directly.
• COS manages the DRC INSIGHT portion of the Chrome OS device conguration process.
• When you use COS to create DRC Org Units and group Chrome OS devices, DRC assigns each Chrome
OS device a Device ID. This Device ID is dierent from the serial number of the Chrome OS device.
• Google uses the Chrome OS device’s serial number to enroll the Chrome OS device in the Google
domain.
• DRC uses the Chrome OS device’s Device ID to register the Chrome OS device in a DRC Org Unit.
To help manage and organize your Chrome OS devices, keep track of the current Device ID.
• On a Chrome OS device, do not log in to your Google account if you want to access DRC INSIGHT.
Because DRC INSIGHT runs in Single App Kiosk mode, you cannot access it after you have logged
in to a Google account. If you attempt to start the DRC INSIGHT App, an error message is displayed
indicating that you are not in Single App Kiosk mode. To access DRC INSIGHT, log out of your Google
account and start the DRC INSIGHT App.

Page 139
FAQsFAQs
Page 139
Hints and TipsHints and Tips
Google/Chrome OS Device Plug-In Error
When testers test using Chrome OS devices, the process generates communications to both Google Chrome
and to DRC. When a tester launches the DRC INSIGHT app on the day of testing, DRC INSIGHT attempts
to reach Google Chrome to generate a new instance of DRC INSIGHT on the Chrome OS device. If the
communication to Google times out before this happens, a plug-in error occurs.
Districts with complex content lters, peer-to-peer networking, or deep packet inspection of Internet trac
in their network may have extra ltering, which can delay the communication to Google on the initial
launch of DRC INSIGHT and cause a plug-in error.
If your site experiences a Google plug-in error while testing with Chrome OS devices, you can use the
following information to troubleshoot the process.
Note: Verify that the Chrome OS device is connecting to the testing site’s (school’s) Wi-Fi network. If a
Chrome OS device is connecting to a guest Wi-Fi network, it may be “seen” as a guest computer and could
cause/receive errors during testing.
Basic Steps
1. Reboot the device.
2. Wait for/conrm that you have a solid Internet connection.
3. Wait 30 seconds and reopen DRC INSIGHT.
Intermediate Steps
1. Perform a speed test at speedtest.net.
2. Check your allowlisting.
3. Check your access point-to-tester ratio.
4. Verify how the school’s Wi-Fi policy handles “guest” (i.e., kiosk mode) Chrome OS device trac.
5. Check the connection type in Google Admin for “Direct Connection.”
Advanced Steps
1. Check the content lter settings:
• SonicWall and Smoothwall: Disable Deep Packet Inspection through SSL.
• LiteSpeed: Disable Decrypt SSL.
• iboss: Add Chrome OS device kiosk user exceptions. Can iboss be used to allowlist URLs? If not,
can iboss be disabled?
2. Check the access point brand. If it is Cisco Meraki, disable layer 7 s ltering.

Page 140
Error Messages

Page 141
Error MessagesError Messages
What’s Covered in This Section
This section describes the common error messages you may encounter while installing, conguring, or
using DRC INSIGHT, Central Oce Services (COS), and COS Service Devices (COS - SDs). It also
provides recommendations to resolve them.
For many of the error messages, there are references to more detailed descriptions of how to resolve the
errors.

Page 142
Error MessagesError Messages
Message: Chromium OS version xxxx.xx.x is not supported by DRC INSIGHT
The version of the operating system on this Testing Device is not supported by the DRC
INSIGHT team.
Description: DRC INSIGHT cannot use the version of Chrome OS.
What Should I Do? Update the Chrome OS browser to version 90 or higher, or to the most recent stable
channel.
Message: Conguration Error
Contact your technical resource and provide them with the following information: DRC
INSIGHT cannot retrieve the conguration prole associated with this device because a
device can only be actively assigned to one Central Oce Services Org Unit for a testing
program.
Description: COS is unable to uniquely identify the device because more than one Org Unit ID exists for
the device within the same testing program.
What Should I Do? Verify that the device has been assigned to only one Org Unit per testing program on
the device (see COS Online Help).
Message: Conguration Not Found
Contact your technical resource and provide them with the following information: DRC
INSIGHT cannot retrieve the conguration prole associated with this device because
it cannot nd the Central Oce Services Org Unit ID which was entered incorrectly, was
deleted, or was not assigned to the device.
Description: One of the following situations has occurred:
• The COS Org Unit ID was deleted after the device was assigned to it.
• The COS Org Unit ID was not uploaded.
• The COS Org Unit ID was entered incorrectly.
• The COS Org Unit ID was not set up in Chrome Management (or in a Mobile Device Management
[MDM] solution).
What Should I Do? Verify that the device has been assigned to a COS Conguration in COS and that
the Org Unit ID has been uploaded to this device. After you have the correct Org Unit information, click
Assign Device to Org Unit and enter the correct Org Unit ID
(see COS Online Help).

Page 143
Error MessagesError Messages
Message: Connection Error
There has been an interruption with this testing device’s connection. The Student may be
moved to another testing device to continue testing.
If this error persists, contact your local technology support sta to verify connections are
working. They can contact DRC Customer Support if they need additional help to address
this situation.
Description: A system communication error occurred while a student was testing in DRC INSIGHT.
What Should I Do? The student may be moved to another testing device to continue testing. If the error
persists, contact your local technology support sta to verify connections are working. They can contact
DRC Customer Support if they need additional assistance.
Message: Connection Error
This computer cannot connect to the local Content Management and/or content Hosting
server(s). The connection or the content must be restored before the user can continue
testing. If this is the rst time you are seeing this message, please try connecting again.
Please contact your local IT sta to verify network and local Content Management and/
or content Hosting server(s) are working. They can contact DRC Customer Support if they
need additional help to resolve the matter.
Description: The testing client is not able to connect to the COS - SD. This connection error occurred while
trying to log in.
What Should I Do? Verify that you can reach the COS - SD. If the issue persists, check your COS - SD’s
rewall and the allowlisting settings on your rewall, content lter, proxies, and other network devices.
Message: Connection Error Retrieving Content
This computer cannot connect to the server to retrieve content. The connection or the
content must be restored before the student can continue testing. Please contact your
local IT sta to verify that the network connection is working. They can contact DRC
Customer Support if they need additional help to resolve the matter.
Description: The testing client is not able to connect and download the test form from the COS - SD. This
connection error occurred while trying to download the form.
What Should I Do? Verify that all the test forms are up-to-date and that the testing client can reach the
COS - SD.
Page 144
Error MessagesError Messages
Message: Connection Error Retrieving Content
Please contact your local IT sta to verify network connection is working. They can contact
DRC Customer Support if they need additional help to resolve the matter.
Description: The testing client is not able to connect and download the test form from DRC. This
connection error occurred while the client was trying to download the form.
What Should I Do? If the issue persists, check the allowlisting settings on your network devices and
prioritize testing trac. If possible, allow testing trac to bypass as many network devices as possible.
Ensure that bandwidth is not being completely consumed. If you are using a COS - SD, verify the
allowlisting settings and rewalls to and on the COS - SD (see Volume I: Introduction to Online Testing).
Message: Connection Retry is in Progress
You are experiencing a temporary network connectivity issue. The system is attempting to
reconnect.
If the system reconnects, this message closes and you can continue testing. If the system
cannot reconnect, the message closes, an Internet Connection Error message displays,
and you have to exit DRC INSIGHT.
If you want to exit the test now, select the Exit the Test button.
Description: The connection necessary to transmit the test response has been lost during testing. For the
next ve minutes, while this message is displayed, DRC INSIGHT will attempt to restore contact with the
DRC servers and send the test response. During this time, if a connection is re-established, the message will
close and the tester can continue testing. If a connection is not re-established during this time, the message
will close and the Internet Connection Error message will be displayed. At any time during the ve-minute
interval, the test proctor can click Exit the Test to temporarily end testing for the tester.
What Should I Do?
• If the message disappears and no Internet Connection Error message is displayed, you do not need to do
anything—the tester can resume testing.
• If the message disappears and the Internet Connection Error message is displayed, the tester must
discontinue testing, exit DRC INSIGHT, and resume testing on a dierent Testing Device (see the
“Internet Connection Error” message).
• If you click Exit the Test while the Network Connectivity Issue message is displayed, the test ends and
the tester must re-enter the test. All testing information will be saved and the tester can resume testing
using the same Testing Device (or a dierent Testing Device) at the point in the test where they left o.

Page 145
Error MessagesError Messages
Message: Could Not Retrieve Testing Information
Possible connection error while attempting to retrieve device conguration.
Description: DRC INSIGHT is unable to determine the identity of the device.
What Should I Do? Check your network connection and retry. Verify that the device is registered in COS
(see COS Online Help).
Message: Device Registration
A device cannot be actively registered to more than one Central Oce Services Org Unit
for the same testing program.
Description: COS is unable to uniquely identify the device because more than one Org Unit ID exists for
the device within the same testing program.
What Should I Do? Verify that the device has been assigned to only one Org Unit per testing program in
the COS Conguration and that one or more Org Unit IDs have been uploaded to this device. After you
have the correct Org Unit information, click Assign Device to Org Unit and enter the correct Org Unit ID
(see COS Online Help).
Message: Download Of Upgrade Failed
Your upgrade failed because the download was unsuccessful.
Description: The testing client tried to update but was unable to download the update.
What Should I Do? Try one or more of the following actions:
• Retry the update.
• Verify your allowlisting settings.
• Manually update the testing client.
Important: Only Linux users will see this message and the Upgrade button.
Page 146
Error MessagesError Messages
Message: Error Retrieving Content
DRC has detected an error retrieving content. Initial IT Troubleshooting - review the testing
device’s Central Oce Services Conguration.
Description: If you are testing on an iPad device at iPadOS level 14 or higher with a COS Conguration
that can access multiple testing programs, you must manually enable Cross-Website Tracking on each iPad
Testing Device. You cannot enable Cross-Website Tracking with MDM software.
What Should I Do? Enable Cross-Website Tracking by performing the following steps on each iPad:
1. Navigate to Settings.
2. Tap DRC INSIGHT.
3. Toggle Allow Cross-Website Tracking to on.
Message: Failed to Load Device Information
A communication error occurred. Click Reload to try again or Cancel to cancel the process.
Description: Because of a network communication error, the device information was not loaded from COS.
What Should I Do? Wait a few seconds before clicking Reload to retry the process. If the network
problems persist, click Cancel and contact your network administrator (or try again later).
Message: Guided Access Is Not Enabled
Please raise your hand and wait for help.
Description: Guided Access is either not set up or not working on the iPad device.
What Should I Do? Try starting Guided Access on the iPad device (see Volume III: DRC INSIGHT).

Page 147
Error MessagesError Messages
Message: Internet Connection Error
There has been an interruption in Internet connection. The student may be moved to
another computer to continue testing. If this error persists, contact your local IT sta to
verify network and Internet connections are working. They can contact DRC Customer
Support if they need additional help to resolve the matter.
Description: There was an interruption in the Internet connection and the testing client was unable to reach
DRC.
What Should I Do? Click OK to close DRC INSIGHT. Move the student to a dierent Testing Device to
continue testing. If the issue persists, check the allowlisting on your network devices and prioritize testing
trac. Allow testing trac to bypass as many network devices as possible. Ensure that the bandwidth is not
being completely consumed.
Message: Operating System version is not supported by DRC INSIGHT
Please raise your hand and wait for help.
This version of the operating system on this Testing Device is not supported by the DRC
INSIGHT team. Please contact DRC Customer Support if you have questions.
Select Exit to return to the Test Sign In page.
Description: DRC INSIGHT will not work with the version of the operating system that is currently
installed on the Testing Device.
What Should I Do? Install a supported version of the operating system or select a dierent Testing Device
on which to test.
Message: Registration Failed
The registration was unsuccessful
The registration failed because the Central Oce Services Org Unit ID does not exist. Click
Back to re‑enter the Org Unit ID.
Description: DRC INSIGHT was unable to register the device because it could not nd the device’s COS
Org Unit ID.
What Should I Do? Verify that you have the correct Org Unit ID for the device, click Back, and re-enter
the Org Unit ID.

Page 148
Error MessagesError Messages
Message: Session Ended
Another session has been activated with this student’s login. Please conrm the student is
using their assigned login. If the student is actively testing on another computer, click OK.
Please contact DRC Customer Support if you need additional help to resolve this matter.
Description: Someone else has logged in with the same credentials on another device.
What Should I Do? Verify that the student is using the correct testing credentials and that another student
is not using them and have the student log in again.
Message: Session Inactive. Please raise your hand and wait for help.
Your session has been ended due to inactivity. Any test responses you submitted will be
stored. Click OK to return to the log‑in page.
Description: The student’s test session ended due to inactivity.
What Should I Do? If the student needs to continue testing, have them click OK to return to the log-in
page and log in again using his or her log-in credentials.
Message: Session Status Outside Window
Testing is currently unavailable. Please contact an administrator.
Description: The test ticket that is being used to log in to the test is in a test session for which the window
is not active.
What Should I Do? Move the student to a test session in an appropriate testing window.
Message: The device’s operating system has been updated and is in the process of being
certied by DRC.
The DRC INSIGHT application should perform as intended, but if you have questions,
please contact your Technology Coordinator.
This device is using OS version xxxxx
Description: The operating system on the Testing Device is valid, but the version or level of the operating
system has not been fully tested by DRC.
What Should I Do? You are allowed to test with this version, but DRC recommends that you use a fully
tested and supported level of the operating system.

Page 149
Error MessagesError Messages
Message: Your Client Attempted To Access An Invalid URL
Your session has been ended because your client tried to access an unsupported address.
Please click the OK button to proceed.
Description: The client is pointed to the wrong URL.
What Should I Do? The issue is often caused by incorrect forwarding by either the router DNS or the ISP.
For the correct URLs, refer to Volume I: Introduction to Online Testing.
Message: Your Client Failed The Readiness Check
This Testing Device did not pass a Readiness Check test. Please review the Readiness
Check to see which test failed and to x the issue.
Description: The Testing Device failed a System Readiness Check test.
What Should I Do? Use the System Readiness Check to see which test failed and x the issue. This error
can be caused by issues such as an invalid operating system or incorrect screen resolution.
Message: Your Client Is Out Of Date
Your session has been ended because your client is out of date. We will now attempt an
upgrade.
Description: The testing client is out of date.
What Should I Do? Click Upgrade to initiate the update of the Secure Browser.
Important: Only Linux users will see this message and the Upgrade button.
Message: Your Client Is Out Of Date
Please contact your local IT sta to update the DRC INSIGHT application.
Description: The testing client is out of date.
What Should I Do? Contact your local IT sta to update the DRC INSIGHT application.
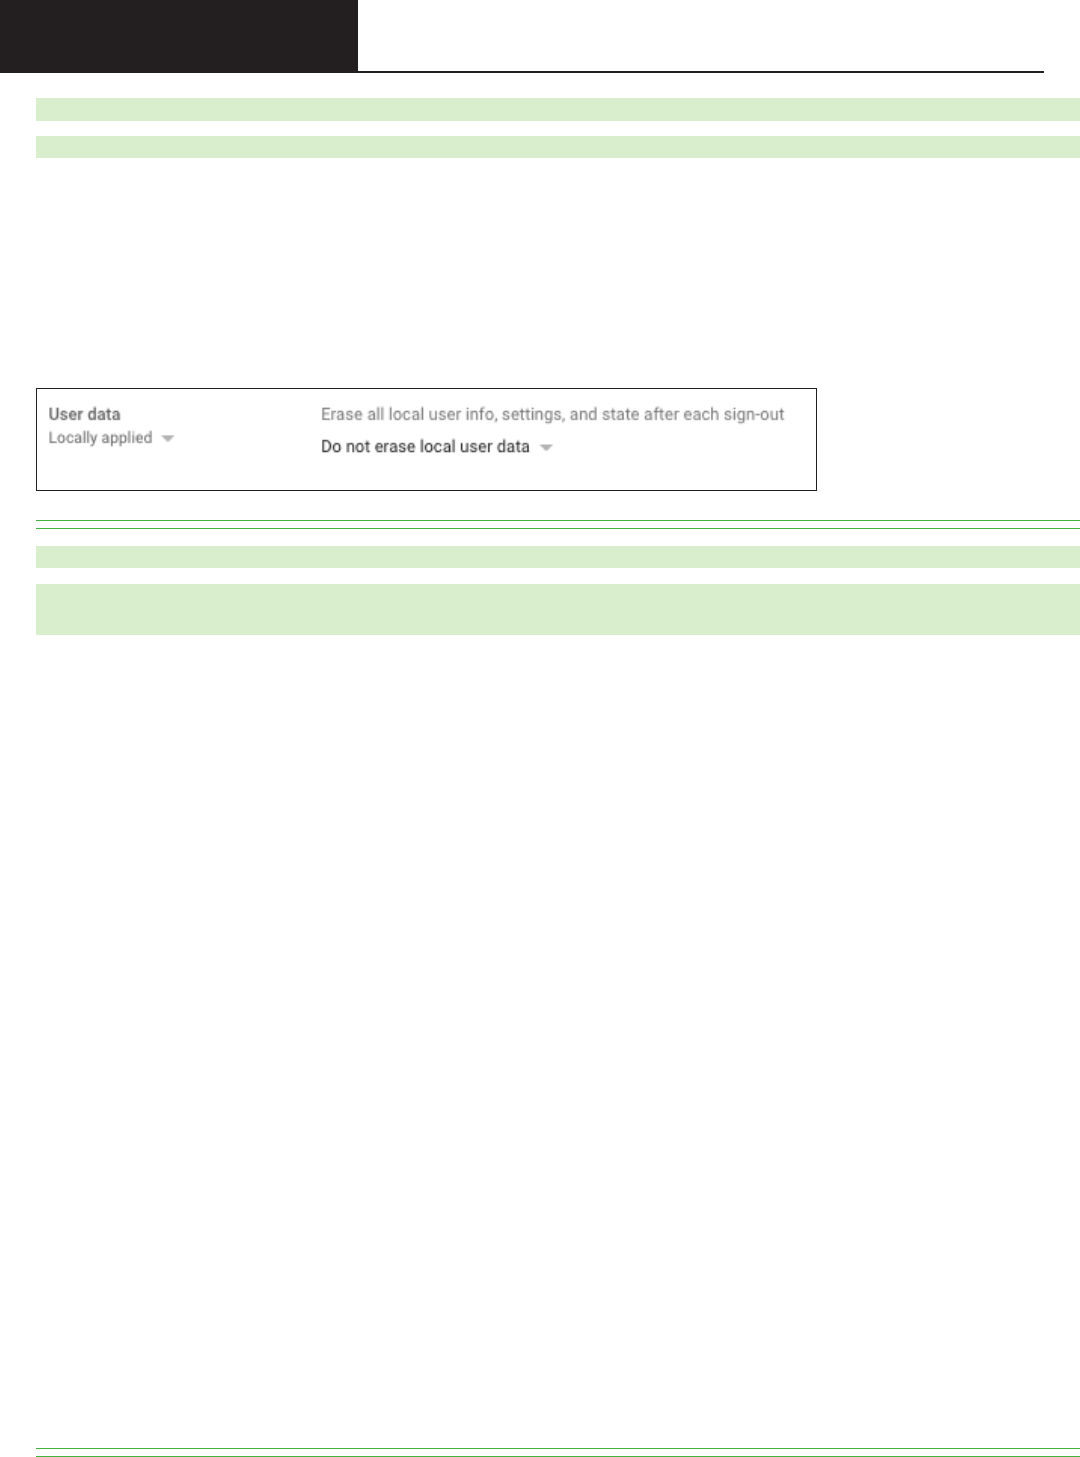
Page 150
Error MessagesError Messages
Message: Your Device Has Not Been Registered
The Chromebook device was already registered in Central Oce Services.
Description: Because the Google Admin Console setting for Erase all local user info, settings, and state
after sign-out was accidentally set to Erase all local user data after each sign-out, the Chromebook was
registered successfully but the registration was lost/deleted when the Chromebook was restarted.
What Should I Do? Verify that the setting for Erase all local user info, settings, and state after sign-out in
the Google Admin Console is set to Do not erase all local user data (see below).
Message: Your Testing Session Has Been Stopped
The testing session has been terminated due to inactivity. Please close all other
applications or browser sessions that may be open and re‑log in to the test.
Description: The DRC INSIGHT Test Engine monitors whether a tester leaves the DRC INSIGHT Secure
Application without exiting the test normally. If a tester leaves the test environment outside of the normal
and allowed methods, this error message is displayed and the tester’s test session is closed. For example,
if a tester attempts to open a virtual desktop or toggle to one during a test, the DRC INSIGHT Secure
Application will detect this activity and end the tester’s test session. At the same time, the DRC INSIGHT
Test Engine logs events to record this situation. Antivirus software, remote control/support software, rewall
software, active scanning and lter software can take system resources away from DRC INSIGHT and
possibly cause a timeout message. Ensure that these processes are scheduled outside of testing.
What Should I Do? Determine what caused this message to display and shut down or remove access to
any applications or browser sessions that the tester may have been able to access during the test session. In
addition, perform one or more of the following steps.
• Verify that no virtual desktop Apps are open before DRC INSIGHT is started.
• Verify that the student is not using the following key combinations: Control-Shift-Esc, Control-Alt-
Delete, or Windows-L. Using these key combinations will cause this error message to display.
• Ensure that tester is not using specic hotkeys or key combinations that would prompt the student to
leave DRC INSIGHT. Some examples include quickly pressing the Shift key ve times to activate
sticky keys, holding the Shift key for eight seconds, pressing Control-Tab, or swiping to another screen
on a touch-enabled device.
• Restart the testing device.
• Use Online Tools Training (OTT) to determine whether the problem happens within OTT.
• If necessary, move the tester to a dierent Testing Device, preferably a testing device that has been used
successfully for testing. The tester must log in again to continue testing.
Page 151
NotesNotes

Data Recognition Corporation (DRC)
13490 Bass Lake Road
Maple Grove, MN 55311
LAS Links Help Desk, toll-free: 1.800.538.9547 (9:00 a.m. – 7:00 p.m. CST)
Email: [email protected]
Revision Date: August 1, 2023
