
Oracle Linux Virtualization Manager
Getting Started
F52194-08
July 2023

Oracle Linux Virtualization Manager Getting Started,
F52194-08
Copyright © 2022, 2023, Oracle and/or its affiliates.

Contents
1
Preface
Conventions 1-1
Documentation Accessibility 1-2
Access to Oracle Support for Accessibility 1-2
Diversity and Inclusion 1-2
2
Requirements and Scalability Limits
3
Installation and Configuration
Installing the Engine 3-1
Configuring the Engine 3-3
Engine Configuration Options 3-4
OVN Provider 3-5
WebSocket Proxy 3-5
Data Warehouse 3-5
VM Console Proxy 3-5
Grafana 3-5
Manager DNS Name 3-6
Automatic Firewall Configuration 3-6
Data Warehouse Database 3-6
Engine Database 3-7
Admin User Password 3-8
Application Mode 3-8
OVN Provider Credentials 3-8
SAN Wipe After Delete 3-8
Web Server Configuration 3-8
Data Warehouse Sampling Scale 3-9
Grafana 3-9
Logging in to the Administration Portal 3-9
Preparing to Log in 3-9
Logging in 3-10
iii

Next Steps 3-11
Logging Out 3-11
Configuring a KVM Host 3-11
Preparing a KVM Host 3-11
Adding a KVM Host 3-13
4
Quick Start
Before You Begin 4-1
Adding a KVM Host to the Manager 4-2
Adding Storage 4-2
Attaching an iSCSI Data Domain 4-2
Uploading Images to the Data Domain 4-3
Before You Begin 4-3
Uploading an ISO Image to the Data Domain 4-4
Creating a Logical Network 4-5
Creating a Virtual Machine Network 4-5
Assigning the Virtual Machine Network to a KVM Host 4-6
Creating a New Virtual Machine 4-9
Installing Remote Viewer on Client Machine 4-9
Creating a New Oracle Linux Virtual Machine 4-10
Installing the Oracle Linux Guest OS 4-13
Installing the Oracle Linux Guest Agent 4-13
Creating a New Microsoft Windows Virtual Machine 4-14
Before You Begin 4-14
Creating a New Microsoft Windows Virtual Machine 4-15
Installing the Microsoft Windows Guest OS 4-18
Installing the VirtIO Drivers 4-19
Installing the QEMU Guest Agent 4-20
Creating a Template 4-22
Sealing an Oracle Linux Virtual Machine for Use as a Template 4-22
Creating an Oracle Linux Template 4-23
Creating a Cloud-Init Enabled Template 4-25
Before You Begin 4-25
Using Cloud-Init to Automate the Initial Setup of a Virtual Machine 4-26
Creating a Virtual Machine from a Template 4-27
Creating an Oracle Linux Virtual Machine from a Template 4-27
Backing Up and Restoring the Manager 4-28
Backing Up the Manager 4-29
Restoring a Full Backup of the Manager 4-29
iv

5
Self-Hosted Engine Deployment
Self-Hosted Engine Prerequisites 5-1
Deploying the Self-Hosted Engine 5-2
Using the Command Line to Deploy 5-4
Using the Cockpit Portal to Deploy 5-9
Enabling High-Availability 5-11
Configuring a Highly Available Host 5-11
Configuring Power Management and Fencing on a Host 5-12
Preventing Host Fencing During Boot 5-14
Checking Fencing Parameters 5-14
Installing Additional Self-Hosted Engine Hosts 5-14
Cleaning up the Deployment 5-15
Upgrading Or Updating the Self-Hosted Engine 5-15
6
Deploying GlusterFS Storage
Deploying GlusterFS Storage Using Cockpit 6-1
Creating a GlusterFS Storage Domain Using the Manager 6-3
v

1
Preface
Oracle Linux Virtualization Manager Release 4.4 is based on oVirt, which is a free, open-
source virtualization solution. The product documentation comprises:
• Release Notes - A summary of the new features, changes, fixed bugs, and known issues
in the Oracle Linux Virtualization Manager. It contains last-minute information, which
might not be included in the main body of documentation.
• Architecture and Planning Guide - An architectural overview of Oracle Linux
Virtualization Manager, prerequisites, and planning information for your environment.
• Getting Started Guide - How to install, configure, and get started with the Oracle Linux
Virtualization Manager. The document includes an example scenario covering basic
procedures for setting up the environment, such as adding hosts and storage, creating
virtual machines, configuring networks, working with templates, and backup and restore
tasks. In addition, there is information on upgrading your engine and hosts as well as
deploying a self-hosted configuration.
• Administration Guide - Provides common administrative tasks for Oracle Linux
Virtualization Manager and information on setting up users and groups, configuring high-
availability, memory and CPUs, configuring and using event notifications, configuring
vCPUs and virtual memory.
You can also refer to:
• REST API Guide, which you can access from the Welcome Dashboard or directly
through its URL
https://manager-fqdn/ovirt-engine/apidoc
.
• Upstream oVirt Documentation.
To access the Release 4.3.10 documentation, PDFs are available at:
• https://www.oracle.com/a/ocom/docs/olvm43/olvm-43-releasenotes.pdf
• https://www.oracle.com/a/ocom/docs/olvm43/olvm-43-gettingstarted.pdf
• https://www.oracle.com/a/ocom/docs/olvm43/olvm-43-architecture-planning.pdf
• https://www.oracle.com/a/ocom/docs/olvm43/olvm-43-administration.pdf
Conventions
The following text conventions are used in this document:
Convention Meaning
boldface Boldface type indicates graphical user interface elements associated
with an action, or terms dened in text or the glossary.
italic Italic type indicates book titles, emphasis, or placeholder variables for
which you supply particular values.
monospace
Monospace type indicates commands within a paragraph, URLs, code
in examples, text that appears on the screen, or text that you enter.
1-1

Documentation Accessibility
For information about Oracle's commitment to accessibility, visit the Oracle
Accessibility Program website at http://www.oracle.com/pls/topic/lookup?
ctx=acc&id=docacc.
For information about the accessibility of the Oracle Help Center, see the Oracle
Accessibility Conformance Report at https://www.oracle.com/corporate/accessibility/
templates/t2-11535.html.
Access to Oracle Support for Accessibility
Oracle customers that have purchased support have access to electronic support
through My Oracle Support. For information, visit https://www.oracle.com/corporate/
accessibility/learning-support.html#support-tab.
Diversity and Inclusion
Oracle is fully committed to diversity and inclusion. Oracle respects and values having
a diverse workforce that increases thought leadership and innovation. As part of our
initiative to build a more inclusive culture that positively impacts our employees,
customers, and partners, we are working to remove insensitive terms from our
products and documentation. We are also mindful of the necessity to maintain
compatibility with our customers' existing technologies and the need to ensure
continuity of service as Oracle's offerings and industry standards evolve. Because of
these technical constraints, our effort to remove insensitive terms is ongoing and will
take time and external cooperation.
Chapter 1
Documentation Accessibility
1-2

2
Requirements and Scalability Limits
Before you begin the tasks in this guide, you should review Oracle Linux Virtualization
Manager Release 4.4 concepts, environment requirements, and scalability limitations in the
Oracle Linux Virtualization Manager: Architecture and Planning Guide.
2-1

3
Installation and Configuration
To deploy Oracle Linux Virtualization Manager, you install and configure the engine on a host
with Oracle Linux 8.5 (or later), configure KVM hosts, storage, and networks, and create
virtual machines. Thoroughly review the Requirements and Scalability Limits as the
requirements for the engine host are different than the KVM hosts.
To review conceptual information and help to plan your installation, see the Oracle Linux
Virtualization Manager: Architecture and Planning Guide.
Installing the Engine
To install Oracle Linux Virtualization Manager, you perform a fresh installation of Oracle Linux
8.5 (or later) on the host, install the
ovirt-engine
package, and then run the engine-setup
command to configure the Manager.
Note:
You can install the Manager in a virtual machine as long as it is not managing that
virtual machine, or in a self-hosted engine configuration. For more information, see
Self-Hosted Engine Deployment. Do not configure the same host as a
standalone engine and a KVM host.
You can download the installation ISO for Oracle Linux 8.5 (or later) from the Oracle Software
Delivery Cloud at https://edelivery.oracle.com.
1. Install Oracle Linux 8.5 (or later) on the host using the Minimal Install base environment.
Follow the instructions in the Oracle
®
Linux 8: Installing Oracle Linux.
Important:
Do not install any additional packages until after you have installed the
Manager packages, because they may cause dependency issues.
2. (Optional) If you use a proxy server for Internet access, configure Yum with the proxy
server settings. For more information, see the Oracle
®
Linux: Managing Software on
Oracle Linux.
3. Complete one of the following sets of steps:
• For ULN registered hosts or using Oracle Linux Manager
Subscribe the system to the required channels.
3-1

a.
For ULN registered hosts, log in to https://linux.oracle.com with your ULN
user name and password. For Oracle Linux Manager registered hosts,
access your internal server URL.
b.
On the Systems tab, click the link named for the host in the list of
registered machines.
c.
On the System Details page, click Manage Subscriptions.
d.
On the System Summary page, select each required channel from the list
of available channels and click the right arrow to move the channel to the
list of subscribed channels. Subscribe the system to the following
channels:
–
ol8_x86_64_baseos_latest
–
ol8_x86_64_appstream
–
ol8_x86_64_kvm_appstream
–
ol8_x86_64_ovirt44
–
ol8_x86_64_ovirt44_extras
–
ol8_x86_64_gluster_appstream
– (For VDSM)
ol8_x86_64_UEKR7
e. Click Save Subscriptions.
f. Enable the pki-deps and PostgreSQL:13 appstream modules.
# dnf -y module enable pki-deps
# dnf -y module enable postgresql:13
g. Disable the virt:ol module and enable the virt:kvm_utils2 module.
# dnf -y module disable virt:ol
# dnf -y module enable virt:kvm_utils2
• For Oracle Linux yum server hosts
Install the Oracle Linux Virtualization Manager Release 4.4 package and
enable the required repositories.
a. (Optional) Make sure the host is using the modular yum repository
configuration. For more information, see Oracle
®
Linux: Yum
Modularization Update Notice.
b. Enable the
ol8_baseos_latest
repository.
# dnf config-manager --enable ol8_baseos_latest
Important:
Before you execute dnf config-manager ensure the dnf-utils
package is installed on your system. For more information, see
Yum DNF in Oracle
®
Linux: Managing Software on Oracle
Linux .
c.
Install the Oracle Linux Virtualization Manager Release 4.4 package.
Chapter 3
Installing the Engine
3-2

# dnf install oracle-ovirt-release-el8
d.
Use the dnf command to verify that the required repositories are enabled.
i.
Clear the dnf cache.
# dnf clean all
ii.
List the configured repositories and verify that the required repositories are
enabled.
# dnf repolist
The following repositories must be enabled:
–
ol8_baseos_latest
–
ol8_appstream
–
ol8_kvm_appstream
–
ol8_ovirt44
–
ol8_ovirt44_extras
–
ol8_64_gluster_appstream
– (For VDSM)
ol8_64_UEKR7
iii. If a required repository is not enabled, use the dnf config-manager to enable
it.
# dnf config-manager --enable
repository
4. Install the Manager using the
ovirt-engine
command.
# dnf install ovirt-engine
Proceed to Configuring the Engine.
Configuring the Engine
After you install the Oracle Linux Virtualization Manager, you run the engine-setup command
(the Setup program) to configure the Manager. You are prompted to answer a series of
questions whose values are used to configure the Manager. Some of these questions relate
to features that are in technology preview; Oracle recommends that you accept the default
values for these features. For more information, see Technology Preview in the Oracle Linux
Virtualization Manager: Release Notes.
The Manager uses two PostgreSQL databases: one for the engine and one for the data
warehouse. By default, Setup creates and configures the engine database locally on the
engine host. Alternatively, you can configure the engine host to use a manually-configured
local or remote database. If you choose to use a manually-configured local or remote
database, you must set it up before running
engine-setup
. Currently, running the engine or
data warehouse database on a remote host is a technology preview feature.
To configure the Manager:
1.
Run the
engine-setup
command on the host where you installed the Manager.
[ INFO ] Stage: Initializing
[ INFO ] Stage: Environment setup
Configuration files: /etc/ovirt-engine-setup.conf.d/10-packaging-jboss.conf, /etc/
ovirt-engine-setup.conf.d/10-packaging.conf
Chapter 3
Installing the Engine
3-3

Log file: /var/log/ovirt-engine/setup/ovirt-engine-setup-YYYYMMDDHHMMSS-
snz1rn.log
[ INFO ] Stage: Environment packages setup
[ INFO ] Stage: Programs detection
[ INFO ] Stage: Environment setup (late)
[ INFO ] Stage: Environment customization
Note:
Run
engine-setup --accept-defaults
to automatically accept all
questions that have default answers.
The Setup program prompts you to configure the Manager.
2.
Enter Yes if you want to configure Cinderlib integration, which is currently a Tech
Preview feature. The default is No.
Configure Cinderlib integration (Currently in tech preview) (Yes, No) [No]:
3.
Enter Yes to configure the Manager.
Configure Engine on this host (Yes, No) [Yes]:
If you enter No, the configuration stops. To restart, rerun the engine-setup
command.
4.
For the remaining configuration questions, provide input or accept default values,
which are in square brackets after each question. To accept the default value for a
given question, press Enter.
Note:
Setup asks you for the fully qualified DNS name (FQDN) of the Manager
host. Although Setup tries to automatically detect the name, you must
ensure the FQDN is correct.
For detailed information on the configuration options, see Engine
Configuration Options.
5.
Once you have answered all the questions, Setup displays a list of the values you
entered. Review the list carefully and then press Enter to configure the Manager.
Your answers are saved to a file that can be used to reconfigure the Manager
using the same values. Setup also displays the location of the log file for the
configuration process.
6.
When the configuration is complete, details about how to log in to the
Administration Portal are displayed. To verify that the configuration was
successful, log into the Administration Portal, as described in Logging in to the
Administration Portal.
Engine Configuration Options
The information in thie section describes the options for configuring Oracle Linux
Virtualization Manager when you run the engine-setup command.
Chapter 3
Installing the Engine
3-4

Note:
Some of the configuration option are in technology preview; Oracle recommends
that you accept the default values for these features. For more information, see
Technology Preview in the Oracle Linux Virtualization Manager: Release Notes.
OVN Provider
Configuring ovirt-provider-ovn also sets the Default cluster's default network
provider to ovirt-provider-ovn.
Non-Default clusters may be configured with an OVN after installation.
Configure ovirt-provider-ovn (Yes, No) [Yes]:
Install the Open Virtual Network (OVN) provider on the Manager host and add it as an
external network provider. The default cluster is automatically configured to use OVN as its
network provider.
OVN is an OVS (Open vSwitch) extension which enables you to configure virtual networks.
Using external providers, including the OVN provider, is a technology preview feature.
WebSocket Proxy
Configure WebSocket Proxy on this machine? (Yes, No) [Yes]:
The WebSocket Proxy enables you to connect to virtual machines using the noVNC or HTML
5 consoles.
For security and performance reasons, you can configure the WebSocket Proxy on a remote
host.
Data Warehouse
Please note: Data Warehouse is required for the engine.
If you choose to not configure it on this host, you have to configure
it on a remote host, and then configure the engine on this host so that it can
access the database of the remote Data Warehouse host.
Configure Data Warehouse on this host (Yes, No) [Yes]:
The Data Warehouse feature can run on the Manager host or on a remote host. Running
Data Warehouse on a remote host reduces the load on the Manager host.
Running the Data Warehouse on a remote host is a technology preview feature.
VM Console Proxy
Configure VM Console Proxy on this host (Yes, No) [Yes]:
The VM Console Proxy enables you to access virtual machine serial consoles from a
command line. To use this feature, serial consoles must be enabled in the virtual machines.
Grafana
Use Engine admin password as initial Grafana admin password (Yes, No) [Yes]:
Chapter 3
Installing the Engine
3-5

Grafana can be configured to to use the Engine password to make signing in easier.
Manager DNS Name
Host fully qualified DNS name of this server [<autodetected-host-name>]:
The fully qualified DNS name of the Manager host. Check that the automatically
detected DNS name is correct.
Automatic Firewall Configuration
Setup can automatically configure the firewall on this system.
Note: automatic configuration of the firewall may overwrite current settings.
Do you want Setup to configure the firewall? (Yes, No) [Yes]:
The following firewall managers were detected on this system: firewalld
Firewall manager to configure (firewalld): firewalld
Configure the firewall on the host to open the ports used for external communication
between Oracle Linux Virtualization Manager and the components it manages.
If Setup configures the firewall, and no firewall managers are active, you are prompted
to select a firewall manager from a list.
If you enter No, you must manually configure the firewall. When the Manager
configuration is complete, Setup displays a list of ports that need to be opened, see for
details.
Data Warehouse Database
Where is the DWH database located? (Local, Remote) [Local]:
The Data Warehouse database (the history database) can run on the Manager host or
on a remote host. Running the database on a remote host reduces the load on the
Manager host.
Running the database on a remote host is a technology preview feature.
Caution:
In this step you configure the name of the database, and the user name and
password for connecting to it. Make a note of these details.
Enter Local to connect to a local PostgreSQL server, or Remote to connect to an
existing PostgreSQL server running on a remote host.
If you enter Local, you can choose whether to set up a local PostgreSQL server
automatically, or to connect to an existing local PostgreSQL server.
Setup can configure the local postgresql server automatically for the DWH to
run.
This may conflict with existing applications.
Would you like Setup to automatically configure postgresql and create DWH
database,
or prefer to perform that manually? (Automatic, Manual) [Automatic]:
Chapter 3
Installing the Engine
3-6

Enter Automatic to have Setup configure a local database server, or Manual to connect to an
existing local database server. If you enter Manual, you are prompted for the details for
connecting to the database:
DWH database secured connection (Yes, No) [No]:
DWH database name [ovirt_engine_history]:
DWH database user [ovirt_engine_history]:
DWH database password:
If you enter Remote to connect to an existing PostgreSQL server running on a remote host,
you are prompted for the details for connecting to the database:
DWH database host [localhost]:
DWH database port [5432]:
DWH database secured connection (Yes, No) [No]:
DWH database name [ovirt_engine_history]:
DWH database user [ovirt_engine_history]:
DWH database password:
Engine Database
Where is the Engine database located? (Local, Remote) [Local]:
The Oracle Linux Virtualization Manager database (the engine database) can run on the
Manager host or on a remote host. Running the database on a remote host reduces the load
on the Manager host.
Running the database on a remote host is a technology preview feature.
Caution:
In this step you configure the name of the database, and the user name and
password for connecting to it. Make a note of these details.
Enter Local to connect to a local PostgreSQL server, or Remote to connect to an existing
PostgreSQL server running on a remote host.
If you enter Local, you can choose whether to set up a local PostgreSQL server
automatically, or to connect to an existing local PostgreSQL server.
Setup can configure the local postgresql server automatically for the engine to run.
This may conflict with existing applications.
Would you like Setup to automatically configure postgresql and create Engine database,
or prefer to perform that manually? (Automatic, Manual) [Automatic]:
Enter Automatic to have Setup configure a local database server, or Manual to connect to an
existing local database server. If you enter Manual, you are prompted for the details for
connecting to the database:
Engine database secured connection (Yes, No) [No]:
Engine database name [engine]:
Engine database user [engine]:
Engine database password:
If you enter Remote to connect to an existing PostgreSQL server running on a remote host,
you are prompted for the details for connecting to the database:
Chapter 3
Installing the Engine
3-7

Engine database host [localhost]:
Engine database port [5432]:
Engine database secured connection (Yes, No) [No]:
Engine database name [engine]:
Engine database user [engine]:
Engine database password:
Admin User Password
Engine admin password:
Confirm engine admin password:
Enter a password for the default administrative user (admin@internal). Make a note of
the password. If you use a simple password, you might get the following warning:
[WARNING] Password is weak: The password fails the dictionary check - it is
based on a dictionary word
Use weak password? (Yes, No) [No]: Yes
Application Mode
Application mode (Both, Virt, Gluster) [Both]:
The Manager can be configured to manage virtual machines (Virt) or manage Gluster
clusters (Gluster), or Both.
OVN Provider Credentials
Use default credentials (admin@internal) for ovirt-provider-ovn (Yes, No) [Yes]:
oVirt OVN provider user[admin@internal]:
oVirt OVN provider password:
If you installed the OVN provider, configure the credentials for connecting to the OVN
(Open vSwitch) databases.
Using external providers, including the OVN provider, is a technology preview feature.
SAN Wipe After Delete
Default SAN wipe after delete (Yes, No) [No]:
Enter Yes to set the default value for the
wipe_after_delete
flag to
true
, which wipes
the blocks of a virtual disk when it is deleted.
Using the wipe after delete functionality is a technology preview feature.
Web Server Configuration
Organization name for certificate [<autodetected-domain-based-name>]:
Provide the organization name to use for the automatically generated self-signed SSL
certificate used by the Manager web server.
Setup can configure the default page of the web server to
present the application home page. This may conflict with existing applications.
Do you wish to set the application as the default web page of the server? (Yes,
No) [Yes]:
Chapter 3
Installing the Engine
3-8

Enter Yes to make the Oracle Linux Virtualization Manager landing page the default page
presented by the web server.
Setup can configure apache to use SSL using a certificate issued
from the internal CA. Do you wish Setup to configure that, or prefer to
perform that manually? (Automatic, Manual) [Automatic]:
Enter Automatic to generate a self-signed SSL certificate for the web server. Only use self-
signed certificates for testing purposes.
Enter Manual to provide the location of the SSL certificate and private key to use the web
server.
Data Warehouse Sampling Scale
Please choose Data Warehouse sampling scale:
(1) Basic
(2) Full
(1, 2)[1]:
Set the Data Warehouse sampling scale, either Basic or Full. This step is skipped the Data
Warehouse is not configured to run on the Manager host.
Enter 1 for Basic, which reduces the values of
DWH_TABLES_KEEP_HOURLY
to
720
and
DWH_TABLES_KEEP_DAILY
to
0
. Enter 2 for Full.
If the Manager and the Data Warehouse run on the same host, Basic is the recommended
sample scale because this reduces the load on the Manager host. Full is recommended only
if the Data Warehouse runs on a remote host.
The Full sampling scale is a technology preview feature.
Grafana
Use Engine admin password as initial Grafana admin password (Yes, No) [Yes]:
Grafana can be configured to to use the Engine password to make signing in easier.
Logging in to the Administration Portal
After you run the engine-setup command to configure Oracle Linux Virtualization Manager,
you should log into the Administration Portal to verify that the configuration was successful.
Preparing to Log in
It is recommended that you use the latest version one of the following browsers to access the
Administration Portal
• Mozilla Firefox
• Google Chrome
• Apple Safari
• Microsoft Internet Explorer 11
• Microsoft Edge
Chapter 3
Installing the Engine
3-9

If Oracle Linux Virtualization Manager was configured to use a self-signed SSL
certificate, or an SSL certificate that is signed by a Certificate Authority (CA) that is not
trusted by the browser (for example an Intermediate CA), you should install the CA
certificate in the browser. Consult your browser's instructions for how to import a CA
certificate.
You can download the CA certificate by clicking Engine CA Certificate on the Welcome
dashboard or by navigating directly to
http://manager-fqdn/ovirt-engine/
services/pki-resource?resource=ca-certificate&format=X509-PEM-CA
.
Usually you access the Administration Portal using the fully qualified domain name of
the Manager host that you provided during installation. However, you can access the
Administration Portal using an alternate host name(s). To do this, you need to add a
configuration file to the Manager as follows:
1.
Log in to the Manager host as root.
2.
Create the file
/etc/ovirt-engine/engine.conf.d/99-custom-sso-
setup.conf
with the following content:
SSO_ALTERNATE_ENGINE_FQDNS="
alias1.example.com
alias2.example.com
"
The list of alternate host names must be separated by spaces.
3. Restart Oracle Linux Virtualization Manager.
# systemctl restart ovirt-engine
Logging in
You log in to the Administration Portal using a web browser and the default
admin@internal user.
1.
Go to
https://manager-fqdn/ovirt-engine
. The Welcome page displays.
2.
(Optional) Change the preferred language from the drop-down list on the
Welcome page.
You can view the Administration Portal in multiple languages. The default
language is based on the locale of your web browser.
3. Click Administration Portal. The Login page displays.
4. Enter
admin
for the Username and the password you specified when you
configured the Manager.
5. From the Profile list, select
internal
and click Log In.
Important:
From the Welcome dashboard, you also have the option of logging into two
additional portals:
• The VM Portal
• The Monitoring Portal
For more information, see Access Portals in the Oracle Linux Virtualization
Manager: Architecture and Planning Guide
Chapter 3
Installing the Engine
3-10

Next Steps
Now that you have configured and logged into the Manager, the next step is to add Oracle
Linux KVM hosts, as described in Configuring a KVM Host.
You also need to add storage and configure logical networks. See Adding Storage and
Creating a Logical Network.
Logging Out
To log out of the Administration Portal, click the person icon in the header bar and click
Sign Out. You are returned to the Login page.
Configuring a KVM Host
Prepare and add a KVM host installed with Oracle Linux 8.5 (or later). For detailed
information on the supported guest operating systems, see the Oracle
®
Linux: KVM User's
Guide.
To manage an Oracle Linux KVM host using Oracle Linux Virtualization Manager, prepare the
KVM host by performing a fresh installation of Oracle Linux 8.5 (or later) and enabling the
required repositories, and then you add the host to a data center using the Administration
Portal.
Preparing a KVM Host
Before you can add an Oracle Linux KVM host, prepare it by performing a fresh installation of
Oracle Linux 8.5 (or later) and enabling the required repositories. You can download the
installation ISO for Oracle Linux 8.5 (or later) from the Oracle Software Delivery Cloud at
https://edelivery.oracle.com.
1. Install Oracle Linux 8.5 (or later) on the host.
• Follow the instructions in the Oracle
®
Linux 8: Installing Oracle Linux.
• Select Minimal Install as the base environment for the installation.
Caution:
Do NOT select any other base environment than Minimal Install for the
installation or your hosts will have incorrect qemu and libvirt versions,
incorrect repositories configured, and no access to virtual machine
consoles.
• Do not install any additional packages until after you have added the host to the
Manager, because they may cause dependency issues.
2. (Optional) If you use a proxy server for Internet access, configure Yum with the proxy
server settings. For more information, see the Oracle
®
Linux: Managing Software on
Oracle Linux.
3.
Complete one of the following sets of steps:
• For ULN registered hosts or using Oracle Linux Manager
Chapter 3
Configuring a KVM Host
3-11

Subscribe the system to the required channels.
a.
For ULN registered hosts, log in to https://linux.oracle.com with your ULN
user name and password. For Oracle Linux Manager registered hosts,
access your internal server URL.
b.
On the Systems tab, click the link named for the host in the list of
registered machines.
c.
On the System Details page, click Manage Subscriptions.
d.
On the System Summary page, select each required channel from the list
of available channels and click the right arrow to move the channel to the
list of subscribed channels. Subscribe the system to the following
channels:
–
ol8_x86_64_baseos_latest
–
ol8_x86_64_appstream
–
ol8_x86_64_kvm_appstream
–
ol8_x86_64_ovirt44
–
ol8_x86_64_ovirt44_extras
–
ol8_x86_64_gluster_appstream
– (For VDSM)
ol8_x86_64_UEKR7
e. Click Save Subscriptions.
f. Disable the virt:ol module and enable the virt:kvm_utils2 module.
# dnf -y module disable virt:ol
# dnf -y module enable
virt:kvm_utils2
• For Oracle Linux yum server configured KVM hosts
Install the Oracle Linux Virtualization Manager Release 4.4 package and
enable the required repositories.
Note:
Installing the Oracle Linux Virtualization Manager Release 4.4
package configures an Oracle Linux KVM host; it does not install the
Manager.
a. (Optional) Make sure the host is using the modular yum repository
configuration. For more information, see Getting Started with Oracle Linux
Yum Server.
b. Enable the ol8_baseos_latest repository.
# dnf config-manager --enable ol8_baseos_latest
Chapter 3
Configuring a KVM Host
3-12

Important:
Before you execute dnf config-manager ensure the dnf-utils package
is installed on your system. For more information, see Yum DNF in
Oracle
®
Linux: Managing Software on Oracle Linux.
c.
Install the Oracle Linux Virtualization Manager Release 4.4 package.
# dnf install oracle-ovirt-release-el8
d.
Use the dnf command to verify that the required repositories are enabled.
i.
Clear the dnf cache.
# dnf clean all
ii.
List the configured repositories and verify that the required repositories are
enabled.
# dnf repolist
The following repositories must be enabled:
–
ol8_64_baseos_latest
–
ol8_appstream
–
ol8_kvm_appstream
–
ol8_ovirt44
–
ol8_ovirt44_extras
–
ol8_gluster_appstream
– (For VDSM)
ol8_UEKR7
iii. If a required repository is not enabled, use the dnf config-manager to enable
it.
# dnf config-manager --enable
repository
4. (Optional) Open the Cockpit port.
# firewall-cmd --zone=public --add-port=9090/tcp
The Cockpit web interface can be used to monitor the host’s resources and to perform
administrative tasks. You can access the host's Cockpit web interface from the
Administration Portal or by connecting directly to the host.
For more information about configuring
firewalld
, see Configuring a Packet Filtering
Firewall in the Oracle
®
Linux 8: Configuring the Firewall.
5.
(Optional) Complete the previous steps to prepare additional KVM hosts.
The Oracle Linux KVM host is now ready to be added to the Manager using the
Administration Portal.
Adding a KVM Host
Once you have configured an Oracle Linux KVM host, you use the Administration Portal to
add the host to a data center so that it can be used to run virtual machines. You can follow
the steps below to add KVM hosts installed with other supported guest operating systems.
Chapter 3
Configuring a KVM Host
3-13

Note:
When you install Oracle Linux Virtualization Manager, a data center and
cluster named Default is created. You can rename and configure this data
center and cluster, or you can add new data centers and clusters, to meet
your needs. See the Data Centers and Clusters tasks in the Oracle Linux
Virtualization Manager: Administration Guide for details of how to do this.
To add an Oracle Linux KVM host:
1.
Log in to the Administration Portal.
See Logging in to the Administration Portal for details.
2.
Go to Compute and then click Hosts.
3.
On the Hosts pane, click New.
The New Host dialog box opens with the General tab selected on the sidebar.
4.
From the Host Cluster drop-down list, select the data center and host cluster for
the host.
The Default data center is auto-selected.
For the example scenario in Quick Start, you use the default data center and
cluster. If you want to create a new data center or a new cluster, refer to the Data
Centers or Clusters tasks in the Oracle Linux Virtualization Manager:
Administration Guide.
5.
In the Name field, enter a name for the host.
6.
In the Hostname field, enter the fully-qualified domain name or IP address of the
host.
7.
In the SSH Port field, change the standard SSH port 22 if the SSH server on the
host uses a different port.
8.
Under Authentication, select the authentication method to use.
Oracle recommends that you select SSH PublicKey authentication. If you select
this option, copy the key displayed in the SSH PublicKey field to the
/
root/.ssh/authorized_keys file on the host.
Otherwise, enter the root user's password to use password authentication.
9.
(Optional) Configure other settings for the host from the other tabs on the New
Host sidebar.
Note:
If you do not want to set any other configuration options now, you can
always make changes later by selecting a host from the Hosts pane and
clicking Edit.
10. Click OK.
The Power Management Configuration screen is displayed.
Chapter 3
Configuring a KVM Host
3-14

11.
If you do not want to configure power management, click OK. Otherwise, click Configure
Power Management. See Configuring Power Management and Fencing on a Host for
more information.
The host is added to the list of hosts in the Manager. While the Manager is installing the
host agent (VDSM) and other required packages on the host, the status of the host is
shown as Installing. You can view the progress of the installation in the Hosts details
pane. When the installation is complete, the host status changes to Up.
12.
(Optional) Complete the previous steps to add more KVM hosts to the Manager.
Important:
Oracle Linux Virtualization Manager allows you to overallocate a KVM host's
memory and CPU resources. As the KVM host itself also needs memory and CPU
in order to run, Oracle recommends that you reserve some memory and CPU for
the KVM host. To do this, go to Administration and set a memory quota and a
vCPU quota.
Now that you have your engine and host(s) configured, you can complete other configuration
and administrative tasks. See Quick Start for information on configuring your environment
with storage, networks, virtual machines and learn how to create templates and back up your
environment. See the Oracle Linux Virtualization Manager: Administration Guide for more
detailed configuration and administrative tasks.
Chapter 3
Configuring a KVM Host
3-15

4
Quick Start
To get you started with Oracle Linux Virtualization Manager, the following example scenario
walks you through the procedures for adding hosts, adding storage, setting up a network,
creating virtual machines, and backing up and restoring the Manager.
Before You Begin
Before you begin the quick start tasks, you should be familiar with the concepts that are
presented in the Oracle Linux Virtualization Manager: Architecture and Planning Guide and
ensure the following prerequisites are met.
• The procedures in this section assume that you have installed and configured Oracle
Linux Virtualization Manager in your environment. For more information, refer to
Installation and Configuration.
• For tasks that must be completed in the Manager, the procedures in this emphasisde
assume that you are logged in to the Administration Portal.
• Oracle Linux Virtualization Manager creates a default data center and cluster during
installation. For the purpose of this example scenario, the default data center and cluster
are used. For the procedures to create new data centers or a new clusters, refer to
Clusters in the Oracle Linux Virtualization Manager: Administration Guide.
• For Adding a KVM Host to the Manager, you must have access to a host that you can
add to your virtualization environment and it must be appropriately prepared. See
Preparing a KVM Host.
• For Adding Storage, an Internet Small Computer System Interface (iSCSI) storage device
is used for the example scenario. If you do not have access to an iSCSI device, refer to
Storage in the Oracle Linux Virtualization Manager: Administration Guide for the
procedures for adding other storage types to your virtualization environment.
• For Uploading Images to the Data Domain, the
ovirt-engine
certificate must be
registered as a valid CA in the browser to connect to the
ovirt-imageio-service
.
• In Creating a New Virtual Machine:
– The procedures for creating an Oracle Linux virtual machine assume you are using
an Oracle Linux 7 guest operating system.
Note:
For detailed information on the supported guest operating systems, see the
Oracle
®
Linux: KVM User's Guide.
– The procedures for creating Oracle Linux and Microsoft Windows virtual machines
assume that you have added the ISO images to the data domain on the storage
device used in Adding Storage.
4-1

Important:
See See Windows Virtual Machines Lose Functionality Due To
Deprecated Guest Agent in the Known Issues section of the Oracle
Linux Virtualization Manager: Release Notes.
– To use the console to access a virtual machine, you must install the Remote
Viewer application on the client from which you want to access. This
application provides users with a graphical console for connecting to virtual
machines.
1. Install the
virt-viewer
package.
# dnf install virt-viewer
2. Restart your browser for the changes to effect in the Oracle Linux
Virtualization Manager.
Adding a KVM Host to the Manager
To add a KVM host to the Manager, follow the procedure for Adding a KVM Host.
Adding Storage
For this example scenario, you attach an iSCSI storage to your virtualization
environment and then upload an ISO image to the data domain. If you do not have
access to an iSCSI device, refer to Storage in the Oracle Linux Virtualization Manager:
Administration Guide for the procedures for adding other storage types to your
virtualization environment.
Attaching an iSCSI Data Domain
For iSCSI storage, a storage domain is created from a volume group that is composed
of pre-existing LUNs.
To attach an iSCSI data domain to your virtualization environment:
1. Go to Storage and then click Domains.
The Storage Domains pane opens.
2. Click New Domain.
The New Domain dialog box opens.
3. From the Data Center drop-down list, select the data center for which to attach the
data domain.
The Default data center is pre-selected in the drop-down list. Leave Default
selected from the drop-down list because the default data center and cluster are
used for the example scenario.
For the procedures to create new data centers or a new clusters, refer to Data
Centers or Clusters tasks in the Oracle Linux Virtualization Manager:
Administration Guide.
4. For the Name field, enter a name for the data domain.
Chapter 4
Adding a KVM Host to the Manager
4-2

5.
From the Domain Function drop-down list, select the domain function. By default, the
Data option is selected in the drop-down list.
For this step, leave Data as the domain function because you are creating a data domain
in this example.
6.
From the Storage Type drop-down list, select iSCSI.
7.
From the Host drop-down list, select the host for which to attach the data domain.
For this example scenario, select the host added in Adding a KVM Host to the Manager.
8.
When iSCSI is selected for the Storage Type, the Discover Targets dialog box opens
and the New Domain dialog box automatically displays the known targets with unused
LUNs under the Target Name column.
If the target from which you are adding storage is not listed, complete the following fields
in the Discover Targets dialog box:
a.
For the Address field, enter fully qualified domain name or IP address of the iSCSI
host on the storage array.
b.
For the Port field, enter the port to connect to on the host when browsing for targets.
By default, this field is automatically populated with the default iSCSI Port, 3260.
After completing these fields, click Discover.
The Target Name column updates to list all the available targets discovered on the
storage array.
9.
Under the Target Name column, select the desired target and select the black right-
directional arrow to log in to the target.
The Storage Domains pane refreshes to list only the targets for which you logged in.
10.
Click + to expand the desired target.
The target expands to display all the unused LUNS.
11.
Click Add for each LUN ID that is to connect to the target.
12.
(Optional) Configure the advanced parameters.
If you are using ZFS storage, you must uncheck the Discard after Delete option.
13.
Click OK.
You can click Tasks to monitor the various processing steps that are completed to attach
the iSCSI data domain to the data center.
After the iSCSI data domain has been added to your virtualization environment, you can
then upload the ISO images that are used for creating virtual machines in Creating a New
Virtual Machine.
Uploading Images to the Data Domain
Before using the Manager to upload images to the data domain, you must perform the
following steps to ensure that the prerequisites for uploading images have been met on the
Manager and KVM hosts.
Before You Begin
To ensure that the prerequisites for uploading images to the data domain have been met:
Chapter 4
Adding Storage
4-3

1.
On the engine host, verify that the
ovirt-imageio
service has been configured
and is running.
# systemctl status ovirt-imageio.service
When the service is running, the output displays as follows.
# systemctl status ovirt-imageio.service
ovirt-imageio.service - oVirt ImageIO
Loaded: loaded (/usr/lib/systemd/system/ovirt-imageio.service; enabled;
vendor preset: disabled)
Active: active (running) since Mon 2019-03-25 13:12:29 PDT; 2 weeks 0
days ago
Main PID: 28708 (ovirt-imageio-p)
CGroup: /system.slice/ovirt-imageio.service
└─28708 /usr/bin/python2 /usr/bin/ovirt-imageio
...
This service is automatically configured and is started when you run the engine-
setup command during the installation of the Manager.
2. On the KVM host, verify that the
ovirt-imageio
service has been configured
and is running. For example:
# systemctl status ovirt-imageio-daemon
ovirt-imageio-daemon.service - oVirt ImageIO Daemon
Loaded: loaded (/usr/lib/systemd/system/ovirt-imageio-daemon.service;
disabled;
vendor preset: disabled)
Active: active (running) since Wed 2019-03-27 18:38:36 EDT; 3 weeks 4
days ago
Main PID: 366 (ovirt-imageio-d)
Tasks: 4
CGroup: /system.slice/ovirt-imageio-daemon.service
└─366 /usr/bin/python /usr/bin/ovirt-imageio-daemon
Mar 27 18:38:36 myserver systemd[1]: Starting oVirt ImageIO Daemon...
Mar 27 18:38:36 myserver systemd[1]: Started oVirt ImageIO Daemon.
3. Verify that the certificate authority has been imported into the web browser used to
access the Manager by browsing to the following URL and enabling the trust
settings:
https://engine_address/ovirt-engine/services/pki-resource?
resource=ca-certificate&format=X509-PEM-CA
4.
Verify that you are using a browser that meets the browser requirement to access
the Administration Portal.
For more information, refer to the Logging in to the Administration Portal.
5.
Proceed to Uploading an ISO Image to the Data Domain.
Uploading an ISO Image to the Data Domain
To upload an ISO image to data domain using the Manager:
1.
Download or copy an ISO image file that you want to upload into your environment
to a location on your desktop, laptop, or a system where the Manager is
accessible from a Web browser.
2.
Go to Storage and then click Disks.
The Disks pane opens.
Chapter 4
Adding Storage
4-4

3.
Click Upload and then select Start from the drop-down list.
The Upload Image dialog box opens.
4.
Click Choose File and navigate to the location where you saved the ISO image.
5.
Complete the Disk Options section of the dialog box.
6.
Ensure that the prerequisites have been met by clicking Test Connection.
If the test returns a warning or error message, refer to Before You Begin to review the
prerequisites.
7. Click OK to start uploading the ISO image.
The status field on the Disks pane tracks the progress of the upload.
After the ISO image upload is completed successfully, you can attach the image to virtual
machines as CDROMs or use the image to boot virtual machines.
Creating a Logical Network
For this example scenario, you create a virtual machine network that you then assign to the
KVM host added in Adding a KVM Host to the Manager. This network is used as the virtual
machine network for the virtual machines created in Creating a New Virtual Machine.
Note:
If you plan to use VLANs on top of bonded interfaces, refer to the My Oracle
Support (MOS) article How to Configure 802.1q VLAN on NIC (Doc ID 1642456.1)
for instructions.
Creating a Virtual Machine Network
To create a virtual machine network:
1.
Go to Network and then click Networks.
2.
On the Networks pane, click New.
The New Logical Network dialog box opens with the General tab selected on the
sidebar.
3.
From the Data Center drop-down list, select the Data Center for the network.
By default, the Default option is selected in the drop-down list.
For this step, leave Default selected from the drop-down list because the default data
center and cluster are used in this example scenario.
For the procedures to create new data centers or a new clusters, refer to Data Centers or
Clusters tasks in the Oracle Linux Virtualization Manager: Administration Guide.
4.
For the Name field, enter a name for the new network.
5.
Leave the VM Network check box selected.
Under the Network Parameters section, the VM Network check box is selected by
default, which is left selected because a virtual machine network is being created in this
example.
Chapter 4
Creating a Logical Network
4-5
6.
(Optional) Configure other settings for the new logical network from the other tabs
on the New Logical Network sidebar.
The default settings are used for this example scenario.
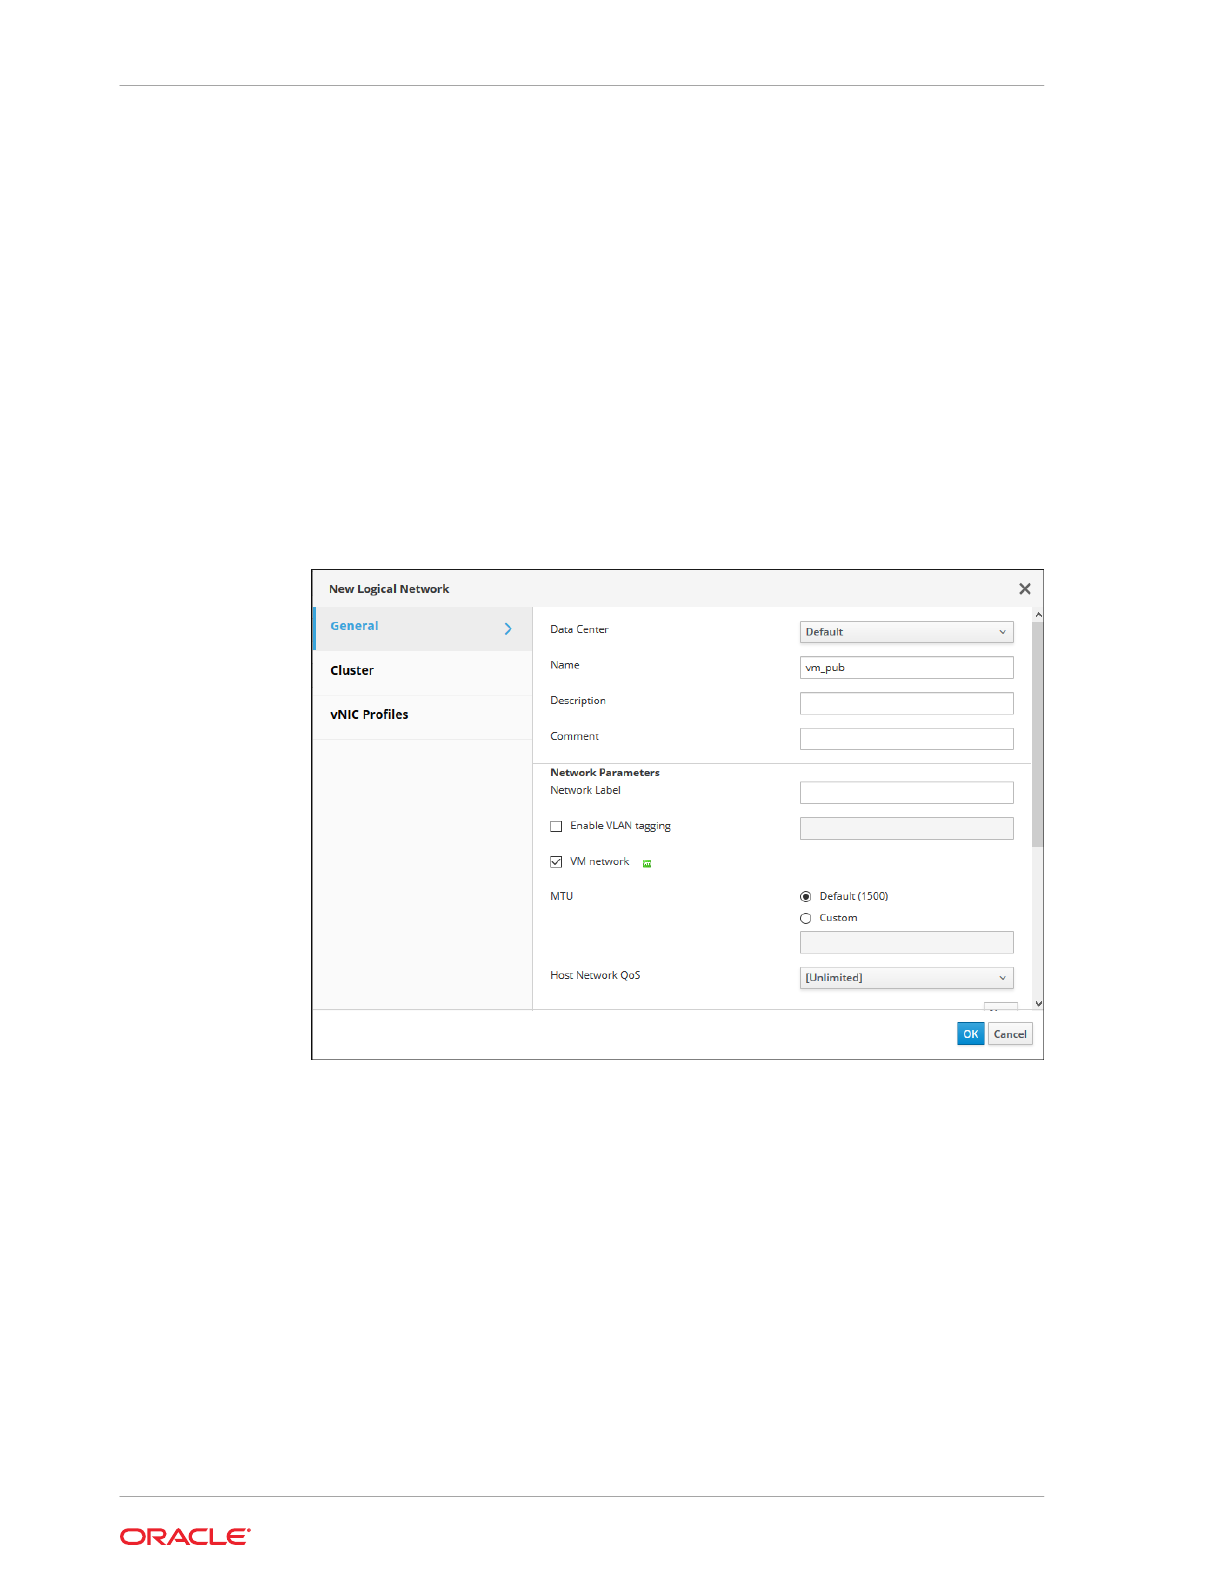
7. Click OK to create the network.
The following screenshot shows the General tab of the New Logical Network
dialog box completed for the new logical network that is being created in this
example:
• From the Data Center drop-down list, the Default option is selected.
• For the Name field,
vm_pub
is entered.
• Under the Network Parameters section, the VM Network check box is
selected.
Figure 4-1 New Logical Network Dialog Box: General Tab
Assigning the Virtual Machine Network to a KVM Host
To assign the virtual machine network to a KVM host:
1.
Go to Compute and then click Hosts.
The Hosts pane opens.
2.
Under the Name column, click the name of the host for which to add the network.
The following screenshot shows the Hosts pane with the name of the host
highlighted in a red rectangular box to emphasize where you need to click to set
up a network on a host.
Chapter 4
Creating a Logical Network
4-6

Figure 4-2 Hosts Pane
After clicking the name of the host, the General tab opens with details about the host.
3. Click the Network Interfaces tab on the horizontal menu.
The Network Interfaces tab opens with details about the network interfaces on the
available host.
4.
Highlight the network interface that you want to use for the network being added by
clicking the row for the respective interface.
5.
Click Setup Host Networks.
The Setup Host Networks dialog box opens for the host. The physical interfaces on the
host are listed under the Interfaces column and any logical networks assigned to the
interface are displayed under the Assigned Logical Networks column. Unassigned
logical networks are displayed under the Unassigned Logical Networks column.
As shown in the following screenshot, the logical network created in Creating a Logical
Network named
vm_pub
is displayed under the Unassigned Logical Networks column.
In the next step, you assign this network to the network interface named
eno2
, which
currently has no network assigned to it.
Chapter 4
Creating a Logical Network
4-7
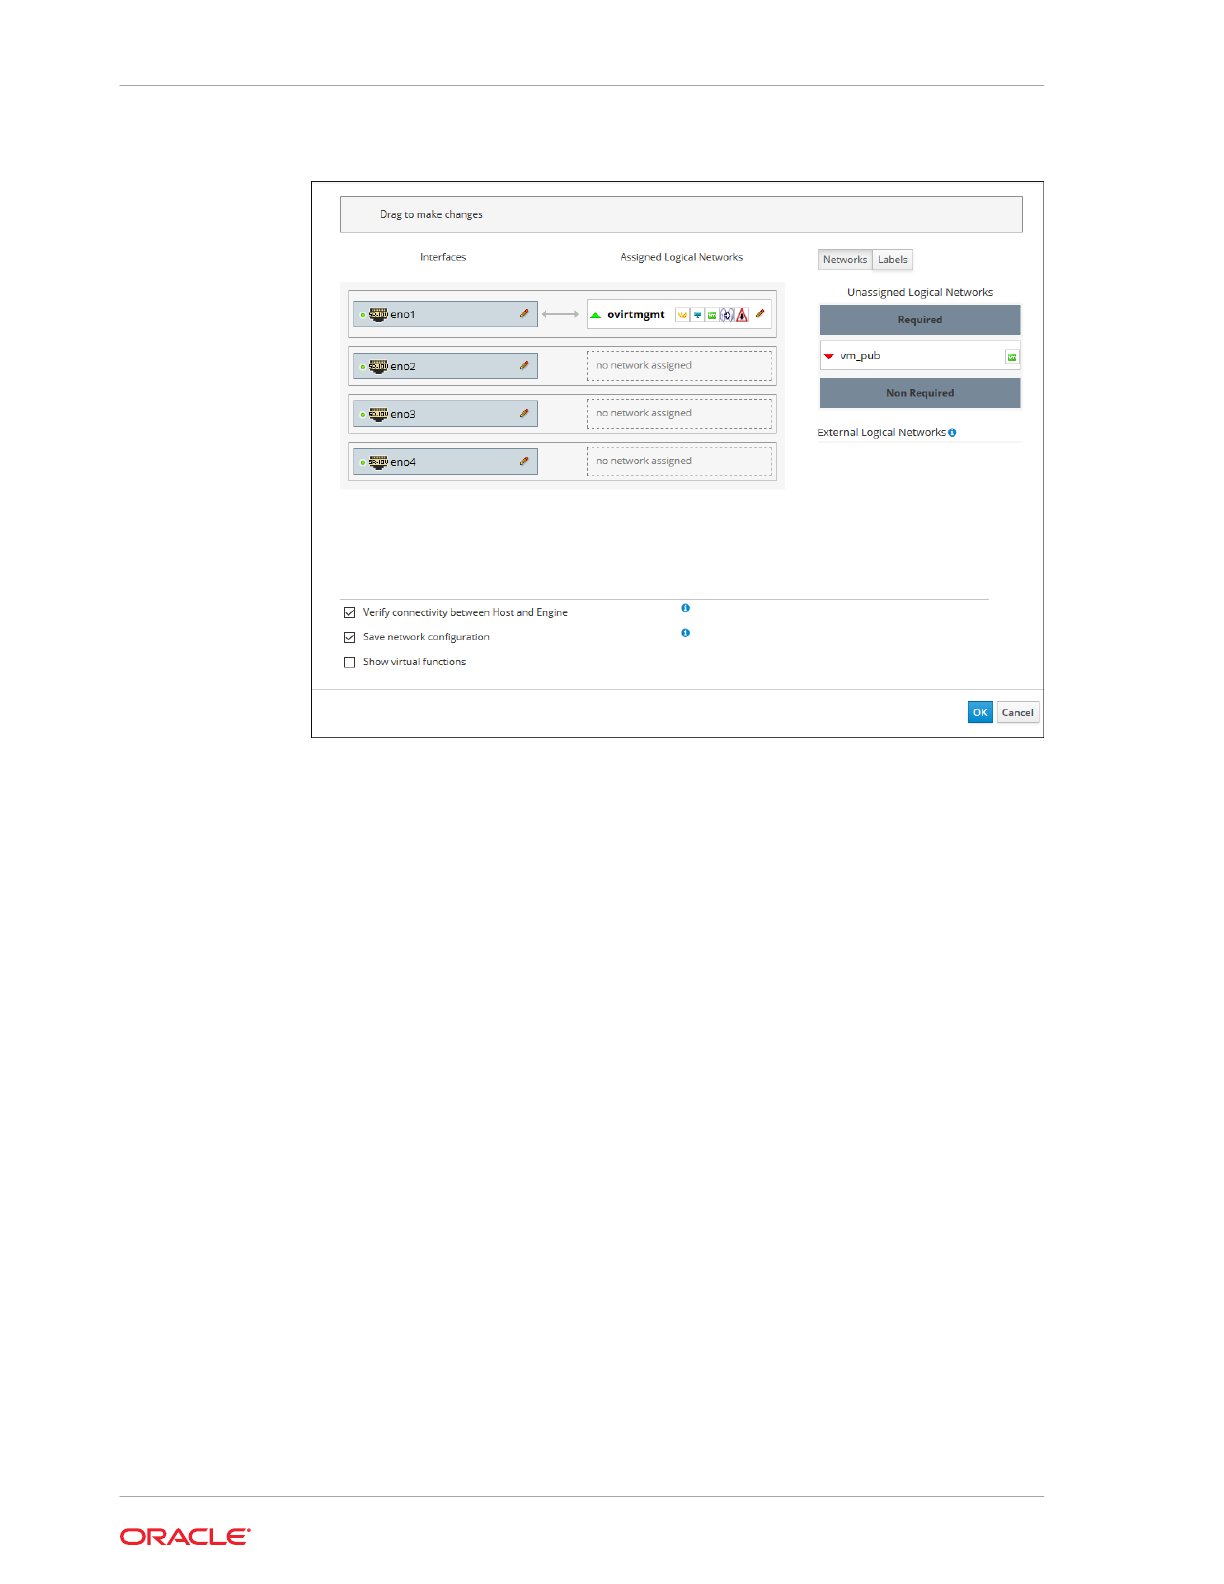
Figure 4-3 Setup Host Dialog Box: Unassigned Logical Networks
6. Select the network you want to add from the Unassigned Logical Networks
column by left-clicking the network and, while holding down the mouse, drag the
network over to the box to the right of the available network interface where you
want to add the network.
Alternatively, you can right-click the network and select the available interface from
a drop-down list.
For this example, the logical network named
vm_pub
is assigned to the available
network interface named
eno2
. As shown in the following screenshot, after
dragging the network from Unassigned Logical Networks over to this interface,
the network named
vm_pub
appears under the Assigned Logical Networks
column as assigned to the network interface named
eno2
.
Chapter 4
Creating a Logical Network
4-8
Figure 4-4 Setup Host Dialog Box: Assigned Logical Networks
7.
After editing the network settings, click OK to save the settings.
8.
Click OK to add the network.
Creating a New Virtual Machine
Before creating new virtual machines for use in your virtualization environment, refer to
Before You Begin for more information about the prerequisites for this example scenario.
Note:
In addition to creating virtual machines, you can import an Open Virtual Appliance
(OVA) file into your environment from any host in the data center. For more
information, see oVirt Virtual Machine Management in oVirt Documentation.
Installing Remote Viewer on Client Machine
A console is a UI that allows you to view and interact with a virtual machine similar to a
physical machine. The default console is Remove Viewer application that provides users with
a UI for connecting to virtual machines.
Before you begin a Linux or Windows installation, download the appropriate install package
from the Virtual Machine Manager web site.
Chapter 4
Creating a New Virtual Machine
4-9

Note:
See See Windows Virtual Machines Lose Functionality Due To Deprecated
Guest Agent in the Known Issues section of the Oracle Linux Virtualization
Manager: Release Notes.
For more information, see Consoles in the Oracle Linux Virtualization Manager:
Architecture and Planning Guide.
To install Remote Viewer on Linux:
1.
Ensure you have downloaded the
virt-viewer
installation package.
2. Install the
virt-viewer
package using one of the following commands depending
on your system.
# yum install virt-viewer
# dnf install virt-viewer
3. Restart your browser for the changes to take effect in the Oracle Linux
Virtualization Manager.
You can now connect to your virtual machines using the VNC protocol.
To install Remote Viewer on Windows:
1.
Ensure you have downloaded either the 32-bit or 64-bit
virt-viewer
installer
depending on the architecture of your system.
2.
Go to the folder where you saved the file and double-click the file.
3.
If prompted with a security warning, click Run.
4.
If prompted by User Account Control, click Yes.
Once installed, you can access Remote Viewer in the VirtViewer folder of All
Programs from the Start menu.
Creating a New Oracle Linux Virtual Machine
For the example scenario, you create a new Oracle Linux virtual machine, install the
Oracle Linux guest OS, and install the Linux guest agent for this Oracle Linux virtual
machine.
Note:
For detailed information on the supported guest operating systems, see the
Oracle
®
Linux: KVM User's Guide.
To create a new Oracle Linux virtual machine:
1. Go to Compute and then click Virtual Machines.
The Virtual Machines pane opens with the list of virtual machines that have been
created.
Chapter 4
Creating a New Virtual Machine
4-10
2.
Click New.
The New Virtual Machine dialog box opens with the General tab selected on the
sidebar.
3. From the Cluster drop-down list, select the data center and host cluster for the new host.
By default, the Default option is selected in the drop-down list.
For this step, leave Default selected from the drop-down list because the default data
center and cluster are used in this example scenario. For the procedures to create new
data centers or a new clusters, refer to Data Centers or Clusters tasks in the Oracle Linux
Virtualization Manager: Administration Guide.
4. From the Operating System drop-down list, select the operating system for the virtual
machine.
5.
For the Name field, enter a name for the new virtual machine.
6.
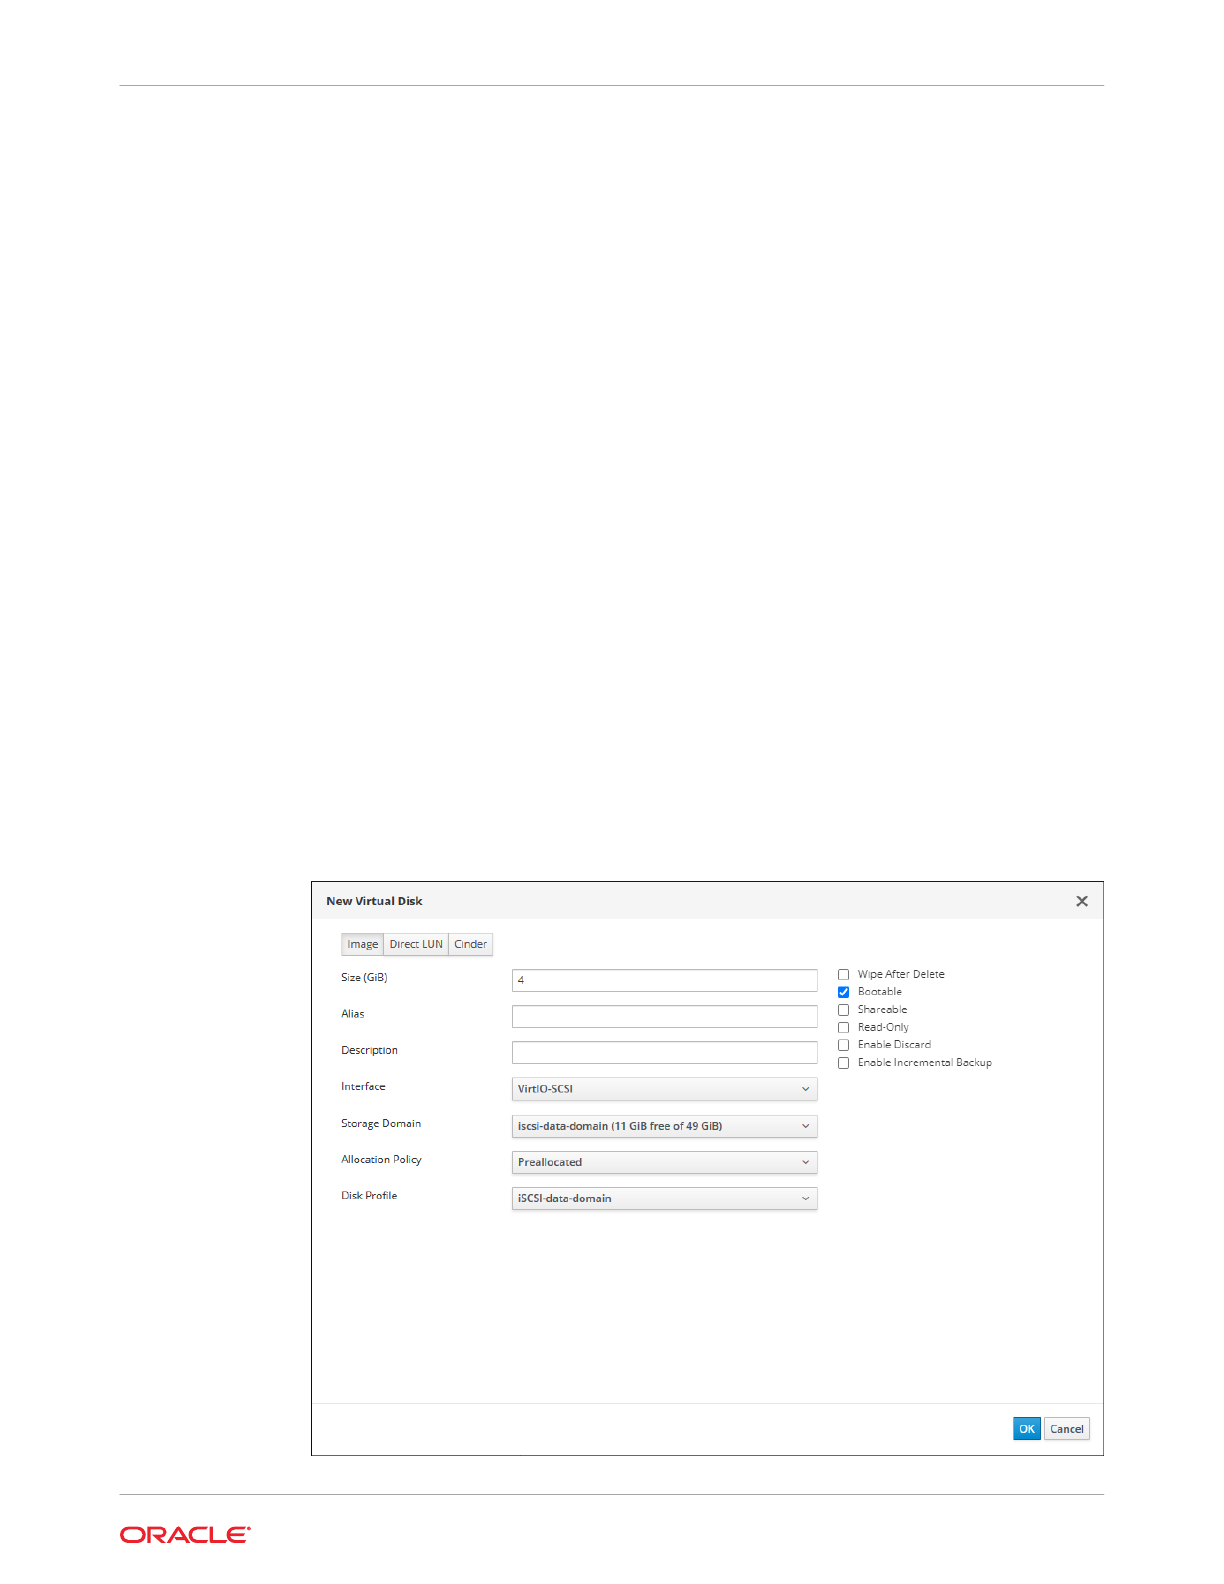
Under Instance Images, add storage to the virtual machine by either using an existing
virtual disk or creating a new virtual desk.
• To use an existing virtual disk, click Attach and select the virtual disk to use for the
virtual machine storage. Then click OK.
• To create a new virtual disk, click Create and update the fields for the virtual machine
storage or accept the default settings. Then click OK.
For the example scenario, all of the default settings are accepted for the new virtual disk
that is being created, except the Size (GiB) field, which is set to
4
. The following
screenshot shows the New Virtual Disk dialog box for the Oracle Linux virtual machine
being created in this example scenario.
Figure 4-5 New Virtual Disk Dialog Box
Chapter 4
Creating a New Virtual Machine
4-11
7.
Connect the virtual machine to a network by adding a network interface. To do
that, select the vNIC profile created in Creating a Logical Network from the nic1
drop-down list.
For information about customizing vNICs, refer to Customizing vNIC Profiles for
Virtual Machines in the Oracle Linux Virtualization Manager: Administration Guide.
The following screenshot shows the General tab open on the New Virtual
Machine dialog box for the new Oracle Linux virtual machine being created in this
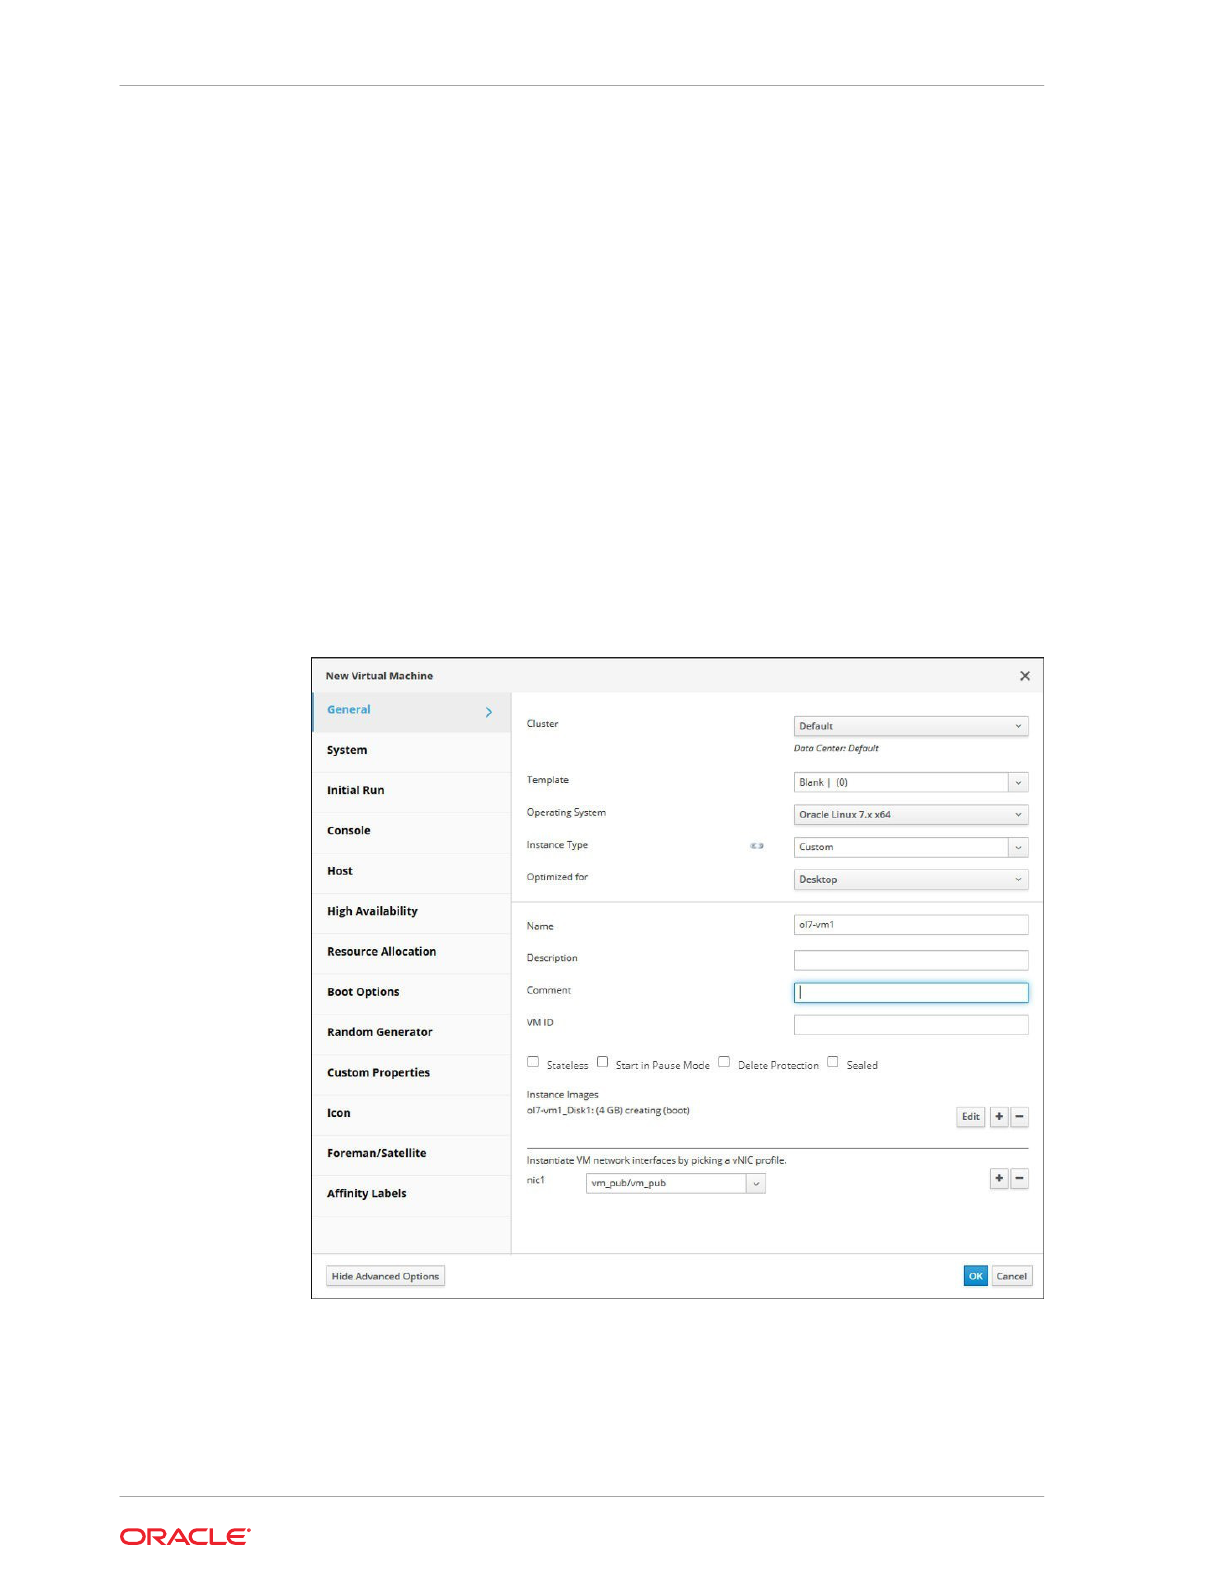
example scenario. In the dialog box, the following key fields are completed:
• From the Cluster drop-down list, the Default option is selected.
• For the Operating System drop-down list, Oracle Linux 7.x x64 is selected.
• For the Name field,
ol7-vm1
is entered.
• Under Instance Images, a virtual disk named
ol7-vm1_Disk1
is being
created, which has been set to a size of
4GB
.
• From the nic1 drop-down list, the logical network named
vm_pub
is selected.
Figure 4-6 New Virtual Machine Dialog Box
8.
Click Show Advanced Options to display additional configuration options
available for the new virtual machine.
9.
(Optional) Click the System tab on the sidebar to adjust the CPU and memory
size for the virtual machine from the defaults.
For this example scenario the default values are used:
Chapter 4
Creating a New Virtual Machine
4-12

• For Memory Size field, the default value of
1024 MB
is used.
• For the Maximum memory field, the default value of
4096 MB
is used.
• For the Total Virtual CPUs field, the default value of
1
is used.
10.
Click OK to create the virtual machine.
11.
Proceed to Installing the Oracle Linux Guest OS.
Installing the Oracle Linux Guest OS
To install the Oracle Linux 7 guest OS for this example scenario:
1.
From the Virtual Machines pane, select the virtual machine created in Creating a New
Oracle Linux Virtual Machine.
2.
Using the down arrow next to Run, select Run Once.
3.
Attach your ISO file, for example OracleLinux-R7-U6-Server-x86_64-dvd.iso, and click
OK.
4.
Click Console to open a console to the virtual machine.
If you have not installed the Remote Viewer application, refer to Before You Begin.
5.
Install the Oracle Linux guest OS.
Refer to the Oracle
®
Linux 7: Installation Guide for more information on how to install
Oracle Linux.
6.
When the installation completes, reboot the virtual machine.
7.
(Optional) If you use a proxy server for Internet access, configure Yum with the proxy
server settings. For more information about configuring
firewalld
, see Configuring a
Packet Filtering Firewall in the Oracle
®
Linux 8: Configuring the Firewall.
8. (Optional) If you are using yum to update the host, make sure the host is using the
modular yum repository configuration. For more information, see Getting Started with
Oracle Linux Yum Server.
9. Proceed to Installing the Oracle Linux Guest Agent.
Installing the Oracle Linux Guest Agent
To install the Oracle Linux guest agent for this example scenario, follow the Oracle Linux 7
parts of the steps below.
1.
Open a console session for the Oracle Linux guest and log in to the terminal.
2.
Install the latest guest agent package.
(Example scenario) For Oracle Linux 8 guests:
# dnf config-manager --enable ol8_appstream
# dnf install qemu-guest-agent
For Oracle Linux 7 guests:
# yum install yum-utils -y
# yum-config-manager --enable ol7_latest
# yum install qemu-guest-agent
For Oracle Linux 6 guests:
Chapter 4
Creating a New Virtual Machine
4-13

# yum install yum-utils -y
# yum-config-manager --enable ol6_latest
# yum install qemu-guest-agent
For Oracle Linux 5 guests:
# yum install yum-utils -y
# yum install http://yum.oracle.com/repo/OracleLinux/OL7/ovirt42/x86_64/
getPackage/ \
ovirt-guest-agent-1.0.13-2.el5.noarch.rpm
3.
Start the guest agent service for the Oracle Linux guest.
(Example scenario) For Oracle Linux 8 and Oracle Linux 7 guests:
# systemctl start qemu-guest-agent.service
For Oracle Linux 6 guests:
# service qemu-ga enable
# service qemu-ga start
For Oracle Linux 5 guests:
# service ovirt-guest-agent enable
# service ovirt-guest-agent start
4.
(Optional) Enable an automatic restart of the guest agent service when the virtual
machine is rebooted.
(Example scenario) For Oracle Linux 8 and Oracle Linux 7 guests:
# systemctl enable qemu-guest-agent.service
For Oracle Linux 6 guests:
# chkconfig qemu-ga on
For Oracle Linux 5 guests:
# chkconfig ovirt-guest-agent on
Creating a New Microsoft Windows Virtual Machine
For the example scenario, you create a new Microsoft Windows virtual machine, install
the Microsoft Windows guest OS, install the VirtIO drivers and install the QEMU guest
agent.
Before You Begin
Before creating Microsoft Windows virtual machines, ensure the following
prerequisites are met.
Obtain the Oracle VirtIO Drivers for Microsoft Windows.
1.
Download Oracle VirtIO Drivers for Microsoft Windows to the Manager host from
Oracle Software Delivery Cloud or My Oracle Support (MOS). Refer to Oracle
VirtIO Drivers for Microsoft Windows for Use With KVM for more information.
2.
Upload the Oracle VirtIO Drivers for Microsoft Windows ISO image to an Oracle
Linux Virtualization Manager storage domain. Refer to Uploading an ISO Image to
the Data Domain for more information.
Chapter 4
Creating a New Virtual Machine
4-14

Download the QEMU guest agent to the Manager host.
• For ULN registered hosts or using Oracle Linux Manager, download
qemu-ga-win
from the oVirt Release 4.4 on Oracle Linux 8 (x86_64) - Extra channel.
• For Oracle Linux yum server configured KVM hosts, download
qemu-ga-win
from the
Oracle Linux 8 (x86_64) oVirt 4.4 Extra repository.
Creating a New Microsoft Windows Virtual Machine
To create a new Microsoft Windows virtual machine:
1. Go to Compute and then click Virtual Machines.
The Virtual Machines pane opens with the list of virtual machines that have been
created.
2.
Click New.
The New Virtual Machine dialog box opens with the General tab selected on the
sidebar.
3.
From the Cluster drop-down list, select the data center and host cluster for the new host.
By default, the Default option is selected in the drop-down list.
For this step, leave Default selected from the drop-down list because the default data
center and cluster are used in this example scenario. For the procedures to create new
data centers or a new clusters, refer to Data Centers or Clusters tasks in the Oracle Linux
Virtualization Manager: Administration Guide.
4.
From the Operating System drop-down list, select the appropriate Microsoft Windows
operating system for the virtual machine.
5. For the Name field, enter a name for the new virtual machine.
6. Under Instance Images, add storage to the virtual machine by either using an existing
virtual disk or creating a new virtual desk.
• To use an existing virtual disk, click Attach and select the virtual disk to use for the
virtual machine storage. Then click OK.
• To create a new virtual disk, click Create and update the fields for the virtual machine
storage or accept the default settings. Then click OK.
The following screenshot shows the New Virtual Disk dialog box for the Oracle Linux
virtual machine being created in this example scenario. In the dialog box, the following
key fields are completed:
• For the Size (GiB) field, a value of
12
is entered.
• From the Interface drop-down list, SATA is selected.
• From the Allocation Policy drop-down list, Thin Provision is selected.
Chapter 4
Creating a New Virtual Machine
4-15
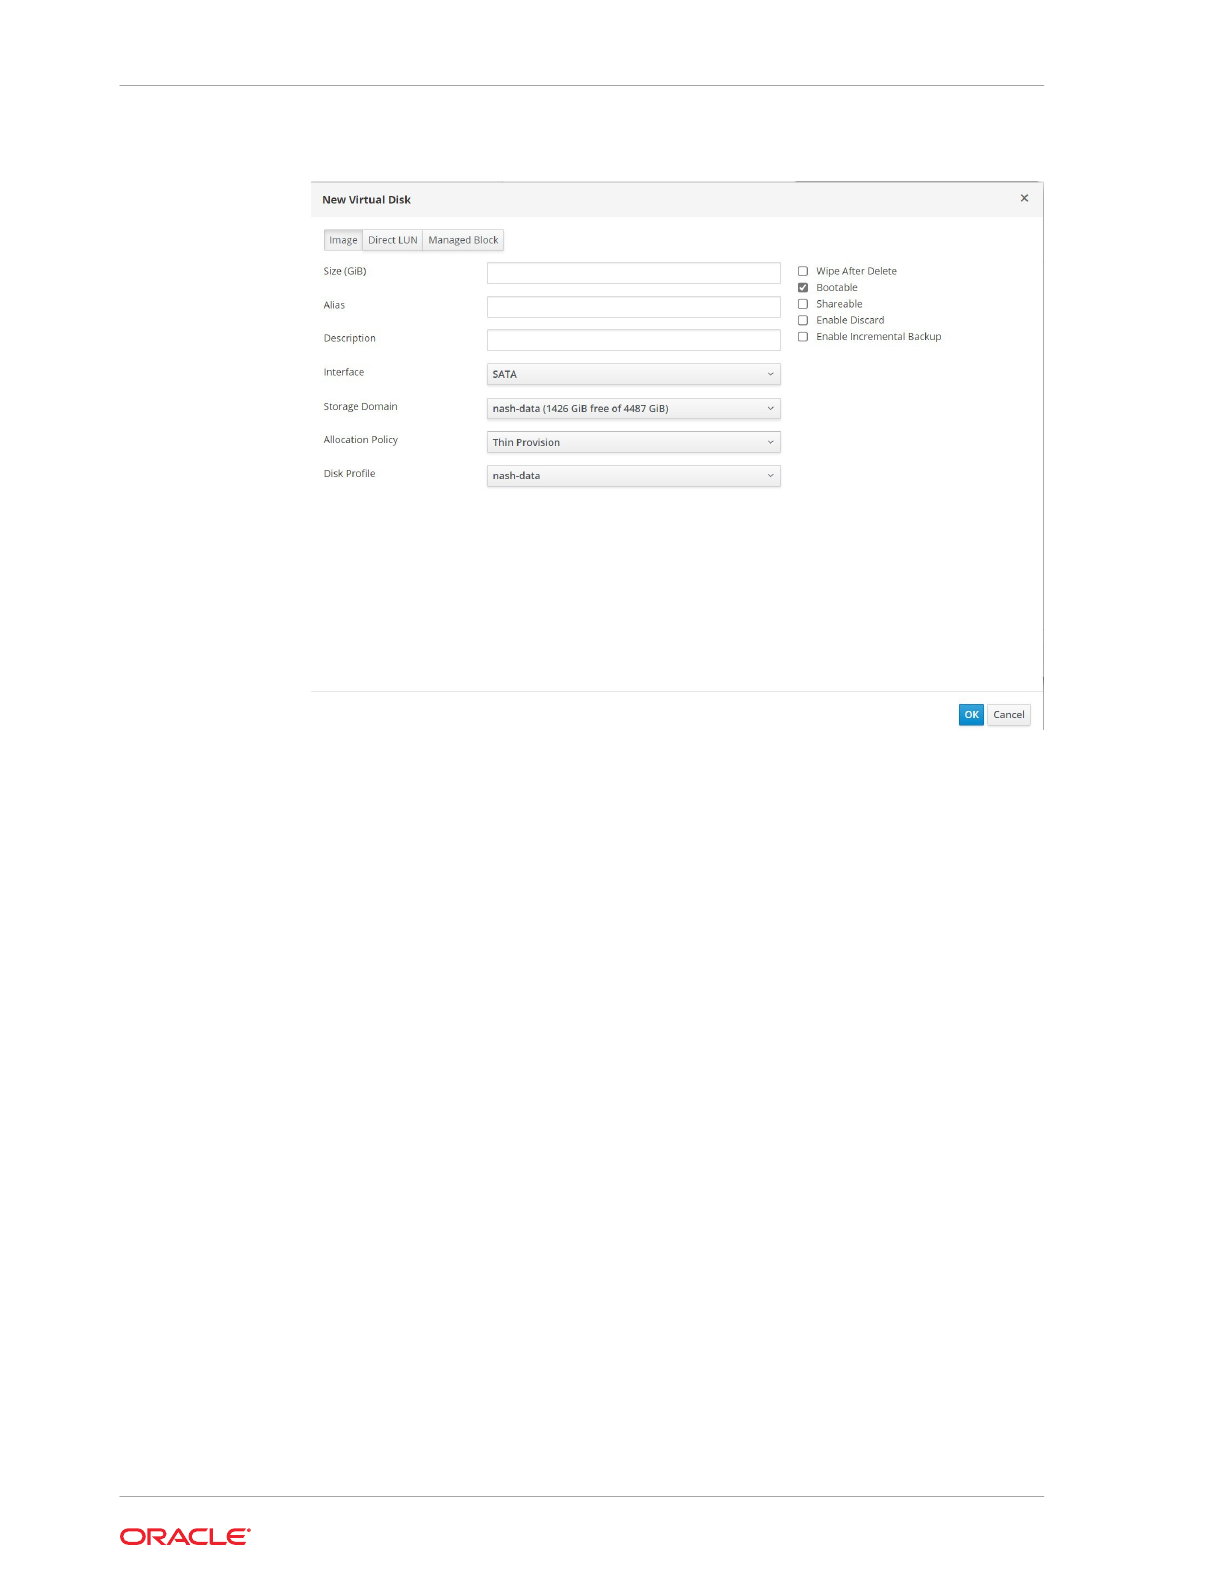
Figure 4-7 New Virtual Disk Dialog Box
7.
Connect the virtual machine to a network by selecting the vNIC profile created in
Creating a Logical Network from the nic1 drop-down list.
For information about customizing vNICs, refer to Customizing vNIC Profiles for
Virtual Machines in the Oracle Linux Virtualization Manager: Administration Guide.
The following screenshot shows the General tab on New Virtual Machine dialog
box for the new Microsoft Windows virtual machine that is being created in this
example scenario. In the dialog box, the following key fields are completed:
• From the Cluster drop-down list, the Default option is selected.
• For the Operating System drop-down list,
Windows 10 x64
is selected.
• For the Name field,
windows-10-vm
is entered.
• Under Instance Images, a virtual disk named
windows-10-vm_Disk1
is being
created, which has been set to a size of
12GB
.
• From the nic1 drop-down list, the logical network named
vm_pub
is selected.
Chapter 4
Creating a New Virtual Machine
4-16
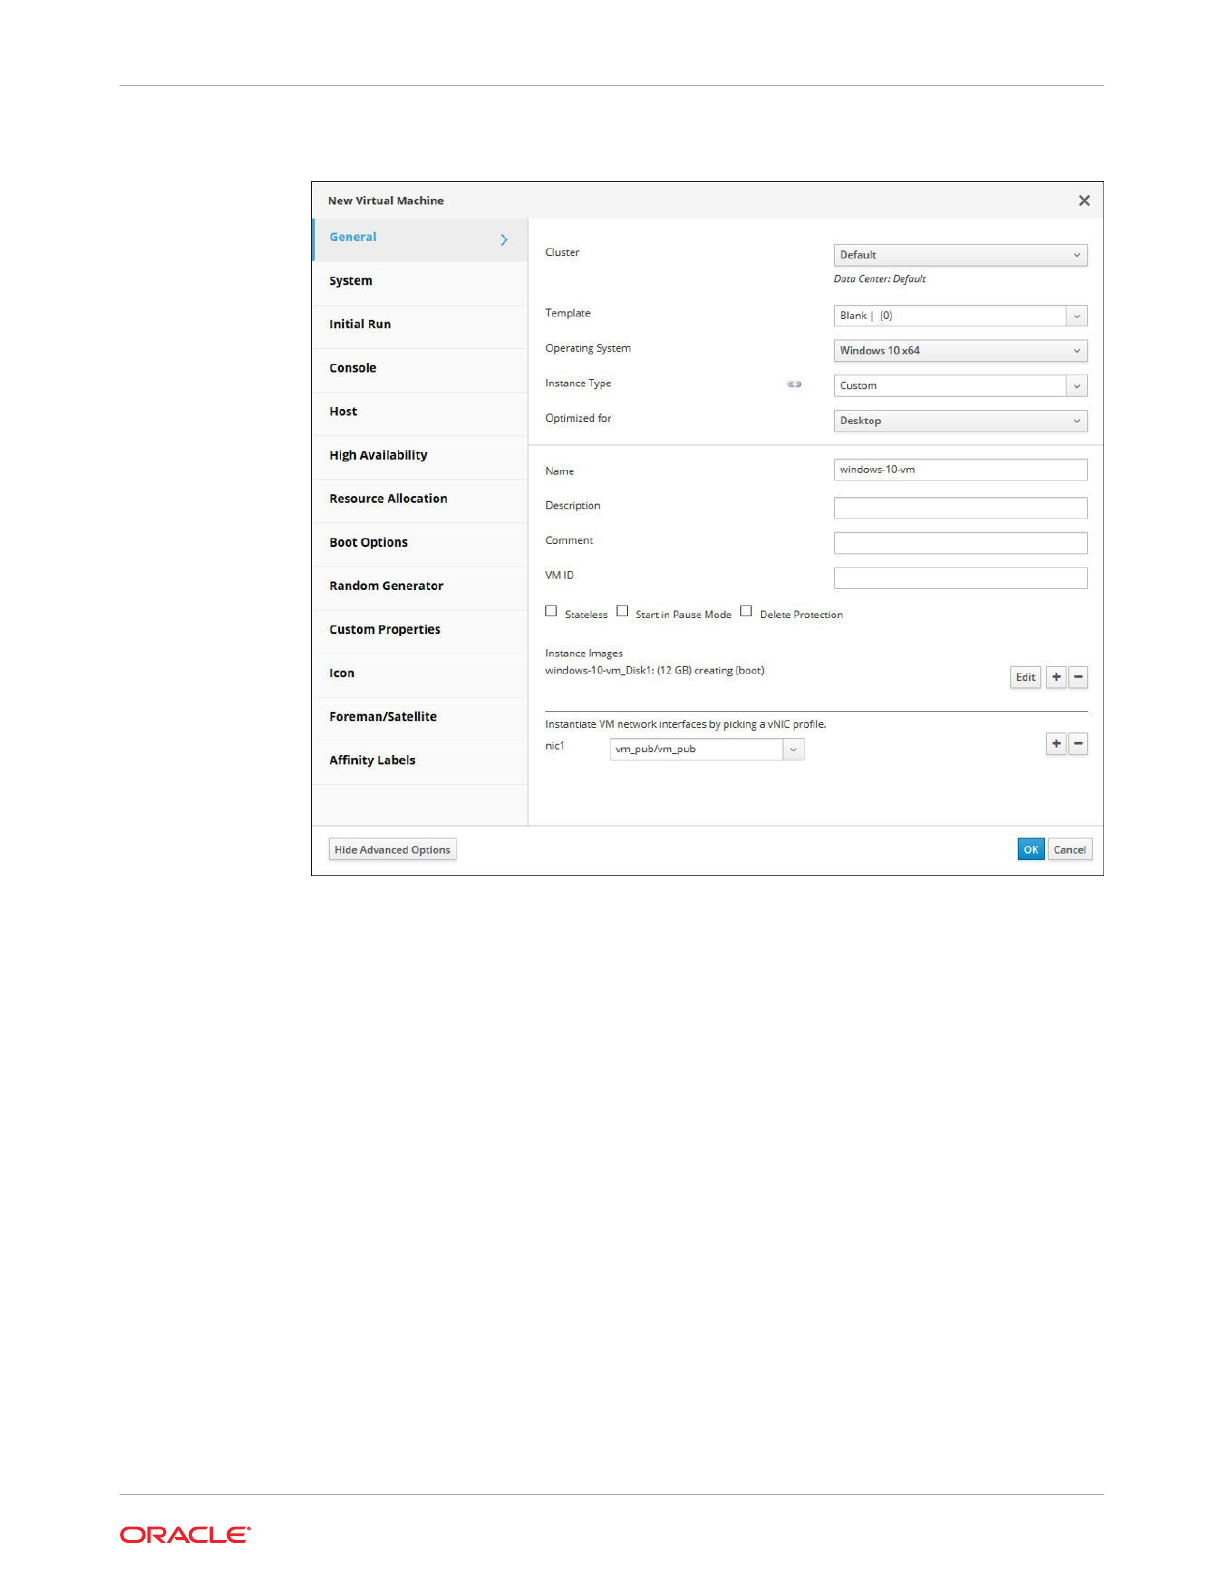
Figure 4-8 New Virtual Machine Dialog Box - General Tab
8. Click the System tab on the sidebar to adjust the memory size for the virtual machine
from the defaults.
In this example, change the Memory Size field to
4096 MB
and the Total Virtual CPUs
field to
4
.
The following screenshot shows the System tab on New Virtual Machine dialog box for
the new Microsoft Windows virtual machine that is being created in this example
scenario. In the dialog box, the following key fields are completed:
Chapter 4
Creating a New Virtual Machine
4-17
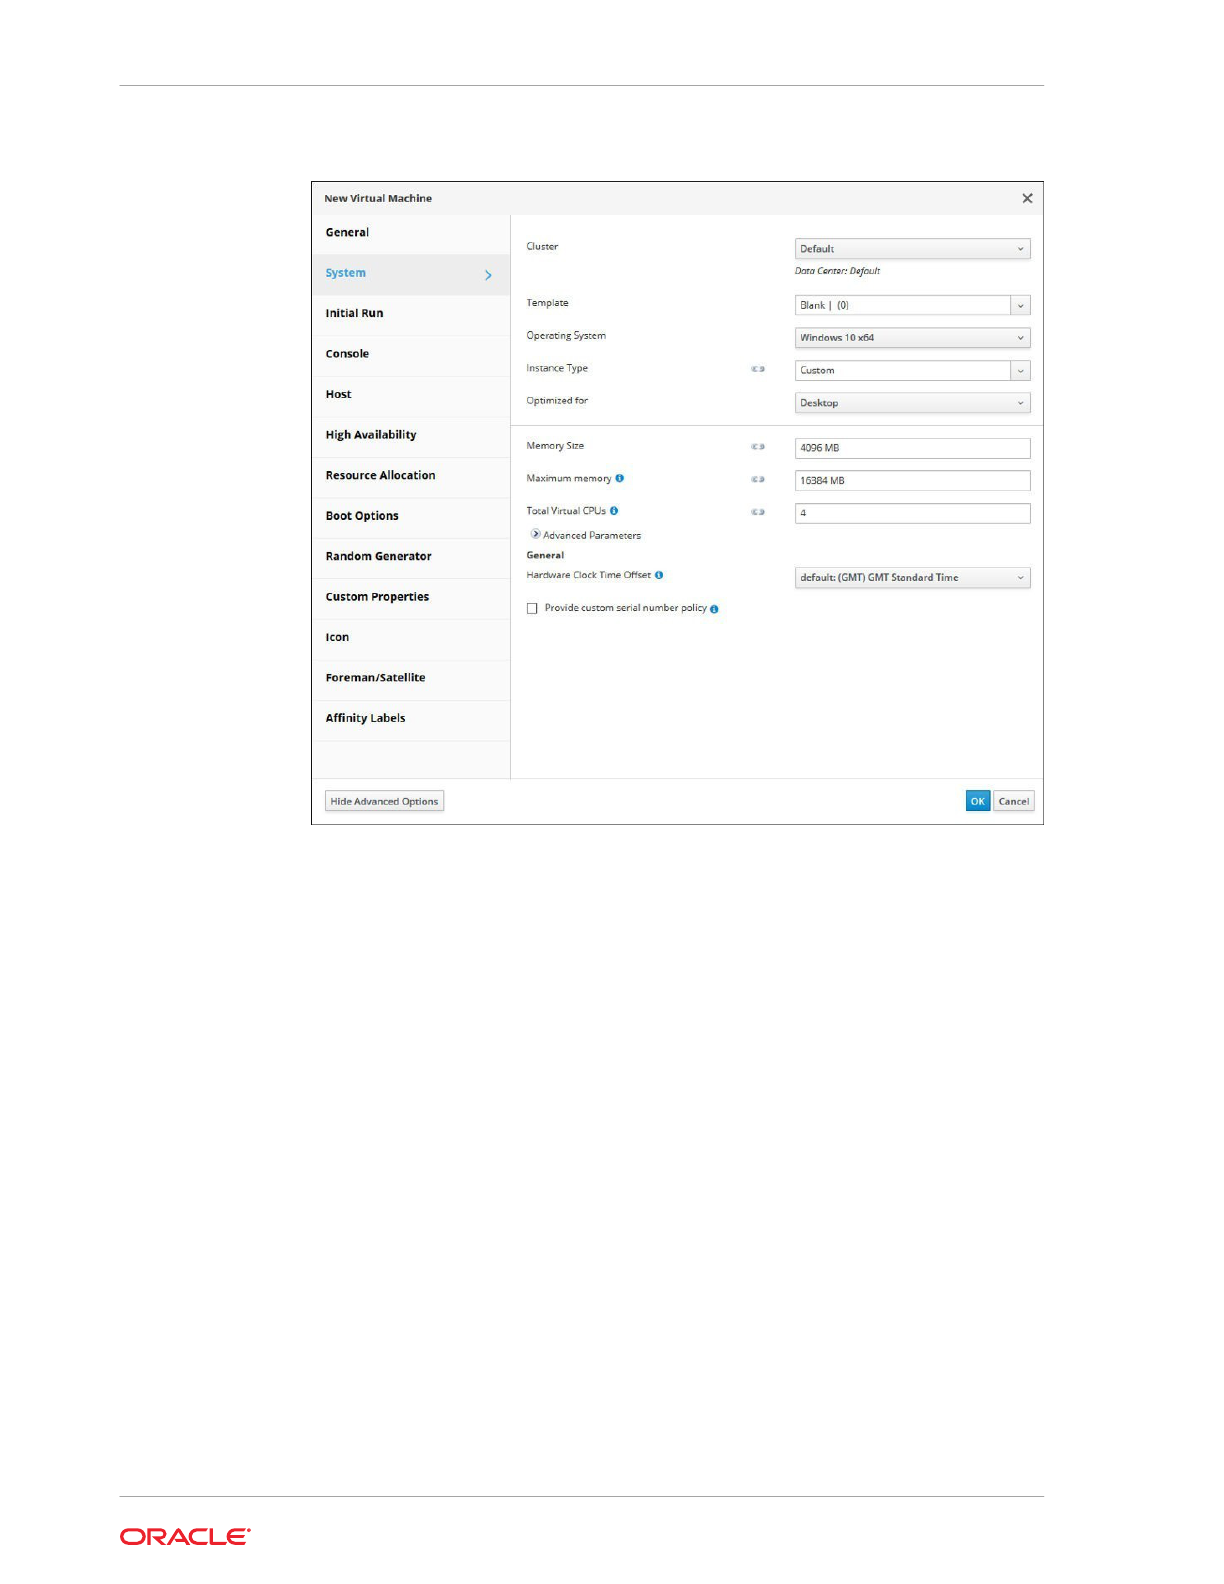
Figure 4-9 New Virtual Machine Dialog Box - System Tab
• The Memory Size field is changed to
4096 MB
.
• The Maximum memory field automatically updates to
16384 MB
when the
Memory Size field is changed to
4096 MB
.
• The Total Virtual CPUs field is changed to
4
.
9. Click OK to create the virtual machine.
10. Proceed to Installing the Microsoft Windows Guest OS.
Installing the Microsoft Windows Guest OS
To install the Microsoft Windows guest OS:
1.
From the Virtual Machines pane, select the virtual machine created in Creating a
New Microsoft Windows Virtual Machine.
2. Using the down arrow next to Run, select Run Once.
3. Attach your ISO file and click OK.
4. Click Console to open a console to the virtual machine.
If you have not installed the Remote Viewer application, refer to Before You Begin.
5. Install the Microsoft Windows guest OS.
Chapter 4
Creating a New Virtual Machine
4-18

Refer to the applicable Microsoft Windows documentation for instructions on how to
install the operating system.
6. When the installation completes, reboot the virtual machine.
7. Proceed to installing the VirtIO drivers and QEMU guest agent.
Installing the VirtIO Drivers
Before attempting to install the Oracle VirtIO Drivers for Microsoft Windows on a new
Microsoft Windows virtual machine, ensure that you have downloaded the drivers onto the
Manager host and uploaded the ISO image to an Oracle Linux Virtualization Manager storage
domain. For more information, see the prerequisities.
To install the Oracle VirtIO Drivers for Microsoft Windows:
1.
After you finish installing the Microsoft Windows guest OS, return to the Virtual
Machines pane, highlight the row for this virtual machine, and click Edit.
The Edit Virtual Machines dialog box opens.
2.
Click the Boot Options tab on the sidebar of the dialog box to specify the boot sequence
for the virtual device.
a.
From the First Device drop-down list, change CD-ROM to Hard Disk.
b.
From the Second Device drop-down list, select CD-ROM.
c.
Select the Attach CD checkbox and choose virtio from the drop-down list.
3.
Click OK to save the changes to the virtual machine configuration.
4.
Click OK when the Pending Virtual Machine changes dialog box appears.
5.
From the Virtual Machines pane, reboot the virtual machine.
6.
Click Console to open a console to the virtual machine and navigate to the CDROM.
7.
Double-click the virtio folder and then click Setup to start the Oracle VirtIO Drivers for
Microsoft Windows installer.
The installer window is displayed.
8.
Click Install to start the Oracle VirtIO Drivers for Microsoft Windows installer.
The installer copies the Oracle VirtIO Drivers for Microsoft Windows installer files and
then installs the drivers on the Microsoft Microsoft Windows guest operating system.
9.
Click Yes, I want to restart my computer now and click Finish.
The virtual machine is restarted.
10.
Stop the virtual machine.
11.
Go to Compute and then click Virtual Machines.
The Virtual Machines pane opens with the list of virtual machines that have been
created.
12.
Select the Microsoft Windows virtual machine created in Creating a New Microsoft
Windows Virtual Machine and click Edit.
13.
Edit the virtual disk. From the Interface drop-down list, change SATA to VirtIO-SCSI .
14.
Click the Boot Options tab on the sidebar.
Chapter 4
Creating a New Virtual Machine
4-19

a.
Do not make any changes to the First Device drop-down list. The Hard Disk
option is selected from a previous step.
b. From the Second Device drop-down list, select None.
c. Deselect the Attach CD checkbox.
15. Click OK to save the changes to the virtual machine configuration.
16. Restart the virtual machine.
17. Proceed to Installing the QEMU Guest Agent.
Installing the QEMU Guest Agent
Before attempting to install the QEMU guest agent on a new Microsoft Windows virtual
machine, ensure that you have downloaded the drivers onto the Manager host. For
more information, see the prerequisities.
1.
On the Manager host, install the QEMU guest agent.
# dnf install qemu-ga-win
2.
Verify the installation.
# ls -alt /usr/i686-w64-dir /sys-root/username/bin
total 9280
drwxr-xr-x. 2 root root 30 Nov 3 13:56 .
-rw-r--r--. 1 root root 9499648 Nov 2 09:45 qemu-ga-i386.msi
drwxr-xr-x. 3 root root 17 Sep 23 19:02 ..
# ls -alt /usr/x86_64-w64-dir /sys-root/username/bin/
total 9472
drwxr-xr-x. 2 root root 32 Nov 3 13:56 .
-rw-r--r--. 1 root root 9697280 Nov 2 09:45 qemu-ga-x86_64.msi
Important:
• If you have access to the virtual machine, you can copy the appropriate
MSI (32-bit or 64-bit) to the virtual machine and then run the installer to
install the QEMU guest agent.
• If you do not have access to the virtual machine, use the following steps
to build and upload an ISO and then install the QEMU guest agent.
Build the ISO and install the QEMU guest agent on the virtual machine.
1.
Build the QEMU guest agent ISO.
# dnf install genisoimage -y
# pwd
/root
# mkdir build-iso
# cp /usr/x86_64-w64-dir /sys-root/username/bin/qemu-ga-x86_64.msi
Chapter 4
Creating a New Virtual Machine
4-20

build-iso/
# cp /usr/i686-w64-dir /sys-root/username/bin/qemu-ga-i386.msi build-iso/
# mkisofs -R -J -o qemu-ga-windows.iso build-iso/*
I: -input-charset not specified, using utf-8 (detected in locale settings)
Using QEMU_000.MSI;1 for /qemu-ga-x86_64.msi (qemu-ga-i386.msi)
52.36% done, estimate finish Thu Nov 3 14:20:49 2022
Total translation table size: 0
Total rockridge attributes bytes: 347
Total directory bytes: 0
Path table size(bytes): 10
Max brk space used 0
9549 extents written (18 MB)
# ll qemu-ga-windows.iso
-rw-r--r--. 1 root root 19556352 Nov 3 14:20 qemu-ga-windows.iso
2. Upload the QEMU guest agent ISO image to an Oracle Linux Virtualization Manager
storage domain. Refer to Uploading an ISO Image to the Data Domain for more
information.
3.
From the Virtual Machines pane, select the virtual machine created in Creating a New
Microsoft Windows Virtual Machine.
4. Highlight the row for this virtual machine, and click Edit.
The Edit Virtual Machines dialog box opens.
5. Click the Boot Options tab on the sidebar of the dialog box to specify the boot sequence
for the virtual device.
a.
From the First Device drop-down list, change CD-ROM to Hard Disk.
b.
From the Second Device drop-down list, select CD-ROM.
c.
Select the Attach CD checkbox and choose the qemu executable from the drop-
down list.
6.
Click OK to save the changes to the virtual machine configuration.
7.
Click OK when the Pending Virtual Machine changes dialog box appears.
8.
From the Virtual Machines pane, reboot the virtual machine.
9.
Click Console to open a console to the virtual machine and navigate to the CDROM.
10.
Double-click the the qemu executable to launch the installation program.
11.
When installation completes, click Yes, I want to restart my computer now and click
Finish.
The virtual machine is restarted.
12. Stop the virtual machine.
13. Go to Compute and then click Virtual Machines.
The Virtual Machines pane opens with the list of virtual machines that have been
created.
14.
Select the Microsoft Windows virtual machine created in Creating a New Microsoft
Windows Virtual Machine and click Edit.
15.
Click the Boot Options tab on the sidebar.
Chapter 4
Creating a New Virtual Machine
4-21

a.
Do not make any changes to the First Device drop-down list. The Hard Disk
option is selected from a previous step.
b. From the Second Device drop-down list, select None.
c. Deselect the Attach CD checkbox.
16. Click OK to save the changes to the virtual machine configuration.
17. From the Virtual Machines pane, reboot the virtual machine.
18. Run the Microsoft Windows virtual machine.
For more information, see the Oracle
®
Linux: KVM User's Guide
Creating a Template
For this example scenario, you seal the Oracle Linux virtual machine created in
Creating a New Virtual Machine and then you create an Oracle Linux template based
on that virtual machine. You then use that template as the basis for a Cloud-Init
enabled template to automate the initial setup of a virtual machine.
A template is a copy of a virtual machine that you can use to simplify the subsequent,
repeated creation of similar virtual machines. Templates capture the configuration of
software, the configuration of hardware, and the software installed on the virtual
machine on which the template is based, which is known as the source virtual
machine.
Virtual machines that are created based on a template use the same NIC type and
driver as the original virtual machine but are assigned separate, unique MAC
addresses.
Important:
Oracle provides pre-installed and pre-configured templates that allow you to
deploy a fully configured software stack. Use of Oracle Linux templates
eliminates the installation and configuration costs and reduces the ongoing
maintenance costs. For more information, see Importing an Oracle Linux
Template in the Oracle Linux Virtualization Manager: Administration Guide.
Sealing an Oracle Linux Virtual Machine for Use as a Template
Sealing is the process of removing all system-specific details from a virtual machine
before creating a template based on that virtual machine. Sealing is necessary to
prevent the same details from appearing on multiple virtual machines that are created
based on the same template. It is also necessary to ensure the functionality of other
features, such as predictable vNIC order.
To seal an Oracle Linux virtual machine for use as a template:
1. Log in to the Oracle Linux virtual machine as the
root
user.
2.
Flag the system for reconfiguration.
# touch /.unconfigured
3.
Remove the SSH host keys.
Chapter 4
Creating a Template
4-22

# rm -rf /etc/ssh/ssh_host_*
4.
Set the host name value of the
HOSTNAME=localhost.localdomain
in the
/etc/
sysconfig/network
file for Oracle Linux 6 or the
/etc/hostname
file for Oracle
Linux 7.
5. Remove /
etc/udev/rules.d/70-*
.
# rm -rf /etc/udev/rules.d/70-*
6.
Remove the
HWADDR
and
UUID
lines in the
/etc/sysconfig/network-scripts/
ifcfg-eth*
file.
7.
(Optional) Delete all the logs from /var/log and build logs from /root.
8.
Cleanup the command history.
# history -c
9.
Shutdown the virtual machine.
# poweroff
The Oracle Linux virtual machine is now sealed and ready to be made into a template.
Creating an Oracle Linux Template
When you create a template based on a virtual machine, a read-only copy of the virtual
machine's disk is created. This read-only disk becomes the base disk image of the new
template, and of any virtual machines that are created based on the template.
To create an Oracle Linux template:
1. Go to Compute, and then click Virtual Machines.
The Virtual Machines pane opens with the list of virtual machines that have been
created.
2. Click More Actions to expand the drop-down list and select Make Template from the
drop-down list.
The following screenshot shows the More Actions drop-down list expanded to display
the Make Template option. The Make Template option is highlighted with a red
rectangular box for emphasis.
Chapter 4
Creating a Template
4-23
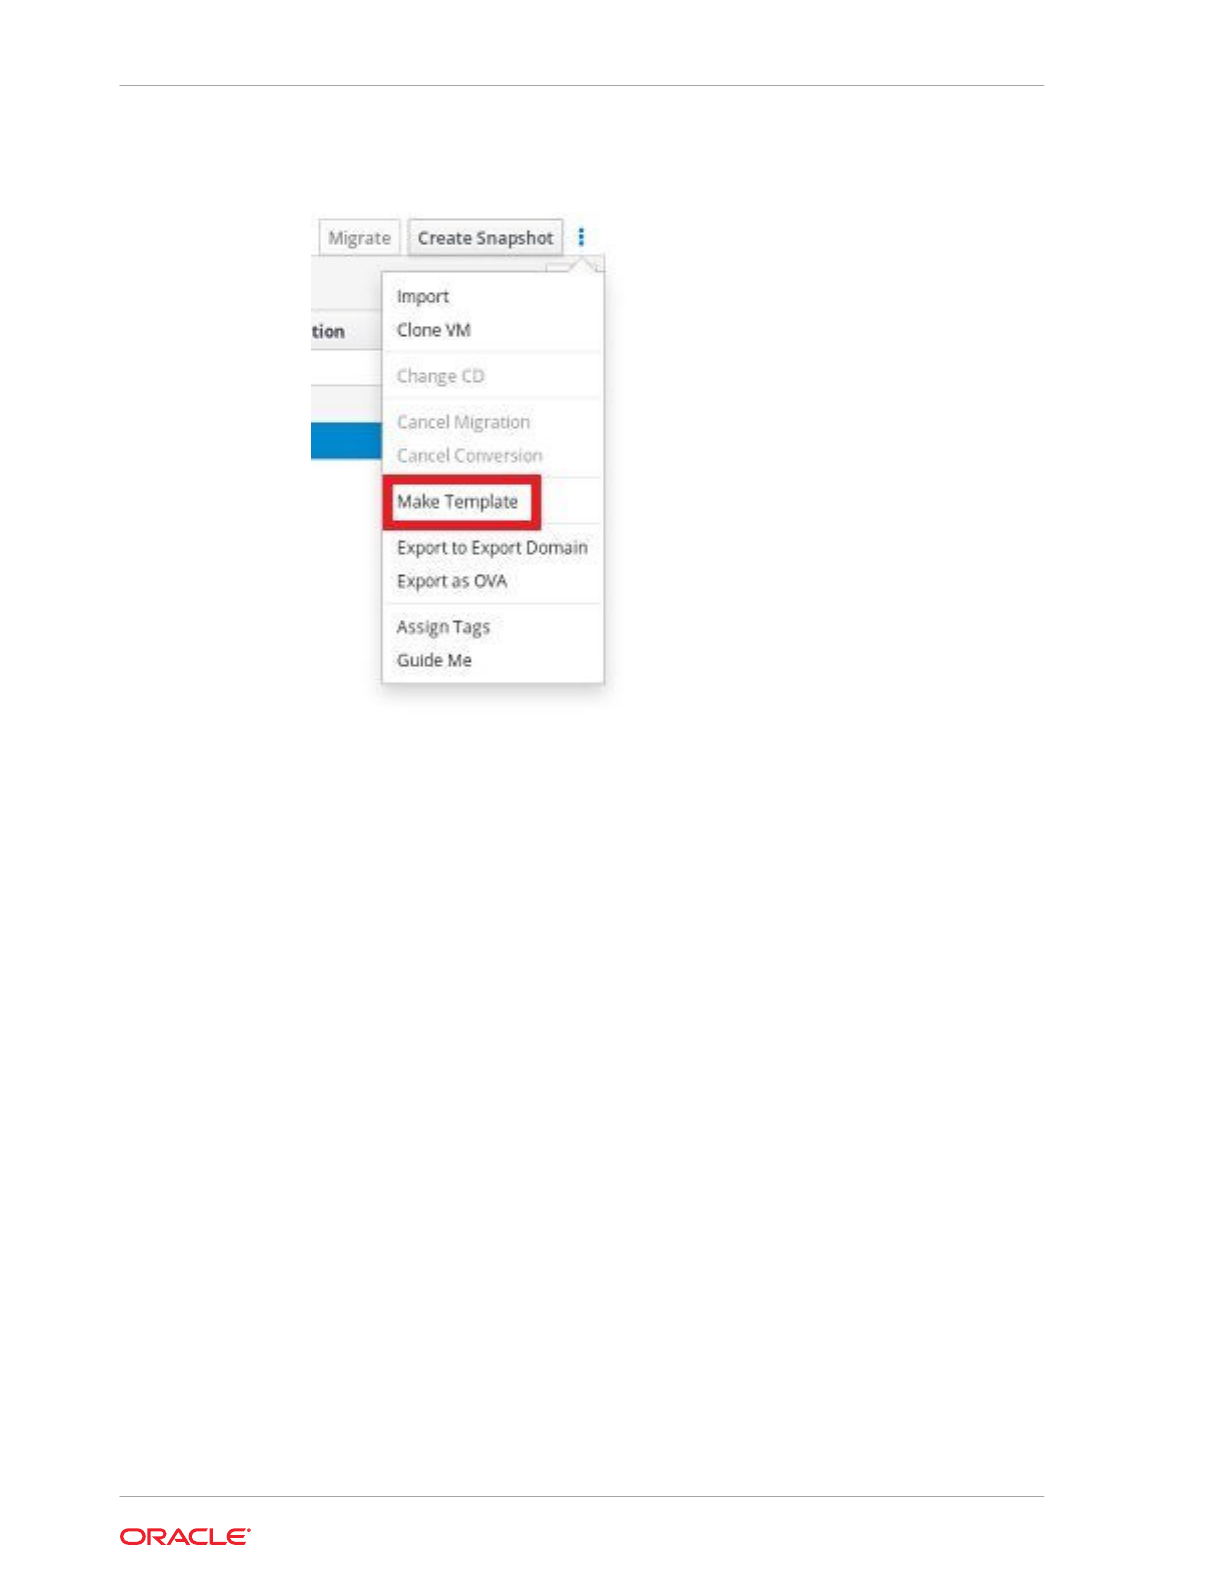
Figure 4-10 Make Template Option
3.
For the Name field, enter a name for the new virtual machine template.
4.
In the Disc Allocation: section under the Alias column, rename the disk alias to
be the same as the template name entered for the Name field.
5.
Click the Seal Template (Linux only) checkbox.
The following screenshot shows the New Template dialog box completed for the
new template named
ol7-vm-template
, which is being created in this example
scenario. In the dialog box, the disk alias has been renamed to
ol7-vm-template
and the Seal Template (Linux only) checkbox is selected.
Chapter 4
Creating a Template
4-24
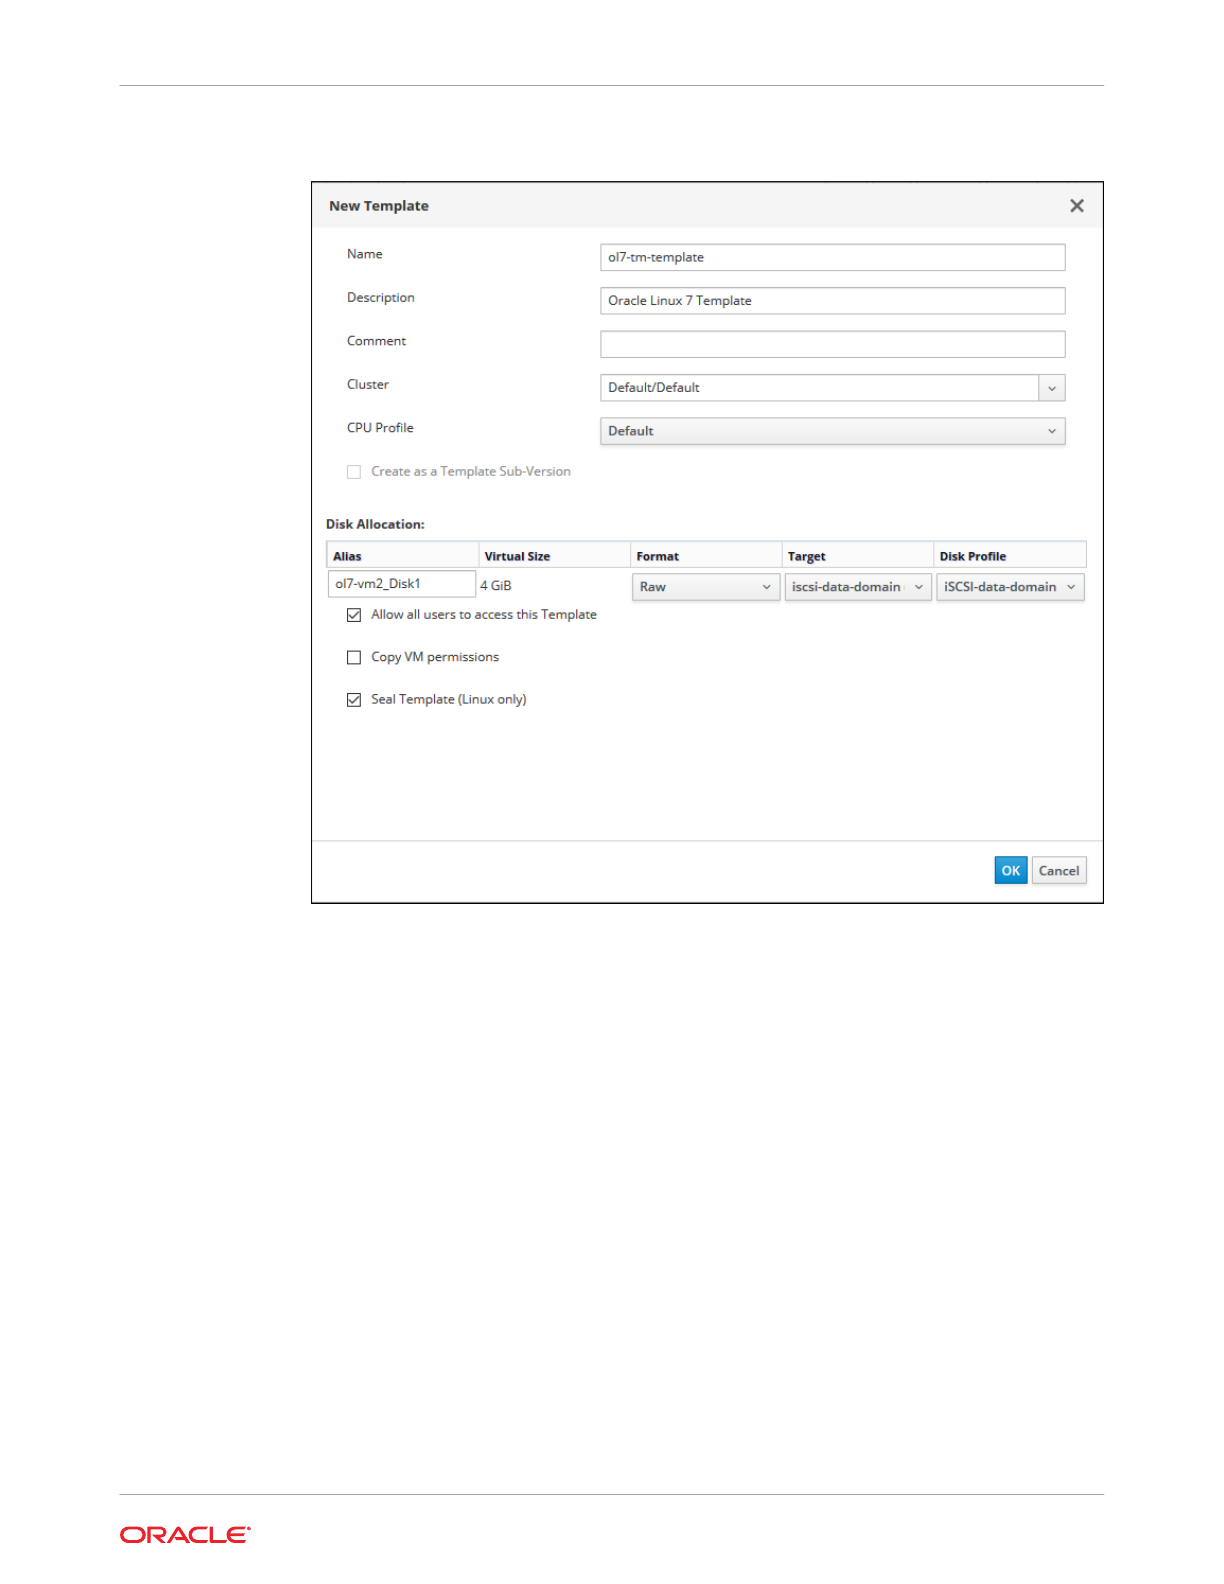
Figure 4-11 New Template Dialog Box
6.
Click the OK button to create the template.
The virtual machine displays a status of image
Locked
while the template is being
created. The time it takes for the template to be created depends on the size of the virtual
disk and the capabilities of your storage hardware. When the template creation process
completes, the template is added to the list of templates displayed on the Templates
pane.
You can now create new Oracle Linux virtual machines that are based on this template.
Creating a Cloud-Init Enabled Template
For Oracle Linux 7 (and later) virtual machines, you can use the Cloud-Init tool to automate
the initial setup of virtual machines. Common tasks, such as configuring host names, network
interfaces, and authorized keys, can be automated by using this tool. When provisioning
virtual machines that have been deployed based on a template, the Cloud-Init tool can be
used to prevent conflicts on the network.
Before You Begin
Before you create Cloud-Init enabled templates, ensure the following prerequisites are met:
Chapter 4
Creating a Template
4-25

• To use Cloud-Init, the
cloud-init
package must first be installed on the virtual
machine. Once installed, the Cloud-Init service starts during the boot process and
searches for instructions on what to configure. Use the Run Once window to
provide these instructions on a one-time only basis.
• You must have sealed an Oracle Linux for use as a template. For more
information, refer to Sealing an Oracle Linux Virtual Machine for Use as a
Template.
• You must create a template. For more information, refer to Creating an Oracle
Linux Template.
1.
Log in to a Oracle Linux virtual machine.
2.
List the
cloud-init
package.
# dnf list cloud-init
3. Install the
cloud-init
package.
# dnf install cloud-init
4.
Run the following command to enable the
cloud-init
service.
# systemctl enable cloud-init
5. Run the following command to start the cloud-init service.
# systemctl start cloud-init
Using Cloud-Init to Automate the Initial Setup of a Virtual Machine
To use Cloud-Init to automate the initial setup of a virtual machine:
1. Go to Compute and then click Templates.
The Templates pane opens with the list of templates that have been created.
2. Select a template and click the Edit button.
3. Click Show Advanced Options.
4. Click the Initial Run tab and select the Use Cloud-Init/Sysprep check box.
5. Enter a host name in the VM Hostname text field.
6. Select the Configure Time Zone check box and select a time zone from the Time
Zone drop-down list.
7. Expand the Authentication section.
• Select the Use already configured password check box to use the existing
credentials, or clear that check box and enter a
root
password in the
Password and Verify Password text fields to specify a new
root
password.
• Enter any SSH keys to be added to the authorized hosts file on the virtual
machine in the SSH Authorized Keys text area.
• Select the Regenerate SSH Keys check box to regenerate SSH keys for the
virtual machine.
8. Expand the Networks section.
• Enter any DNS servers in the DNS Servers text field.
• Enter any DNS search domains in the DNS Search Domains text field.
Chapter 4
Creating a Template
4-26

• Select the In-guest Network Interface check box and use the + Add new and -
Remove selected buttons to add or remove network interfaces to or from the virtual
machine.
Important:
You must specify the correct network interface name and number (for
example,
eth0
,
eno3
,
enp0s
); otherwise, the virtual machine’s interface
connection will be up but will not have the Cloud-Init network configuration.
9.
Expand the Custom Script section and enter any custom scripts in the Custom Script
text area.
Creating a Virtual Machine from a Template
For this example scenario, you create an Oracle Linux virtual machine from the template
created in Creating a Template.
Creating an Oracle Linux Virtual Machine from a Template
To create an Oracle Linux virtual machine from a template:
1. Go to Compute and then click Virtual Machines.
2. Click New VM.
3. From the Template drop-down list, select the desired template from the drop-down list.
For this example scenario, select the template created in Creating an Oracle Linux
Template.
4. On the Cluster drop-down list, select the data center and host cluster for the new host.
By default, the Default option is selected in the drop-down list.
For this step, leave Default selected from the drop-down list because the default data
center and cluster are used in this example scenario.
For the procedures to create new data centers or a new clusters, refer to Data Centers or
Clusters tasks in the Oracle Linux Virtualization Manager: Administration Guide.
5. For the Name field, enter a name for the virtual machine.
The following screenshot shows the New Virtual Machine dialog box for the new Oracle
Linux virtual machine that is being created based on the template that was created in
Creating an Oracle Linux Template. In the dialog box, the following key fields are
completed:
• From the Cluster drop-down list, the Default option is selected.
• From the Template drop-down list, the template named
ol7-vm-template
is selected.
• For the Operating System drop-down list,
Oracle Linux 7.x x64
is selected.
• For the Name field,
ol7-vm2
is entered.
• From the nic1 drop-down list, the logical network named
vm_pub
is selected.
Chapter 4
Creating a Virtual Machine from a Template
4-27
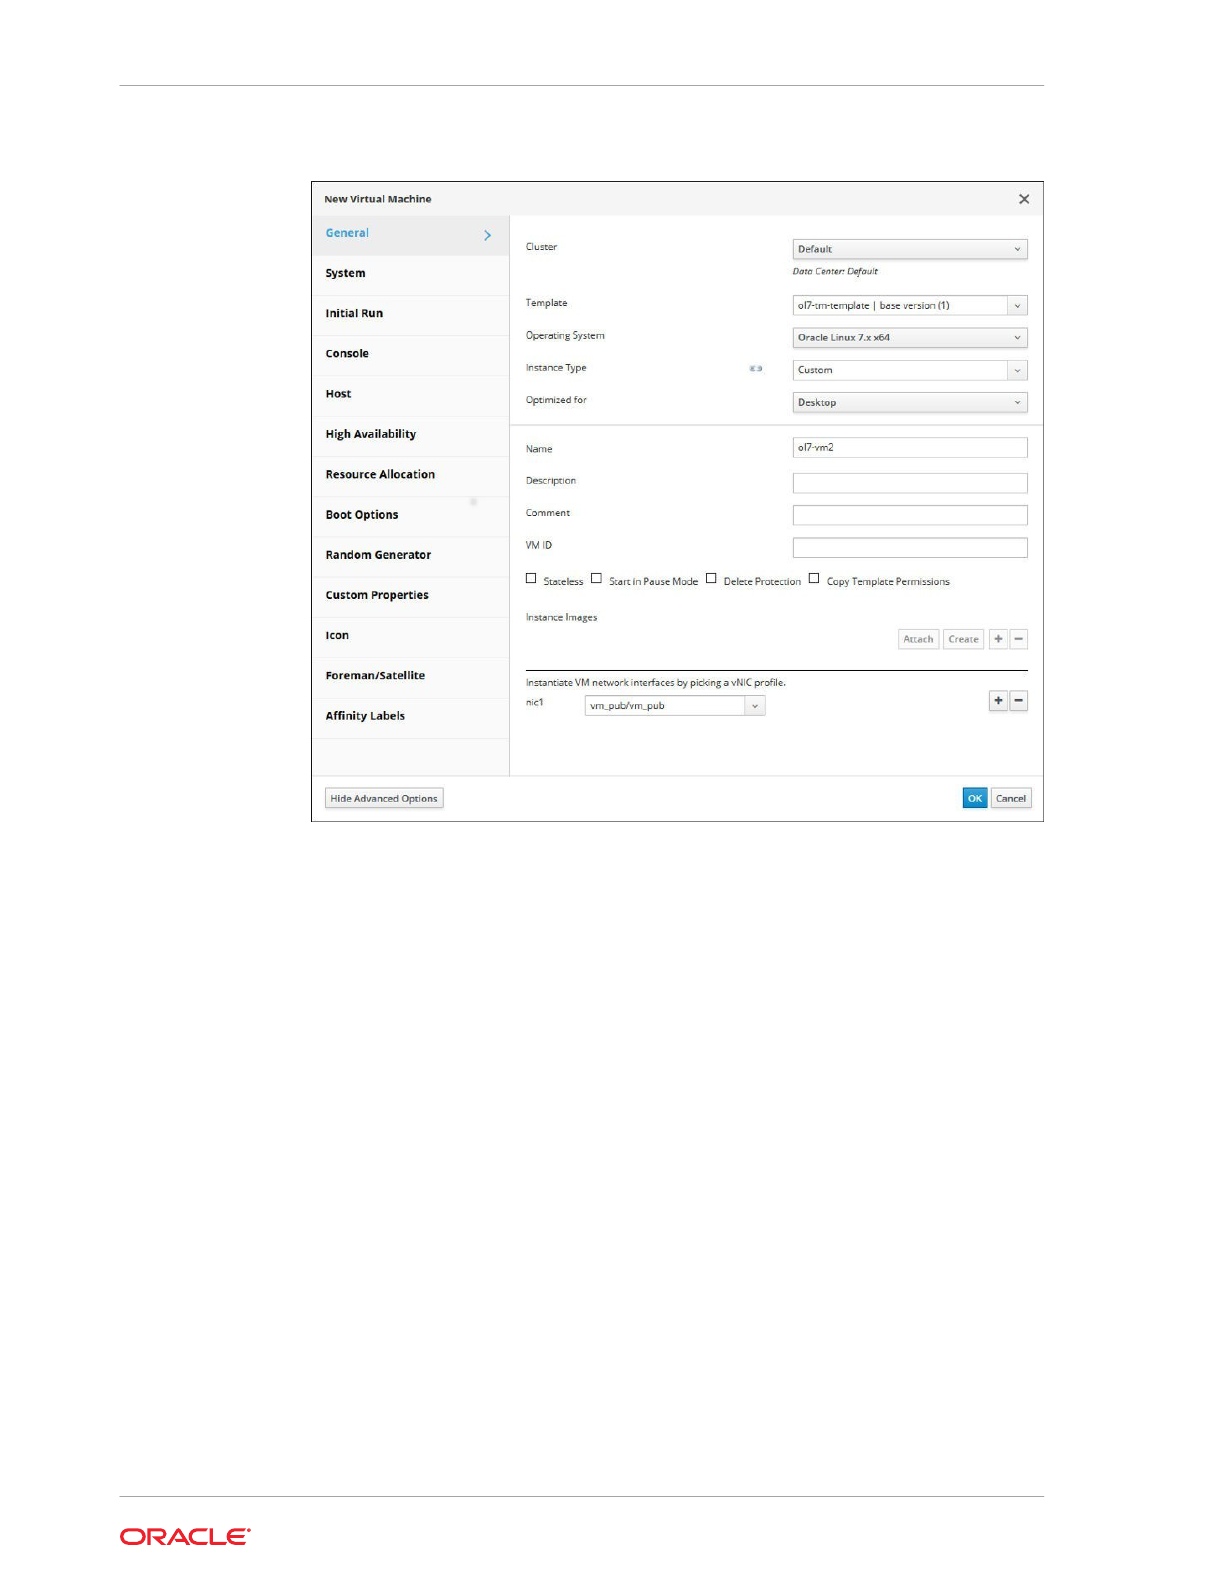
Figure 4-12 New Virtual Machine Dialog Box for a Template - General Tab
6. Click OK to create the virtual machine from the template.
The new virtual machine appears on the Virtual Machines pane.
7. Highlight the virtual machine that you created from the template and then click
Run to boot the virtual machine.
The red down arrow icon to the left of the virtual machine turns green and the
Status column displays
Up
when the virtual machine is up and running on the
network.
Depending on your template, you might need to configure the cloud-init option
when you run the virtual machine for the first time
a.
From the drop-down arrow next to Run, select Run Once
b.
Expand Initial Run and check Use Cloud-init,
c.
The hostname is pre-filled. Fill in other options such as a new user and
password, network configuration, timezone.
d.
Add a cloud-init script.
Backing Up and Restoring the Manager
For this example scenario, you backup and restore the Oracle Linux Virtualization
Manager by using the engine-backup command utility.
Chapter 4
Backing Up and Restoring the Manager
4-28

Backing Up the Manager
To backup the Manager:
1.
Log into the host that is running the Manager.
Note:
When running the Manager within a virtual machine (standalone or self-hosted
engine) log into the virtual machine that is running the engine.
2.
Create a full backup of the Manager. You do not need to stop the ovirt-engine service
before creating your backup.
# engine-backup --mode=backup --scope=all --file=
path
--log=
path
The following example shows how to use the engine-backup command to create a full
backup of the Manager. A backup file and log file for the Manager backup is created in
the path specified.
# engine-backup --mode=backup --scope=all --file=backup/file/ovirt-engine-backup --
log=backup/log/ovirt-engine-backup.log
Backing up:
Notifying engine
- Files
- Engine database 'engine'
- DWH database 'ovirt_engine_history'
Packing into file 'backup/file/ovirt-engine-backup'
Notifying engine
Done.
3.
(Optional) Set up a
cron
job to take regular backups.
By default, the Manager does not take automatic backups. Oracle recommends that you
take you regular backups of the Manager.
The following example shows a sample
cron
job defined in a
crontab
-format file.
today=`date +'%Y%m%d-%H%M'`
engine-backup --mode=backup --scope=all --file=/backup/file/ovirt-engine-backup-$
{today}
--log=/backup/log/ovirt-engine-backup-${today}.log
Restoring a Full Backup of the Manager
To restore a full backup of the Manager:
1.
Login to the host that is running the Manager.
Note:
When running the Manager within a virtual machine (standalone or self-hosted
engine) log into the virtual machine that is running the engine.
Chapter 4
Backing Up and Restoring the Manager
4-29

2.
Clean up the objects associated with the Manager.
# engine-cleanup
This engine-cleanup command removes the configuration files and cleans the
database associated with the Manager.
The following example shows output from the engine-cleanup command.
# engine-cleanup
[ INFO ] Stage: Initializing
[ INFO ] Stage: Environment setup
Configuration files: ...
Log file: ...
Version: otopi-1.7.8 (otopi-1.7.8-1.el7)
[ INFO ] Stage: Environment packages setup
[ INFO ] Stage: Programs detection
[ INFO ] Stage: Environment customization
Do you want to remove all components? (Yes, No) [Yes]: Yes
The following files were changed since setup:
/etc/ovirt-engine/engine.conf.d/11-setup-sso.conf
Remove them anyway? (Yes, No) [Yes]: Yes
--== PRODUCT OPTIONS ==--
[ INFO ] Stage: Setup validation
During execution engine service will be stopped (OK, Cancel) [OK]:
OK
All the installed ovirt components are about to be removed ...(OK,
Cancel)
[Cancel]: OK
[ INFO ] Stage: Transaction setup
[ INFO ] Stopping engine service
[ INFO ] Stopping ovirt-fence-kdump-listener service
[ INFO ] Stopping dwh service
[ INFO ] Stopping Image I/O Proxy service
[ INFO ] Stopping vmconsole-proxy service
[ INFO ] Stopping websocket-proxy service
[ INFO ] Stage: Misc configuration
[ INFO ] Stage: Package installation
[ INFO ] Stage: Misc configuration
[ INFO ] Backing up PKI configuration and keys
...
[ INFO ] Clearing Engine database engine
...
[ INFO ] Clearing DWH database ovirt_engine_history
[ INFO ] Removing files
[ INFO ] Reverting changes to files
...
[ INFO ] Stage: Transaction commit
[ INFO ] Stage: Closing up
--== SUMMARY ==--
Engine setup successfully cleaned up
A backup of PKI configuration and keys is available at ...
ovirt-engine has been removed
A backup of the Engine database is available at ...
A backup of the DWH database is available at ...
--== END OF SUMMARY ==--
Chapter 4
Backing Up and Restoring the Manager
4-30

[ INFO ] Stage: Clean up
Log file is located at ...
[ INFO ] Generating answer file ...
[ INFO ] Stage: Pre-termination
[ INFO ] Stage: Termination
[ INFO ] Execution of cleanup completed successfully
3.
Restore a full backup of the Manager.
The following form of the engine-backup command is used to a restore a full backup of
the Manager.
engine-backup --mode=restore --scope=all --file=
path
--log=
path
--restore-
permissions
The following example shows how to use the engine-backup command to restore a full
backup of the Manager.
# engine-backup --mode=restore --scope=all --file=backup/file/ovirt-engine-backup \
--log=backup/log/ovirt-engine-backup.log --restore-permissions
Preparing to restore:
- Unpacking file 'backup/file/ovirt-engine-backup'
Restoring:
- Files
- Engine database 'engine'
- Cleaning up temporary tables in engine database 'engine'
- Updating DbJustRestored VdcOption in engine database
- Resetting DwhCurrentlyRunning in dwh_history_timekeeping in engine database
- Resetting HA VM status
------------------------------------------------------------------------------
Please note:
The engine database was backed up at 2019-03-25 12:48:02.000000000 -0700 .
Objects that were added, removed or changed after this date, such as virtual
machines, disks, etc., are missing in the engine, and will probably require
recovery or recreation.
------------------------------------------------------------------------------
- DWH database 'ovirt_engine_history'
You should now run engine-setup.
Done.
4.
Run the engine-setup command to complete the setup of the restored Manager.
# engine-setup
This command reconfigures the firewall and ensures that the Manager service is correctly
configured.
5. Log in to the Manager and verify that the Manager has been restored to the backup.
Chapter 4
Backing Up and Restoring the Manager
4-31

5
Self-Hosted Engine Deployment
In Oracle Linux Virtualization Manager, a self-hosted engine is a virtualized environment
where the engine runs inside a virtual machine on the hosts in the environment. The virtual
machine for the engine is created as part of the host configuration process. And, the engine
is installed and configured in parallel to the host configuration.
Since the engine runs as a virtual machine and not on physical hardware, a self-hosted
engine requires less physical resources. Additionally, since the engine is configured to be
highly available, if the host running the Engine virtual machine goes into maintenance mode
or fails unexpectedly the virtual machine is migrated automatically to another host in the
environment. A minimum of two KVM hosts are required.
To review conceptual information, troubleshooting, and administration tasks, see the oVirt
Self-Hosted Engine Guide in oVirt Documentation.
To deploy a self-hosted engine, you perform a fresh installation of Oracle Linux 8.5 (or later)
on the host, install the Oracle Linux Virtualization Manager Release 4.4 package, and then
run the hosted engine deployment tool to complete configuration.
Note:
If you are deploying a self-hosted engine as a hyperconverged infrastructure with
GlusterFS storage, you must deploy GlusterFS BEFORE you deploy the self-hosted
engine. See Deploying GlusterFS Storage.
Self-Hosted Engine Prerequisites
In addition to the Requirements and Scalability Limits, you must satisfy the following
prerequisites before deploying a self-hosted engine.
• A minimum of two KVM hosts.
• A fully qualified domain name for your engine and host with forward and reverse lookup
records set in the DNS.
• A directory of at least 5 GB on the host for the oVirt Engine Appliance. During the
deployment process the
/var/tmp
directory is checked to see if it has enough space to
extract the appliance files. If the
/var/tmp
directory does not have enough space, you
can specify a different directory or mount external storage.
Note:
The VDSM user and KVM group must have read, write, and execute
permissions on the directory.
5-1

• Prepared storage of at least 74 GB to be used as a data storage domain dedicated
to the engine virtual machine. The data storage domain is created during the self-
hosted engine deployment.
If you are using iSCSI storage, do not use the same iSCSI target for the self-
hosted engine storage domain and any additional storage domains.
NOT_SUPPORTED:
When you have a data center with only one active data storage domain
and that domain gets corrupted, you are unable to add new data storage
domains or remove the corrupted data storage domain. If you have
deployed your self-hosted engine in such a data center and its data
storage domain gets corrupted, you must redeploy your self-hosted
engine.
• The host you are using to deploy a self-hosted engine, must be able to access
yum.oracle.com.
Deploying the Self-Hosted Engine
You must perform a fresh installation of Oracle Linux 8.5 (or later) on an Oracle Linux
Virtualization Manager host before deploying a self-hosted engine. You can download
the installation ISO for from the Oracle Software Delivery Cloud at https://
edelivery.oracle.com.
1.
Install Oracle Linux 8.5 (or later) on the host using the Minimal Install base
environment.
Caution:
Do NOT select any other base environment than Minimal Install for the
installation or your hosts will have incorrect qemu and libvirt versions,
incorrect repositories configured, and no access to virtual machine
consoles.
Do not install any additional packages until after you have installed the
Manager packages, because they may cause dependency issues.
Follow the instructions in the Oracle
®
Linux 8: Installing Oracle Linux.
2.
Ensure that the firewalld service is enabled and started.
For more information about configuring
firewalld
, see Configuring a Packet
Filtering Firewall in the Oracle
®
Linux 8: Configuring the Firewall.
3.
Complete one of the following sets of steps:
• For ULN registered hosts or using Oracle Linux Manager
Subscribe the system to the required channels.
Chapter 5
Deploying the Self-Hosted Engine
5-2

a.
For ULN registered hosts, log in to https://linux.oracle.com with your ULN user
name and password. For Oracle Linux Manager registered hosts, access your
internal server URL.
b.
On the Systems tab, click the link named for the host in the list of registered
machines.
c.
On the System Details page, click Manage Subscriptions.
d.
On the System Summary page, select each required channel from the list of
available channels and click the right arrow to move the channel to the list of
subscribed channels. Subscribe the system to the following channels:
–
ol8_x86_64_baseos_latest
–
ol8_x86_64_appstream
–
ol8_x86_64_kvm_appstream
–
ol8_x86_64_ovirt44
–
ol8_x86_64_ovirt44_extras
–
ol8_x86_64_gluster_appstream
– (For VDSM)
ol8_x86_64_UEKR7
e. Click Save Subscriptions.
f. Disable the virt:ol module and enable the virt:kvm_utils2 module.
# dnf -y module disable virt:ol
# dnf -y module enable virt:kvm_utils2
• For Oracle Linux yum server hosts
Install the Oracle Linux Virtualization Manager Release 4.4 package and enable the
required repositories.
a. (Optional) Make sure the host is using the modular yum repository configuration.
For more information, see Getting Started with Oracle Linux Yum Server.
b. Enable the
ol8_baseos_latest
yum repository.
# dnf config-manager --enable ol8_baseos_latest
Important:
Before you execute config-manager ensure the dnf-utils package is
installed on your system. For more information, see Yum DNF in
Oracle
®
Linux: Managing Software on Oracle Linux.
c.
Install the Oracle Linux Virtualization Manager Release 4.4 package.
# dnf install oracle-ovirt-release-el8
d.
Use the dnf command to verify that the required repositories are enabled.
i.
Clear the yum cache.
# dnf clean all
Chapter 5
Deploying the Self-Hosted Engine
5-3

ii.
List the configured repositories and verify that the required
repositories are enabled.
# dnf repolist
The following repositories must be enabled:
–
ol8_baseos_latest
–
ol8_appstream
–
ol8_kvm_appstream
–
ol8_ovirt44
–
ol8_ovirt44_extras
–
ol8_gluster_appstream
– (For VDSM)
ol8_UEKR7
iii. If a required repository is not enabled, use the config-manager to
enable it.
# dnf config-manager --enable
repository
4. Install the hosted engine deployment tool and engine appliance.
# dnf install ovirt-hosted-engine-setup -y
# dnf install ovirt-engine-appliance -y
You can deploy a self-hosted engine using the command line or Cockpit portal. If you
want to use the command line, proceed to Using the Command Line to Deploy. If you
want to use the Cockpit portal, proceed to Using the Cockpit Portal to Deploy.
Note:
If you are behind a proxy, you must use the command line option to deploy.
Using the Command Line to Deploy
You can deploy the self-hosted engine from the command line. A script collects the
details of your environment and uses them to configure the host and the engine.
1.
Start the deployment.
# hosted-engine --deploy
Note:
You can deploy the hosted engine using all the default settings. Make
sure the auto-detected fully qualified DNS name of the host is correct.
The fully qualified DNS name should resolve to the IP address that is
accessible through the host's main interface. For more information on the
default settings, see Engine Configuration Options.
Chapter 5
Deploying the Self-Hosted Engine
5-4

Optionally, use the
--ansible-extra-vars
option to define variables for the deployment.
For example:
# hosted-engine --deploy --ansible-extra-vars="@/root/extra-vars.yml"
cat /root/extra-vars.yml
---
he_pause_host: true
he_proxy: "http://<host>:<port>"
See the oVirt documentation for more information, Deploying the self-hosted engine
using the command line.
2.
Enter Yes to begin deployment.
Continuing will configure this host for serving as hypervisor and will create a
local VM
with a running engine. The locally running engine will be used to configure a new
storage
domain and create a VM there. At the end the disk of the local VM will be moved to
the
shared storage.
Are you sure you want to continue? (Yes, No)[Yes]:
Note:
The hosted-engine script creates a virtual machine and uses cloud-init to
configure it. The script also runs engine-setup and reboots the system so that
the virtual machine can be managed by the high availability agent.
3.
Configure the network.
a.
If the gateway that displays is correct, press Enter to configure the network.
b.
Enter a pingable address on the same subnet so the script can check the host’s
connectivity.
Please indicate a pingable gateway IP address [X.X.X.X]:
c.
The script detects possible NICs to use as a management bridge for the
environment. Select the default.
Please indicate a nic to set ovirtmgmt bridge on: (eth1, eth0) [eth1]:
4.
Enter the path to an OVA archive if you want to use a custom appliance for the virtual
machine installation. Otherwise, leave this field empty to use the oVirt Engine Appliance.
If you want to deploy with a custom engine appliance image,
please specify the path to the OVA archive you would like to use
(leave it empty to skip, the setup will use ovirt-engine-appliance rpm
installing it if missing):
5.
Specify the fully-qualified domain name for the engine virtual machine.
Please provide the FQDN you would like to use for the engine appliance.
Note: This will be the FQDN of the engine VM you are now going to launch,
it should not point to the base host or to any other existing machine.
Engine VM FQDN: manager.example.com
Please provide the domain name you would like to use for the engine appliance.
Engine VM domain: [example.com]
6.
Enter and confirm a root password for the engine.
Chapter 5
Deploying the Self-Hosted Engine
5-5

Enter root password that will be used for the engine appliance:
Confirm appliance root password:
7.
Optionally, enter an SSH public key to enable you to log in to the engine as the
root user and specify whether to enable SSH access for the root user.
Enter ssh public key for the root user that will be used for the engine
appliance (leave it empty to skip):
Do you want to enable ssh access for the root user (yes, no, without-
password)
[yes]:
8.
Enter the virtual machine’s CPU and memory configuration.
Please specify the number of virtual CPUs for the VM (Defaults to appliance
OVF value): [4]:
Please specify the memory size of the VM in MB (Defaults to maximum
available): [7267]:
9.
Enter a MAC address for the engine virtual machine or accept a randomly
generated MAC address.
You may specify a unicast MAC address for the VM or accept a randomly
generated default [00:16:3e:3d:34:47]:
Note:
If you want to provide the engine virtual machine with an IP address
using DHCP, ensure that you have a valid DHCP reservation for this
MAC address. The deployment script does not configure the DHCP
server for you.
10.
Enter the virtual machine’s networking details.
How should the engine VM network be configured (DHCP, Static)[DHCP]?
Note:
If you specified Static, enter the IP address of the Engine. The static IP
address must belong to the same subnet as the host. For example, if the
host is in 10.1.1.0/24, the Engine virtual machine’s IP must be in the
same subnet range (10.1.1.1-254/24).
Please enter the IP address to be used for the engine VM [x.x.x.x]:
Please provide a comma-separated list (max 3) of IP addresses of
domain
name servers for the engine VM
Engine VM DNS (leave it empty to skip):
11.
Specify whether to add entries in the virtual machine’s
/etc/hosts
file for the
engine virtual machine and the base host. Ensure that the host names are
resolvable.
Add lines for the appliance itself and for this host to /etc/hosts on the
engine VM?
Note: ensuring that this host could resolve the engine VM hostname is still
Chapter 5
Deploying the Self-Hosted Engine
5-6

up
to you (Yes, No)[No]
12.
Provide the name and TCP port number of the SMTP server, the email address used to
send email notifications, and a comma-separated list of email addresses to receive these
notifications. Or, press Enter to accept the defaults.
Please provide the name of the SMTP server through which we will send
notifications [localhost]:
Please provide the TCP port number of the SMTP server [25]:
Please provide the email address from which notifications will be sent
[root@localhost]:
Please provide a comma-separated list of email addresses which will get
notifications [root@localhost]:
13. Enter and confirm a password for the
admin@internal
user to access the Administration
Portal.
Enter engine admin password:
Confirm engine admin password:
The script creates the virtual machine which can take time if it needs to install the oVirt
Engine Appliance. After creating the virtual machine, the script continues gathering
information.
14.
Select the type of storage to use.
Please specify the storage you would like to use (glusterfs, iscsi, fc,
nfs)[nfs]:
• If you selected NFS, enter the version, full address and path to the storage, and any
mount options.
Please specify the nfs version you would like to use (auto, v3, v4,
v4_1)[auto]:
Please specify the full shared storage connection path to use (example:
host:/path):
storage.example.com:/hosted_engine/nfs
If needed, specify additional mount options for the connection to the
hosted-engine storage domain []:
• If you selected iSCSI, enter the portal details and select a target and LUN from the
auto-detected lists. You can only select one iSCSI target during the deployment, but
multipathing is supported to connect all portals of the same portal group.
Note:
To specify more than one iSCSI target, you must enable multipathing before
deploying the self-hosted engine. There is also a Multipath Helper tool that
generates a script to install and configure multipath with different options.
Please specify the iSCSI portal IP address:
Please specify the iSCSI portal port [3260]:
Please specify the iSCSI discover user:
Please specify the iSCSI discover password:
Please specify the iSCSI portal login user:
Please specify the iSCSI portal login password:
The following targets have been found:
Chapter 5
Deploying the Self-Hosted Engine
5-7

[1] iqn.2017-10.com.redhat.example:he
TPGT: 1, portals:
192.168.1.xxx:3260
192.168.2.xxx:3260
192.168.3.xxx:3260
Please select a target (1) [1]: 1
The following luns have been found on the requested target:
[1] 360003ff44dc75adcb5046390a16b4beb 199GiB MSFT Virtual HD
status: free, paths: 1 active
Please select the destination LUN (1) [1]:
• If you selected GlusterFS, enter the full address and path to the storage, and
any mount options. Only replica 3 Gluster storage is supported.
* Configure the volume as follows as per [Gluster Volume Options for
Virtual
Machine Image Store]
(documentation/admin-guide/chap-Working_with_Gluster_Storage#Options
set on Gluster Storage Volumes to Store Virtual Machine Images)
Please specify the full shared storage connection path to use
(example: host:/path):
storage.example.com:/hosted_engine/gluster_volume
If needed, specify additional mount options for the connection to the
hosted-engine storage domain []:
• If you selected Fibre Channel, select a LUN from the auto-detected list. The
host bus adapters must be configured and connected. The deployment script
auto-detects the available LUNs, and the LUN must not contain any existing
data.
The following luns have been found on the requested target:
[1] 3514f0c5447600351 30GiB XtremIO XtremApp
status: used, paths: 2 active
[2] 3514f0c5447600352 30GiB XtremIO XtremApp
status: used, paths: 2 active
Please select the destination LUN (1, 2) [1]:
15.
Enter the engine disk size:
Please specify the size of the VM disk in GB: [50]:
If successful, one data center, cluster, host, storage domain, and the engine virtual
machine are already running.
16.
Optionally, log into the Oracle Linux Virtualization Manager Administration Portal to
add any other resources.
In the Administration Portal, the engine virtual machine, the host running it, and
the self-hosted engine storage domain are flagged with a gold crown.
17. Enable the required repositories on the Engine virtual machine.
18. Optionally, add a directory server using the
ovirt-engine-extension-aaa-ldap-
setup
interactive setup script so you can add additional users to the environment.
Chapter 5
Deploying the Self-Hosted Engine
5-8

Using the Cockpit Portal to Deploy
Note:
If you are behind a proxy, you must use the command line option to deploy your
self-hosted engine.
To deploy the self-hosted engine using the Cockpit portal, complete the following steps.
1.
Install the Cockpit dashboard.
# dnf install cockpit-ovirt-dashboard -y
2.
Open the Cockpit port 9090 on firewalld.
# firewall-cmd --permanent --zone=public --add-port=9090/tcp
# systemctl restart firewalld
3.
Start the Cockpit service
# systemctl start cockpit
# systemctl enable cockpit
4.
Log into the Cockpit portal from the following URL:
https://host_IP_or_FQDN:9090
5.
To start the self-hosted engine deployment, click Virtualization and select Hosted
Manager.
6.
Click Start under Hosted Manager.
7.
Provide the following details for the Engine virtual machine.
a.
In the Engine VM FQDN field, enter the Engine virtual machine FQDN. Do not use
the FQDN of the host.
b.
In the MAC Address field, enter a MAC address for the Engine virtual machine or
leave blank and the system provides a randomy-generated address.
c.
From the Network Configuration drop-down list, select DHCP or Static.
• To use DHCP, you must have a DHCP reservation (a pre-set IP address on the
DHCP server) for the Engine virtual machine. In the MAC Address field, enter
the MAC address.
• To use Static, enter the virtual machine IP, the gateway address, and the DNS
servers. The IP address must belong to the same subnet as the host.
d.
Select the Bridge Interface from the drop-down list.
e.
Enter and confirm the virtual machine’s Root Password.
f.
Specify whether to allow Root SSH Access.
g.
Enter the Number of Virtual CPUs for the virtual machine.
h.
Enter the Memory Size (MiB). The available memory is displayed next to the field.
8.
Optionally, click Advanced to provide any of the following information.
Chapter 5
Deploying the Self-Hosted Engine
5-9

• Enter a Root SSH Public Key to use for root access to the Engine virtual
machine.
• Select the Edit Hosts File check box if you want to add entries for the Engine
virtual machine and the base host to the virtual machine’s
/etc/hosts
file. You
must ensure that the host names are resolvable.
• Change the management Bridge Name, or accept the default of
ovirtmgmt
.
• Enter the Gateway Address for the management bridge.
• Enter the Host FQDN of the first host to add to the Engine. This is the FQDN
of the host you are using for the deployment.
9. Click Next.
10. Enter and confirm the Admin Portal Password for the
admin@internal
user.
11.
Optionally, configure event notifications.
• Enter the Server Name and Server Port Number of the SMTP server.
• Enter a Sender E-Mail Address.
• Enter Recipient E-Mail Addresses.
12.
Click Next.
13.
Review the configuration of the Engine and its virtual machine. If the details are
correct, click Prepare VM.
14.
When the virtual machine installation is complete, click Next.
15.
Select the Storage Type from the drop-down list and enter the details for the self-
hosted engine storage domain.
• For NFS:
a.
In the Storage Connection field, enter the full address and path to the
storage.
b.
If required, enter any Mount Options.
c.
Enter the Disk Size (GiB).
d.
Select the NFS Version from the drop-down list.
e.
Enter the Storage Domain Name.
• For iSCSI:
a.
Enter the Portal IP Address, Portal Port, Portal Username, and Portal
Password.
b.
Click Retrieve Target List and select a target. You can only select one
iSCSI target during the deployment, but multipathing is supported to
connect all portals of the same portal group.
Note:
To specify more than one iSCSI target, you must enable
multipathing before deploying the self-hosted engine. There is
also a Multipath Helper tool that generates a script to install and
configure multipath with different options.
Chapter 5
Deploying the Self-Hosted Engine
5-10

c.
Enter the Disk Size (GiB).
d.
Enter the Discovery Username and Discovery Password.
• For FibreChannel:
a.
Enter the LUN ID. The host bus adapters must be configured and connected and
the LUN must not contain any existing data.
b. Enter the Disk Size (GiB).
• For Gluster Storage:
a. In the Storage Connection field, enter the full address and path to the storage.
b. If required, enter any Mount Options.
c. Enter the Disk Size (GiB).
16. Click Next.
17. Review the storage configuration. If the details are correct, click Finish Deployment.
18. When the deployment is complete, click Close.
If successful, one data center, cluster, host, storage domain, and the engine virtual
machine are already running.
19.
Optionally, log into the Oracle Linux Virtualization Manager Administration Portal to add
any other resources.
In the Administration Portal, the engine virtual machine, the host running it, and the self-
hosted engine storage domain are flagged with a gold crown.
20. Enable the required repositories on the Engine virtual machine.
21. Optionally, add a directory server using the
ovirt-engine-extension-aaa-ldap-setup
interactive setup script so you can add additional users to the environment.
22.
To view the self-hosted engine’s status in Cockpit, under Virtualization click Hosted
Engine.
Enabling High-Availability
The host that houses the self-hosted engine is not highly available by default. Since the self-
hosted engine runs inside a virtual machine on a host, if you do not configure high-availability
for the host, then live VM migration is not possible.
Configuring a Highly Available Host
If you want the hosts in a cluster to be responsive and available when unexpected failures
happen, you should use fencing. Fencing allows a cluster to react to unexpected host failures
and enforce power saving, load balancing, and virtual machine availability policies. You
should configure the fencing parameters for your host’s power management device and test
their correctness from time to time.
A Non Operational host is different from a Non Responsive host. A Non Operational host can
communicate with the Manager, but has incorrect configuration, for example a missing logical
network. A Non Responsive host cannot communicate with the Manager.
In a fencing operation, a non-responsive host is rebooted, and if the host does not return to
an active status within a prescribed time, it remains non-responsive pending manual
intervention and troubleshooting.
Chapter 5
Enabling High-Availability
5-11

The Manager can perform management operations after it reboots, by a proxy host, or
manually in the Administration Portal. All the virtual machines running on the non-
responsive host are stopped, and highly available virtual machines are restarted on a
different host. At least two hosts are required for power management operations.
Important:
If a host runs virtual machines that are highly available, power management
must be enabled and configured.
Configuring Power Management and Fencing on a Host
The Manager uses a proxy to send power management commands to a host power
management device because the engine does not communicate directly with fence
agents. The host agent (VDSM) executes power management device actions and
another host in the environment is used as a fencing proxy. This means that you must
have at least two hosts for power management operations.
When you configure a fencing proxy host, make sure the host is in:
• the same cluster as the host requiring fencing.
• the same data center as the host requiring fencing.
•
UP
or
Maintenance
status to remain viable.
Power management operations can be performed in three ways:
• by the Manager after it reboots
• by a proxy host
• manually in the Administration Portal
To configure power management and fencing on a host:
1.
Click Compute and select Hosts.
2.
Select a host and click Edit.
3.
Click the Power Management tab.
4.
Check Enable Power Management to enable the rest of the fields.
5.
Check Kdump integration to prevent the host from fencing while performing a
kernel crash dump. Kdump integration is enabled by default.
Important:
If you enable or disable Kdump integration on an existing host, you must
reinstall the host.
6. (Optional) Check Disable policy control of power management if you do not
want your host’s power management to be controlled by the scheduling policy of
the host's cluster.
7.
To configure a fence agent, click the plus sign (+) next to Add Fence Agent.
Chapter 5
Enabling High-Availability
5-12

The Edit fence agent pane opens.
8.
Enter the Address (IP Address or FQDN) to access the host's power management
device.
9. Enter the User Name and Password of the of the account used to access the power
management device.
10.
Select the power management device Type from the drop-down list.
11.
Enter the Port (SSH) number used by the power management device to communicate
with the host.
12.
Enter the Slot number used to identify the blade of the power management device.
13.
Enter the Options for the power management device. Use a comma-separated list of
key-value pairs.
• If you leave the Options field blank, you are able to use both IPv4 and IPv6
addresses
• To use only IPv4 addresses, enter
inet4_only=1
• To use only IPv6 addresses, enter
inet6_only=1
14. Check Secure to enable the power management device to connect securely to the host.
You can use ssh, ssl, or any other authentication protocol your power management
device supports.
15. Click Test to ensure the settings are correct and then click OK.
Test Succeeded, Host Status is: on displays if successful.
NOT_SUPPORTED:
Power management parameters (userid, password, options, etc.) are tested by
the Manager only during setup and manually after that. If you choose to ignore
alerts about incorrect parameters, or if the parameters are changed on the
power management hardware without changing in the Manager as well, fencing
is likely to fail when most needed.
16. Fence agents are sequential by default. To change the sequence in which the fence
agents are used:
a. Review your fence agent order in the Agents by Sequential Order field.
b. To make two fence agents concurrent, next to one fence agent click the Concurrent
with drop-down list and select the other fence agent.
You can add additional fence agents to this concurrent fence agent group.
17. Expand the Advanced Parameters and use the up and down buttons to specify the
order in which the Manager searches the host’s cluster and dc (data center) for a power
management proxy.
18. To add an additional power management proxy:
a. Click the plus sign (+) next to Add Power Management Proxy.
The Select fence proxy preference type to add pane opens.
b. Select a power management proxy from the drop-down list and then click OK.
Chapter 5
Enabling High-Availability
5-13

Your new proxy displays in the Power Management Proxy Preference list.
Note:
By default, the Manager searches for a fencing proxy within the same
cluster as the host. If The Manager cannot find a fencing proxy within the
cluster, it searches the data center.
19. Click OK.
From the list of hosts, the exclamation mark next to the host’s name disappeared,
signifying that you have successfully configured power management and fencing.
Preventing Host Fencing During Boot
After you configure power management and fencing, when you start the Manager it
automatically attempts to fence non-responsive hosts that have power management
enabled after the quiet time (5 minutes by default) has elapsed. You can opt to extend
the quiet time to prevent, for example, a scenario where the Manager attempts to
fence hosts while they boot up. This can happen after a data center outage because a
host’s boot process is normally longer than the Manager boot process.
You can configure quiet time using the
engine-config
command option
DisableFenceAtStartupInSec
:
# engine-config -s DisableFenceAtStartupInSec=
number
Checking Fencing Parameters
To automatically check the fencing parameters, you can configure the
PMHealthCheckEnabled
(false by default) and
PMHealthCheckIntervalInSec
(3600 sec
by default) engine-config options.
# engine-config -s PMHealthCheckEnabled=True
# engine-config -s PMHealthCheckIntervalInSec=
number
When set to true,
PMHealthCheckEnabled
checks all host agents at the interval
specified by
PMHealthCheckIntervalInSec
and raises warnings if it detects issues.
Installing Additional Self-Hosted Engine Hosts
You add self-hosted engine hosts the same way as a regular host, with an additional
step to deploy the host as a self-hosted engine host. The shared storage domain is
automatically detected and the host can be used as a failover host to host the Engine
virtual machine when required. You can also add regular hosts to a self-hosted engine
environment, but they cannot be used to host the Engine virtual machine.
Important:
Before you begin, refer to Preparing a KVM Host.
Chapter 5
Installing Additional Self-Hosted Engine Hosts
5-14

To install an additional self-hosted engine host, complete the following steps.
1.
In the Administration Portal, go to Compute and click Hosts.
2.
Click New.
For information on additional host settings, see the Admin Guide in the latest upstream
oVirt Documentation.
3.
Use the drop-down list to select the Data Center and Host Cluster for the new host.
4.
Enter the Name and the Address of the new host. The standard SSH port, port 22, is
auto-filled in the SSH Port field.
5.
Select an authentication method to use for the engine to access the host.
• Enter the root user’s password to use password authentication.
• Alternatively, copy the key displayed in the SSH PublicKey field to
/root/.ssh/
authorized_keys
on the host to use public key authentication.
6.
Optionally, configure power management, where the host has a supported power
management card. For information, see Configuring Power Management and Fencing on
a Host.
7. Click the Hosted Engine sub-tab.
8. Select the Deploy radio button.
9. Click OK.
Cleaning up the Deployment
If your self-hosted engine deployment fails, you must perform a few cleanup tasks before
retrying.
1. Run the hosted engine cleanup command:
# /usr/sbin/ovirt-hosted-engine-cleanup
2. Remove the storage:
# rm -rf <storage_repo>/*
3. If the deployment failed after the local, temporary hosted engine virtual machine is
created, you might need to clean up the local virtual machine repository:
# rm -rf /var/tmp/localvm*
Upgrading Or Updating the Self-Hosted Engine
See Upgrading Your Environment to 4.4 or Updating the Self-Hosted Engine in the Oracle
Linux Virtualization Manager: Administration Guide.
Chapter 5
Cleaning up the Deployment
5-15

6
Deploying GlusterFS Storage
Oracle Linux Virtualization Manager has been integrated with GlusterFS, an open source
scale-out distributed filesystem, to provide a hyperconverged solution where both compute
and storage are provided from the same hosts. Gluster volumes residing on the hosts are
used as storage domains in the Manager to store the virtual machine images. In this
scenario, the Manager is run as a self-hosted engine within a virtual machine on these hosts;
although, you can deploy GlusterFS within a standalone environment.
For instructions on creating a GlusterFS storage domain, refer to the My Oracle Support
(MOS) article How to Create Glusterfs Storage Domain (Doc ID 2679824.1).
Note:
If you are deploying a self-hosted engine as hyperconverged infrastructure with
GlusterFS storage, you must deploy GlusterFS BEFORE you deploy the self-hosted
engine. For more information about using GlusterFS, including prerequisites, see
the Oracle Linux GlusterFS documentation.
Deploying GlusterFS Storage Using Cockpit
To deploy GlusterFS storage using the Cockpit web interface, complete the following steps.
Important:
To deploy GlusterFS, you must have at least three (3) KVM hosts. If you want more
than three KVM hosts, they must be added in factors of three.
1.
Ensure that on all KVM hosts you have installed the following packages:
•
cockpit-ovirt-dashboard
to provide a UI for installation
•
vdsm-gluster
to manage gluster services
•
ovirt-host
on the KVM host used for cockpit deployment
2.
Go to Compute, and then click Hosts.
3.
Under the Name column, click the host to be used as the designated server.
4.
Click Host Console.
5.
Enter your login credentials (the user name and password of the root account.).
6.
Go to Virtualization and then click Hosted Engine.
7.
Click Redeploy under Hosted Engine Setup.
8.
Click Start under Hyperconverged.
6-1

9.
On the Hosts screen, enter 3 (or more) KVM hosts that are in the data center to
be used for GlusterFS, with the main designated KVM host entered first and click
Next when finished.
10.
On the FQDNs screen, enter the FQDN (or IP address) for the hosts to be
managed by the Hosted Engine and click Next when finished.
Note:
The FQDN of the designated server is input during the Hosted Engine
deployment process and is not asked for here.
11.
Click Next on the Packages screen.
12.
On the Volumes screen, create the minimum storage domains that are required:
engine
,
data
,
export
, and
iso
. Click Next when finished.
For example:
engine
• Name:
engine
• Volume Type:
Replicate
(default)
• Arbiter: Ensure the check box is selected.
• Brick Dirs: /gluster_bricks/engine/engine (default)
data
• Name:
data
• Volume Type:
Replicate
(default)
• Arbiter: Ensure the check box is selected.
• Brick Dirs:
/gluster_bricks/data/data
(default)
export
• Name:
export
• Volume Type:
Replicate
(default)
• Arbiter: Ensure the check box is selected.
• Brick Dirs:
/gluster_bricks/export/export
(default)
iso
• Name:
iso
• Volume Type:
Replicate
(default)
• Arbiter: Ensure the check box is selected.
• Brick Dirs:
/gluster_bricks/iso/iso
(default)
13. On the Brick Locations screen, specify the brick locations for your volumes and
click Next when finished.
For this step, you specify the brick locations for your volumes (
engine
,
data
,
export
, and
iso
).
Chapter 6
Deploying GlusterFS Storage Using Cockpit
6-2

14.
Review the screen and click Deploy.
• If you are using an internal disk as the Gluster disk, no edits are required and you
can simply click Deploy to continue with the deployment.
• If you are using an external iSCSI ZFS external drive as the Gluster disk, click Edit to
edit the
gdeployConfig.conf
file and specify the block device on each server that
is being used for storage. Click Save and then click Deploy to continue with the
deployment.
This process takes some time to complete, as the gdeploy tool installs required packages
and configures Gluster volumes and their underlying storage.
A message display on the screen when the deployment completes successfully.
Creating a GlusterFS Storage Domain Using the Manager
To add a GlusterFS storage volume as a storage domain:
1. Go to Storage and then click Domains.
2. On the Storage Domains pane, click the New Domain button.
3. For the Name field, enter a name for the data domain.
4. From the Data Center drop-down list, select the data center where the GlusterFS volume
is deployed. By default, the Default option is selected in the drop-down list.
5. From the Domain Function drop-down list, select the domain function. By default, the
Data option is selected in the drop-down list.
For this step, leave Data as the domain function because a data domain is being created
in this example.
6. From the Storage Type drop-down list, select GlusterFS.
7. For the Host to Use drop-down list, select the host for which to attach the data domain.
8. When GlusterFS is selected for the Storage Type, the New Domain dialog box updates
to display additional configuration fields associated with GlusterFS storage domains.
9. Ensure the Use managed gluster volume check box is not selected.
10. From the Gluster drop-down list, select the path to which domain function you are
creating.
11.
For the Mount Options option, specify additional mount options in a comma-separated
list, as you would using the mount -o command.
12. (Optional) Configure the advanced parameters.
13. Click OK to mount the volume as a storage domain.
You can click Tasks to monitor the various processing steps that are completed to add
the GlusterFS storage domain to the data center.
Chapter 6
Creating a GlusterFS Storage Domain Using the Manager
6-3
